1.介绍
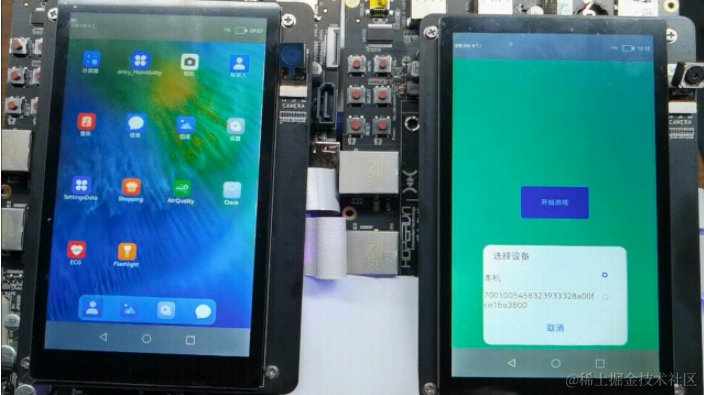
本文将介绍分布式游戏鉴权应用。操作过程为:
-
设备A点击“开始游戏”按钮,开始搜索周边设备。
-
设备A显示周边设备,点击设备B并发起连接请求,远程拉起设备B的FA。
-
设备B收到请求后,选择是否允许“开启游戏”。
- 选择允许,远程拉起设备A,并传递允许的信息,设备A解析了信息后自动开始游戏。
- 选择不允许,远程拉起设备A,并传递不允许的信息,设备A回到最初的状态,并提示申请鉴权未通过。
效果图展示:
2.相关概念
gitee.com/li-shizhen-skin/harmony-os/blob/master/README.md鸿蒙开发文档参考,点击或者复制转到。
3.搭建OpenHarmony环境
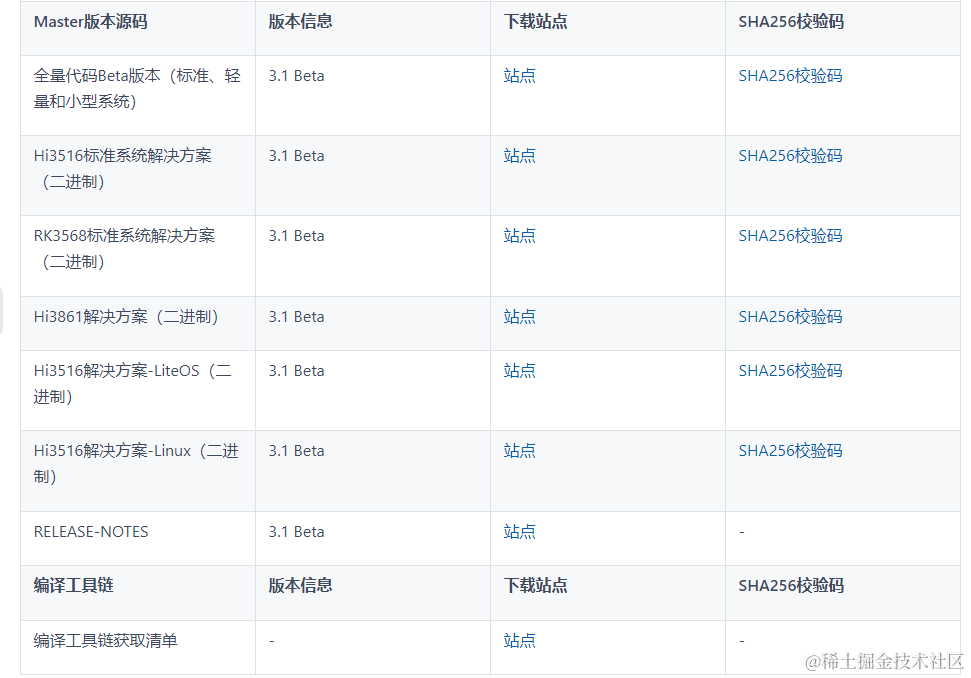
完成本篇Codelab我们首先要完成开发环境的搭建,本示例以RK3568开发板为例,参照以下步骤进行:
-
[获取OpenHarmony系统版本]:标准系统解决方案(二进制)。
以3.1版本为例:
-
搭建烧录环境。
- [完成DevEco Device Tool的安装]
- [完成RK3568开发板的烧录]

鸿蒙HarmonyOS与OpenHarmony籽料
mau123789是v直接拿取
-
搭建开发环境。
- 开始前请参考[工具准备] ,完成DevEco Studio的安装和开发环境配置。
- 开发环境配置完成后,请参考[使用工程向导] 创建工程(模板选择“Empty Ability”) ,选择JS或者eTS语言开发。
- 工程创建完成后,选择使用[真机进行调测] 。
4.分布式组网
本章节以系统自带的音乐播放器为例(具体以实际的应用为准),介绍如何完成两台设备的分布式组网。
-
硬件准备:准备两台烧录相同的版本系统的RK3568开发板A、B。
-
开发板A、B连接同一个WiFi网络。
打开设置-->WLAN-->点击右侧WiFi开关-->点击目标WiFi并输入密码。
-
将设备A,B设置为互相信任的设备。
- 找到系统应用“音乐”。

-
设备A打开音乐,点击左下角流转按钮,弹出列表框,在列表中会展示远端设备的id。

-
选择远端设备B的id,另一台开发板(设备B)会弹出验证的选项框。

- 设备B点击允许,设备B将会弹出随机PIN码,将设备B的PIN码输入到设备A的PIN码填入框中。

配网完毕。
5.代码结构解读
本篇Codelab只对核心代码进行讲解,对于完整代码,我们会在参考中提供下载方式,整个工程的代码结构如下:

-
common:存放公共资源
-
pages:存放页面
index.js:主页面
-
config.json:配置文件
6.初始化页面
在本章节中,您将学会如何进行页面初始化。
-
在data下定义需要使用的字段。
data: { // 目标设备Id,用于记录申请过来的设备Id targetDeviceId: '', // 是否同意玩游戏 isAgree: false, // 是否显示开始游戏图标 showStart: false }, -
根据Ability启动参数来判断页面被拉起的状态。
在拉起页面时候,设置requestType为分布式拉起页面的业务请求类型(申请鉴权或者回复鉴权结果),如果没有requestType参数,则为手动拉起本机Ability。然后通过分析requestType参数的值来进行不同的业务逻辑操作。
onInit() {
  // 获取Ability启动参数
  featureAbility.getWant().then((want) => {
    if (want.parameters !== undefined && want.parameters !== null && want.parameters !== '') {
      // 如果是请求授权被拉起Ability(requestType === 0),则记录申请权限的设备id
      if (want.parameters.requestType === 0) {
        this.isGame = false;
        this.targetDeviceId = want.parameters.localDeviceId;
      } else if (want.parameters.requestType === 1) {
        // 如果是授权后被拉起Ability(requestType === 1),则根据授权情况判断是否进行游戏
        if (want.parameters.isAgree !== null) {
          this.isAgree = want.parameters.isAgree;
          if (this.isAgree === true) {
            this.isGame = true;
            this.isStart = true;
            this.startGame();
          } else {
            this.showStart = true;
            prompt.showToast({
              message: '申请授权未被允许',
              duration: 5000
            });
          }
        }
        this.targetDeviceId = want.parameters.localDeviceId;
      } else {
        // 如果没有请求类型字段(requestType),则表明是手动启动的Ability,此时显示启动游戏图标
        this.showStart = true;
      }
    }
  });
7.显示鉴权设备
在本章节中,您将学会如何显示需要鉴权的设备列表。效果图如下:

-
在index.js文件中,在data下定义deviceList数组,用来表示周边的设备。代码如下:
export default { data: { //可授权的设备 deviceList: [] } } -
在index.hml文件中:
- 定义一个"开始游戏"的button组件,设置startFA的点击事件;
- 显示周边设备的对话框dialog,使用list 、list-item实现设备列表的展示;
- 通过for属性遍历deviceList数组,$item是每一项的实例;
- 给每一项设置selectDevice点击事件,参数为设备的networkId。
代码如下:
<div class="container"> <button class="text-button" onclick="startFA">开始游戏</button> <dialog id="continueAbilityDialog" class="dialog-main" oncancel="cancelDialog"> <div class="dialog-div"> <text class="dialog_title_text">选择设备</text> <list class="dialog_device_list" divider="true"> <list-item for="{{ deviceList }}" class="device_list_item"> <div> <label class="device_item_title" target="{{ $item.id }}">{{ $item.name }}</label> <input class="device_item_radio" type="radio" checked="{{ $item.id === 'localhost' }}" id="{{ $item.id }}" name="radioSample" value="{{ $item.id }}" onchange="onRadioChange({{ $item.id }})"></input> </div> </list-item> </list> <div class="inner-btn"> <button class="dialog_cancel_button" type="text" value="取消" onclick="onDismissDialogClicked"></button> </div> </div> </dialog> </div> -
在index.css文件中,定义布局和样式。代码如下:
.container { flex-direction: column; justify-content: center; align-items: center; } .text-button{ background-color: #5959f1; color: #FFFFFF; text-align: center; font-size: 16px; width: 80px; height: 40px; border-radius: 8px; } .select-device-dialog { width: 90%; height: 33%; } .select-device-wrapper { margin: 5%; width: 90%; height: 90%; flex-direction: column; } .select-device-title { width: 100%; height: 20%; text-align: left; font-size: 20px; } .select-device-list { width: 100%; height: 60%; text-align: left; font-size: 15px; } .select-device-item { width: 100%; height: 33%; } .select-device-item-left { width: 100%; height: 100%; text-align: left; font-size: 16px; } .dialog-main { width: 500px; } .dialog-div { flex-direction: column; align-items: center; } .dialog_title_text { width: 434px; height: 80px; font-size: 32px; font-weight: 600; } .dialog_cancel_button { width: 100%; font-size: 32px; } -
在index.js文件中:
-
定义createDeviceManager方法,获得设备管理器实例并进行获得同一网段下的所有在线设备;
// 创建实例 createDeviceManager() { if (dmClass !== null) { return; } deviceManager.createDeviceManager('com.huawei.cookbook', (err, data) => { if (err) { return; } subscribeId = Math.floor(Math.random() * 10000 + 1000); dmClass = data; dmClass.on('dmFaCallback', data => this.log('dmFaCallback on:' + JSON.stringify(data))); dmClass.on('deviceStateChange', mFilterOption, data => this.log('deviceStateChange on:' + JSON.stringify(data))); dmClass.on('deviceFound', data => this.log('deviceFound on:' + JSON.stringify(data))); dmClass.on('discoverFail', data => this.log('discoverFail on:' + JSON.stringify(data))); dmClass.on('serviceDie', data => this.log('serviceDie on:' + JSON.stringify(data))); this.getLocalDeviceInfoSync(); const deviceInfoList = dmClass.getTrustedDeviceListSync(); const list = []; list[0] = DEVICE_LIST_LOCALHOST; if (deviceInfoList.length > 0) { for (let i = 0; i < deviceInfoList.length; i++) { list[i + 1] = { name: deviceInfoList[i].deviceName, id: deviceInfoList[i].deviceId }; } } this.deviceList = list; }); }, -
定义getLocalDeviceInfoSync方法,获取本设备信息;
getLocalDeviceInfoSync() { if (dmClass != null) { deviceInfo = dmClass.getLocalDeviceInfoSync(); } else { prompt.showToast({ message: '请先初始化' }); } }, -
将获取到的同一网段下的所有在线设备信息放入deviceList数组中;
-
通过this.$element('showDialog')找到hml文件中dialog组件,调用show()方法显示对话框。
-
8.鉴权申请与回应
在本章节中,您将学会如何从设备A拉起设备B的FA,并将设备A的标识信息发送给设备B。效果图如下:
申请鉴权(同意游戏)

申请鉴权(拒绝游戏)
-
设备A点击开始游戏,显示可以进行鉴权申请的设备列表,并选中设备申请游戏鉴权
-
定义startFa方法,用以显示设备列表对话框;
startFA() { this.$element('continueAbilityDialog').show(); }, -
定义onRadioChange方法,用以监听选择的设备变化;
onRadioChange(inputValue, e) { if (inputValue === e.value) { if (e.value === 'localhost') { this.$element('continueAbilityDialog').close(); return; } if (this.deviceList.length > 0) { for (let i = 0; i < this.deviceList.length; i++) { if (this.deviceList[i].id === e.value) { this.startAbilityContinuation(this.deviceList[i].id, this.deviceList[i].name); } } } } }, -
定义startAbilityContinuation方法,用以申请鉴权;
startAbilityContinuation(deviceId, deviceName) {
    this.$element('continueAbilityDialog').close();
    const wantValue = {
      bundleName: 'com.huawei.cookbook',
      abilityName: 'com.huawei.gameauthopenh.MainAbility',
      deviceId: deviceId,
      // localDeviceId:申请设备的id,requestType,请求类型:0,申请鉴权
      parameters: {'localDeviceId': deviceInfo.deviceId, 'requestType': 0}
    };

    featureAbility.startAbility({
      want: wantValue
    }).then((data) => {
      // 销毁自身Ability
      featureAbility.terminateSelf();
    });
  },
-
-
设备B被设备A分布式拉起,对游戏进行授权
-
index.hml页面添加div用以显示授权选项;
<div class="div-permit" if="{{!isGame}}" > <text class="text-title">来自远程合成设备小游戏权限请求,是否允许?</text> <div class="div-button" > <text class="text-allow" onclick="responds(true)">允许</text> <text class="text-reject" onclick="responds(false)">不允许</text> </div> </div> -
定义responds方法用以反馈鉴权结果,并分布式拉起设备A的Ability;
responds(value) {
    const wantValue = {
      bundleName: 'com.huawei.cookbook',
      abilityName: 'com.huawei.gameauthopenh.MainAbility',
      deviceId: this.targetDeviceId,
      parameters: {'localDeviceId': deviceInfo.deviceId, 'requestType': 1, 'isAgree': value}
    };
    featureAbility.startAbility({
      want: wantValue
    }).then((data) => {
      console.info('featureAbility.startAbility finished, ' + JSON.stringify(data));
      featureAbility.terminateSelf();
    });
  },
-
-
设备A被分布式拉起并解析鉴权结果,并根据结果执行不同的操作;
在onInit方法中调用featureAbility.getWant()来获取启动信息并根据启动信息判断游戏申请是否被拒绝;
onInit() { ... // 获取Ability启动参数 featureAbility.getWant().then((want) => { if (want.parameters !== undefined && want.parameters !== null && want.parameters !== '') { // 如果是请求授权被拉起Ability(requestType === 0),则记录申请权限的设备id if (want.parameters.requestType === 0) { this.isGame = false; this.targetDeviceId = want.parameters.localDeviceId; } else if (want.parameters.requestType === 1) { // 如果是授权后被拉起Ability(requestType === 1),则根据授权情况判断是否进行游戏 if (want.parameters.isAgree !== null) { this.isAgree = want.parameters.isAgree; if (this.isAgree === true) { this.isGame = true; this.isStart = true; this.startGame(); } else { this.showStart = true; prompt.showToast({ message: '申请授权未被允许', duration: 5000 }); } } this.targetDeviceId = want.parameters.localDeviceId; } else { // 如果没有请求类型字段(requestType),则表明是手动启动的Ability,此时显示启动游戏图标 this.showStart = true; } } }); ... }, -
index.css文件新增内容如下:
.div-permit{
    flex-direction: column;
    justify-content: center;
    align-items: center;
    width: 100%;
    height: 100%;
}
.div-button{
    flex-direction: row;
    justify-content: center;
    align-items: center;
}
.text-title{
    color: #222222;
    font-size: 22px;
    align-items: center;
    align-content: center;
    margin: 20px;
}
.text-allow{
    color: #3E7BDE;
    font-size: 18px;
    margin-right: 10px;
}
.text-reject{
    color: #212121;
    font-size: 18px;
    margin-left: 10px;
}
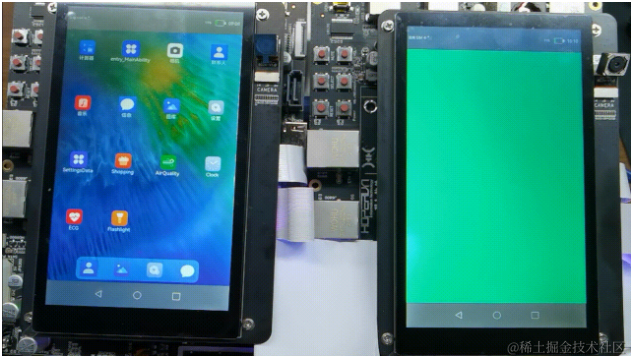
9.游戏:图形的运动、碰撞与合成
- [图形的运动]
- [图形的碰撞与合成
如下图所示,按照从左到右的顺序,相同的图形碰撞合成下一个图形,最终合成OpenHarmony图形。


效果图预览:

图形的运动
-
在index.js的data下定义图片资源数组imgArray和显示在屏幕中图片的数组modes。代码如下:
export default {
  data: {
    // 图片数组
    imgArray: ['common/images/product0.png', 'common/images/product1.png',
      'common/images/product2.png', 'common/images/product3.png',
      'common/images/product4.png', 'common/images/product5.png',
      'common/images/product6.png'],
    //在屏幕中出现的数据
    modes: [],
  }
}
modes添加数据模型格式为:要显示的图形路径src、图形的宽度width、图形的高度height、图形的等级level(用于区分不同的图形),以及图形的左坐标left、顶部坐标top和其在x、y方向上的速度。新增一个数据模型到数组中,代码如下:
addNewData() { var index = Math.floor(Math.random() * 4); var src = this.imgArray[index]; var width = 50 + index * 10; var height = 50 + index * 10; this.modes.push({ level: index, width: width, height: height, src: src, top: 0, left: 120, speedX: 0, speedY: 10, }) } -
在index.hml文件中,遍历modes数组,用Image组件显示图形,只需要动态更改class、style、src等属性即可。代码如下:
<div class="div-image" if="{{isStart}}">
    <image for="{{ (index, item) in modes }}"
           class="product{{ item.level }}"
           style="top : {{ item.top }}; left : {{ item.left }}" src="{{ item.src }} "/>
</div>
对应的index.css新增内容如下:
.div-image{ flex-direction: column; justify-content: flex-start; align-items: flex-start; width: 100%; height: 100%; } .product0{ width: 50px; height: 50px; position: absolute; } .product1{ width: 60px; height: 60px; position: absolute; } .product2{ width: 70px; height: 70px; position: absolute; } .product3{ width: 80px; height: 80px; position: absolute; } .product4{ width: 90px; height: 90px; position: absolute; } .product5{ width: 100px; height: 100px; position: absolute; } .product6{ width: 110px; height: 110px; position: absolute; } -
使用setInterval()开启定时器,反复执行excuteTask()方法,该方法用来计算图形的运动。图形的移动主要是将图形的顶部top和左侧left的坐标值,每次递增各自的x、y方向的速度值。部分代码如下:
export default {
  startGame(){
    addNewData();
    intervalId = setInterval(this.excuteTask, 50);
  },
  excuteTask(){
    this.modes.forEach(item => {
      item.top += item.speedY;
      item.left += item.speedX;
    });
  }
}
图形的碰撞与合成
这部分仅介绍核心的思路,具体的实现过程读者可自行完成,其达到的效果图如下:

-
两个图形若满足它们的的圆心距离小于它们半径的总和,则认为它们发生了碰撞。部分代码如下:
isCollision(run, other) { var runCenterX = run.left + run.width / 2; var runCenterY = run.top + run.width / 2; var otherCenterX = other.left + other.width / 2; var otherCenterY = other.top + other.width / 2; var distance = Math.sqrt(Math.abs(runCenterX - otherCenterX) * Math.abs(runCenterX - otherCenterX) + Math.abs(runCenterY - otherCenterY) * Math.abs(runCenterY - otherCenterY)); if (distance < (run.width + other.width) / 2) { return true; } return false; } -
通过判断两个图形的等级level值是否相等,若相等就可以进行合成。部分代码如下:
isCompose( productA,  productB) {
  return productA.level == productB.level;
}
最后呢,很多开发朋友不知道需要学习那些鸿蒙技术?鸿蒙开发岗位需要掌握那些核心技术点?为此鸿蒙的开发学习必须要系统性的进行。
而网上有关鸿蒙的开发资料非常的少,假如你想学好鸿蒙的应用开发与系统底层开发。你可以参考这份资料,少走很多弯路,节省没必要的麻烦。由两位前阿里高级研发工程师联合打造的《鸿蒙NEXT星河版OpenHarmony开发文档》里面内容包含了(ArkTS、ArkUI开发组件、Stage模型、多端部署、分布式应用开发、音频、视频、WebGL、OpenHarmony多媒体技术、Napi组件、OpenHarmony内核、Harmony南向开发、鸿蒙项目实战等等)鸿蒙(Harmony NEXT)技术知识点
如果你是一名Android、Java、前端等等开发人员,想要转入鸿蒙方向发展。可以直接领取这份资料辅助你的学习。下面是鸿蒙开发的学习路线图。

高清完整版请点击→《鸿蒙NEXT星河版开发学习文档》
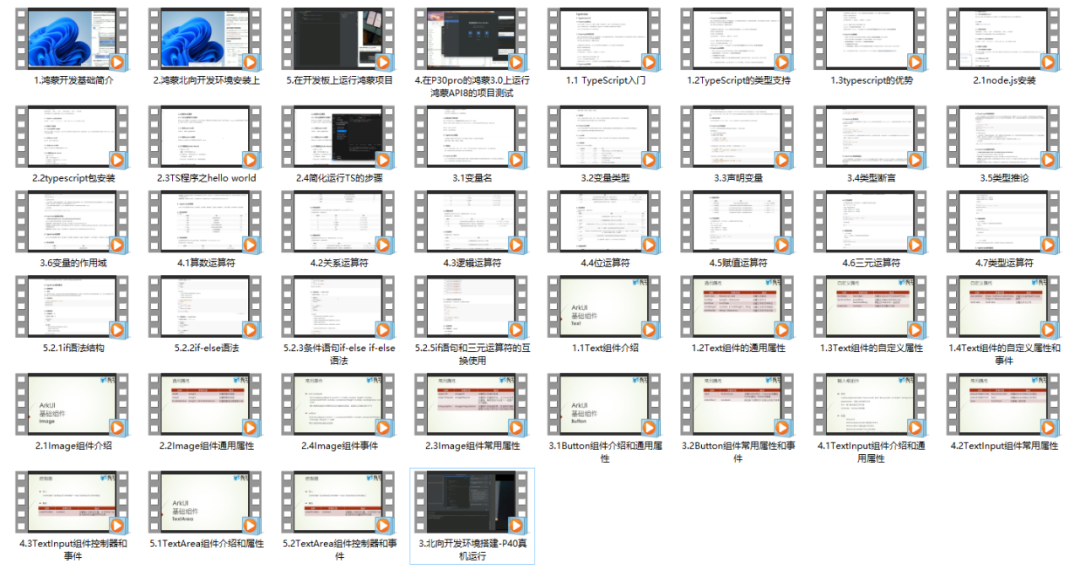
针对鸿蒙成长路线打造的鸿蒙学习文档。话不多说,我们直接看详细资料鸿蒙(OpenHarmony )学习手册(共计1236页)与鸿蒙(OpenHarmony )开发入门教学视频,帮助大家在技术的道路上更进一步。
《鸿蒙 (OpenHarmony)开发学习视频》
《鸿蒙生态应用开发V2.0白皮书》
《鸿蒙 (OpenHarmony)开发基础到实战手册》
获取这份鸿蒙星河版学习资料,请点击→《鸿蒙NEXT星河版开发学习文档》
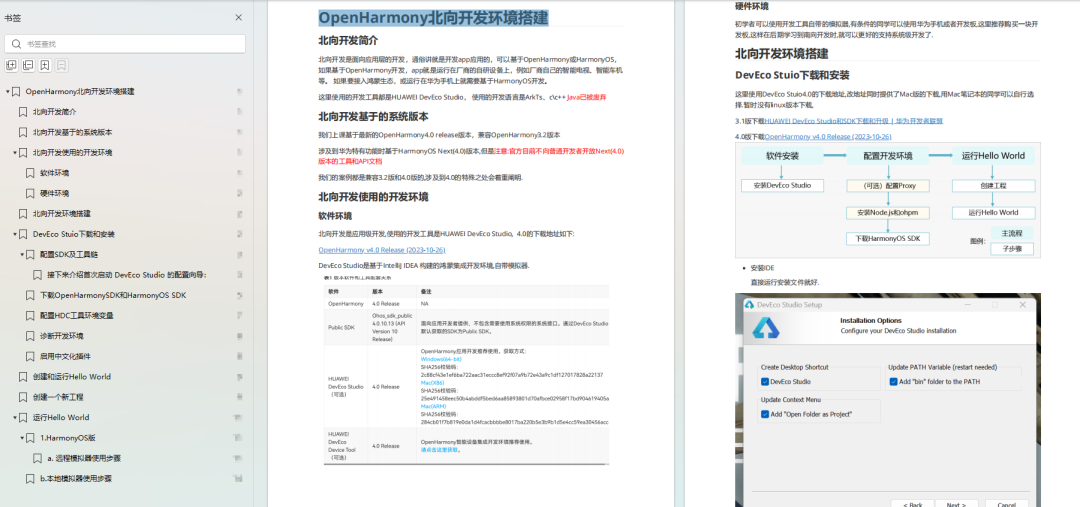
OpenHarmony北向、南向开发环境搭建
《鸿蒙开发基础》
-
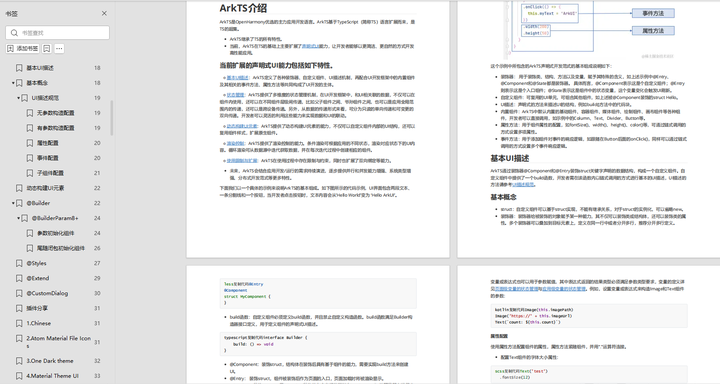
ArkTS语言
-
安装DevEco Studio
-
运用你的第一个ArkTS应用
-
ArkUI声明式UI开发
-
.……
《鸿蒙开发进阶》
-
Stage模型入门
-
网络管理
-
数据管理
-
电话服务
-
分布式应用开发
-
通知与窗口管理
-
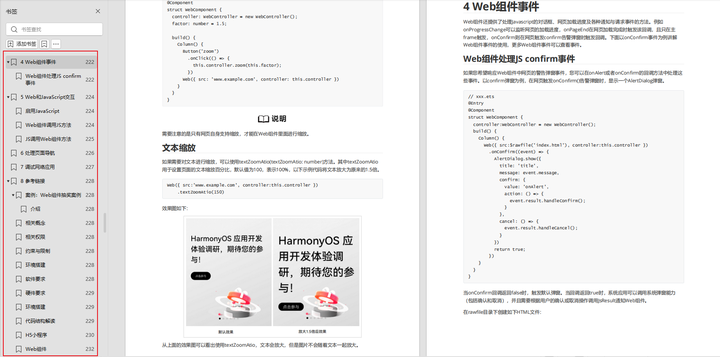
多媒体技术
-
安全技能
-
任务管理
-
WebGL
-
国际化开发
-
应用测试
-
DFX面向未来设计
-
鸿蒙系统移植和裁剪定制
-
……
《鸿蒙开发实战》
-
ArkTS实践
-
UIAbility应用
-
网络案例
-
……

获取这份鸿蒙星河版学习资料,请点击→《鸿蒙NEXT星河版开发学习文档》
总结
鸿蒙—作为国家主力推送的国产操作系统。部分的高校已经取消了安卓课程,从而开设鸿蒙课程;企业纷纷跟进启动了鸿蒙研发。
并且鸿蒙是完全具备无与伦比的机遇和潜力的;预计到年底将有 5,000 款的应用完成原生鸿蒙开发,未来将会支持 50 万款的应用。那么这么多的应用需要开发,也就意味着需要有更多的鸿蒙人才。鸿蒙开发工程师也将会迎来爆发式的增长,学习鸿蒙势在必行!