一、什么是NIO
1.概念
NIO是java1.4中引入的,被称为new I/O,也有说是non-blocking I/O,NIO被成为同步非阻塞的IO。
2.跟BIO流的区别
BIO是面向流的,NIO是面向块(缓冲区)的。
BIO的流都是同步阻塞的,而NIO是同步非阻塞的。
NIO会等待数据全部传输过来再让线程处理,BIO是直接让线程等待。
NIO有选择器,而BIO没有。
NIO是采用管道和缓存区的形式来处理数据的,而BIO是采用输入输出流来处理的。
NIO是可以双向的,BIO只能够单向。

二、NIO常用组件Channel和Buffer的使用
1.代码
这里以文件复制为例
public class test {
    public static void main(String[] args){
        try{
            //存在的照片
            File inFile=new File("C:\\Users\\Administrator\\Desktop\\study.PNG");
            //复制后要存放照片的地址
            File outFile=new File("C:\\Users\\Administrator\\Desktop\\study1.PNG");
            //打开流
            FileInputStream fileInputStream=new FileInputStream(inFile);
            FileOutputStream fileOutputStream=new FileOutputStream(outFile);
            /**
             * RandomAccessFile accessFile=new RandomAccessFile(inFile,"wr");
             *  FileChannel inFileChannel=accessFile.getChannel();
             *  和下面两行代码是一样的,都是可以拿到FileChannel
             */
            //获取Channel
            FileChannel inFileChannel=fileInputStream.getChannel();
            FileChannel outFileChannel=fileOutputStream.getChannel();
           //创建buffer
            ByteBuffer buffer=ByteBuffer.allocate(1024*1024);
            //读取到buffer中
            while (inFileChannel.read(buffer)!=-1){
                //翻转一下,就可以读取到全部数据了
                buffer.flip();
                outFileChannel.write(buffer);
                //读取完后要clear
                buffer.clear();
            }
            //关闭
            inFileChannel.close();
            outFileChannel.close();
            fileInputStream.close();
            fileOutputStream.close();
        }catch (Exception e){}

    }
}
我的桌面上的确多了一张一模一样的图片
2.解释
使用NIO的话,需要注意几个步骤:
打开流
获取通道
创建Buffer
切换到读模式 buffer.flip()
切换到写模式 buffer.clear(); 其实这里也看不出来它是怎么使用缓冲区的,上面这段代码中的while循环的作用和下面的代码是一样的
while ((i=fileInputStream.read())!=-1){
                fileOutputStream.write(i);
          }

让我们赶紧开始NIO的编程
三、BIO和NIO的区别
学习了Channel和Buffer的使用,我们就可以正式进入NIO的开发了
代码
NIO
NIO服务端:只是接受客户端发送过来的数据,然后打印在控制台
/**
 * NIO
 * @author xuxiaobai
 */
public class NIOTest {
    private final static int port = 8080;

    public static void main(String[] args) throws IOException {
        //启动服务端
        TCPServer();
    }
    /**
     * TCP服务端
     * 接受TCP
     *
     * @throws IOException
     */
    public static void TCPServer() throws IOException {
        //创建服务端多路复用选择器
        Selector selector = Selector.open();
        //创建服务端SocketChannel
        ServerSocketChannel serverSocketChannel = ServerSocketChannel.open();
        //定义地址
        InetSocketAddress inetSocketAddress = new InetSocketAddress(InetAddress.getLocalHost(), port);
        //绑定地址
        serverSocketChannel.bind(inetSocketAddress);
        System.out.println("绑定成功:" + inetSocketAddress);
        //设置为非阻塞
        serverSocketChannel.configureBlocking(false);
        //注册服务端选择端,只接受accept事件
        serverSocketChannel.register(selector, SelectionKey.OP_ACCEPT);
        while (true) {
            //加上延时,什么原理我忘记了,只知道是为了防止死锁
            selector.select(500);
            //遍历服务端选择器的事件
            Iterator<SelectionKey> iterator = selector.selectedKeys().iterator();
            while (iterator.hasNext()) {
                SelectionKey next = iterator.next();
                if (!next.isValid()) {
                    //该key无效直接跳过
                    continue;
                }
                //注意
                if (next.isAcceptable()) {
                    //1\. accept事件
                    //接收到accept事件,拿到channel,这个是服务端SocketChannel
                    ServerSocketChannel channel = (ServerSocketChannel) next.channel();
                    //accept得到连接客户端的channel
                    SocketChannel accept = channel.accept();
                    accept.configureBlocking(false);
                    //注册write事件
                    accept.register(selector, SelectionKey.OP_READ);
                    iterator.remove();
                } else if (next.isReadable()) {
                    //2\. read事件
                    //开启一个新的线程
                    Thread thread = new Thread(() -> {
                        SocketChannel channel = (SocketChannel) next.channel();
                        ByteBuffer byteBuffer = ByteBuffer.allocate(1024);
                        byteBuffer.clear();
                        try {
                            channel.read(byteBuffer);
                            //开始处理数据
                            byteBuffer.flip();
                            byte[] bytes = new byte[byteBuffer.remaining()];
                            byteBuffer.get(bytes);
                            String x = new String(bytes);
                            if(x.equals("")){
                                //老是会莫名其妙地打印一些空行,打个补丁
                                return;
                            }
                            System.out.println(x);
                            if ("exit".equals(x)) {
                                //关闭通道
                                try {
                                    channel.close();
                                } catch (IOException e) {
                                    e.printStackTrace();
                                }
                                next.cancel();
                            }
                        } catch (IOException e) {
                            //出现异常的处理
                            e.printStackTrace();
                            try {
                                channel.close();
                            } catch (IOException ioe) {
                                ioe.printStackTrace();
                            }
                            next.cancel();
                        }

                    });
                    iterator.remove();
                    thread.start();
                }
            }
        }
    }
}
BIO
BIO服务端:接受客户端的数据,然后打印在控制台
BIO客户端:向服务端发送数据。NIO的测试中也使用这个客户端进行测试
/**
 * BIO
 * @author xuxiaobai
 */
public class BIOTest {
    private final static int port = 8080;

    public static void main(String[] args) throws IOException {
        TCPClient();
//        TCPServer();
    }

    /**
     * TCP客户端
     * 发送TCP
     * @throws IOException
     */
    private static void TCPClient() throws IOException {
        SocketChannel socketChannel = SocketChannel.open();
        //定义地址
        InetSocketAddress inetSocketAddress = new InetSocketAddress(InetAddress.getLocalHost(), port);
        //连接
        socketChannel.connect(inetSocketAddress);
        System.out.println("连接成功:"+inetSocketAddress);
        Scanner scanner = new Scanner(System.in);
        while (true) {
            String next = scanner.next();
            //直接包装一个buffer
            ByteBuffer wrap = ByteBuffer.wrap(next.getBytes());
            //写入
            socketChannel.write(wrap);
            if ("exit".equals(next)) {
                //等于exit时关闭channel
                socketChannel.close();
                break;
            }
        }
    }

    /**
     * TCP服务端
     * 接受TCP
     * @throws IOException
     */
    private static void TCPServer() throws IOException {
        ServerSocketChannel serverSocketChannel = ServerSocketChannel.open();
        //定义地址
        InetSocketAddress inetSocketAddress = new InetSocketAddress(InetAddress.getLocalHost(), port);
        //绑定
        serverSocketChannel.bind(inetSocketAddress);
        System.out.println("绑定成功:"+inetSocketAddress);
        while (true) {
            //接受连接
            SocketChannel accept = serverSocketChannel.accept();
            new Thread(new Runnable() {
                @Override
                public void run() {
                    //定义一个缓冲区,读出来的数据超出缓冲区的大小时会被丢弃
                    ByteBuffer byteBuffer = ByteBuffer.allocate(1024);
                    while (true) {
                        try {
                            //每次使用前都要清空,但这里没有真的区clear数据,只是移动了buffer里面的下标
                            byteBuffer.clear();
                            //读取数据到缓冲区
                            accept.read(byteBuffer);
                            //每次读取数据前都要flip一下,这里都移动下标
                            byteBuffer.flip();
                            byte[] bytes = new byte[byteBuffer.remaining()];
                            //获取数据
                            byteBuffer.get(bytes);
                            String x = new String(bytes);
                            System.out.println(x);
                            if (x.equals("exit")) {
                                //当读出来的数据等于exit时退出
                                accept.close();
                                break;
                            }
                        } catch (Exception e) {
                            e.printStackTrace();
                        }
                    }
                }
            }).start();
            //启动该线程
        }
    }
}

搞完了代码,让我们来看看代码的演示效果————从客户端发送数据到服务端,下面展示一下效果:
先后启动BIO的TCPServer和TCPClient方法;
TCPClient:

TCPServer:

步骤
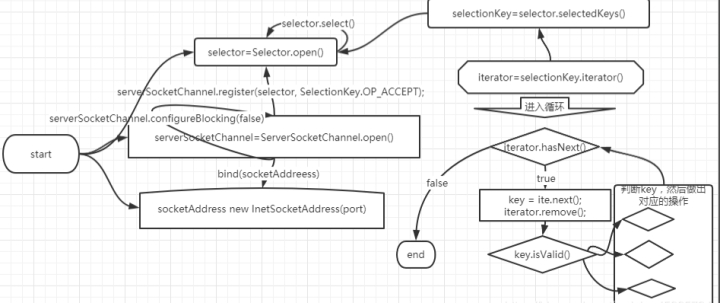
画了个图来表示,这是关于selector的配置流程,在循环中根据不同key值所进行的操作,跟上面文件复制的例子差不多了,只不过这里的Channel是通过 key.channel()获得的。

差别
我们来看看一下BIO和NIO的差别。
BIO
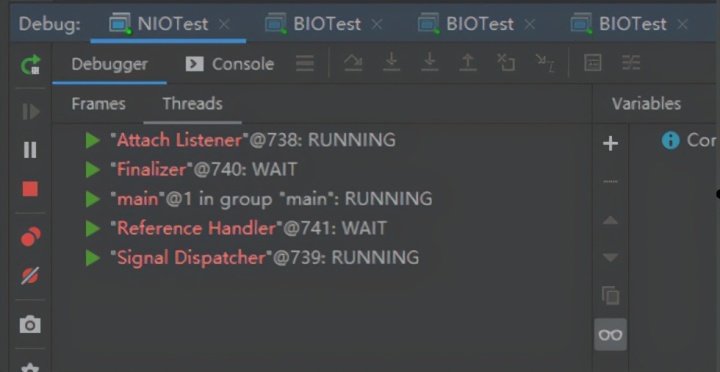
我们用IDEA的debug启动BIO的服务端,然后在启动多个客户端。

我这里启动了三个客户端,可以看到有三个线程已经创建好了,然而我这时还没有发送数据到服务端。
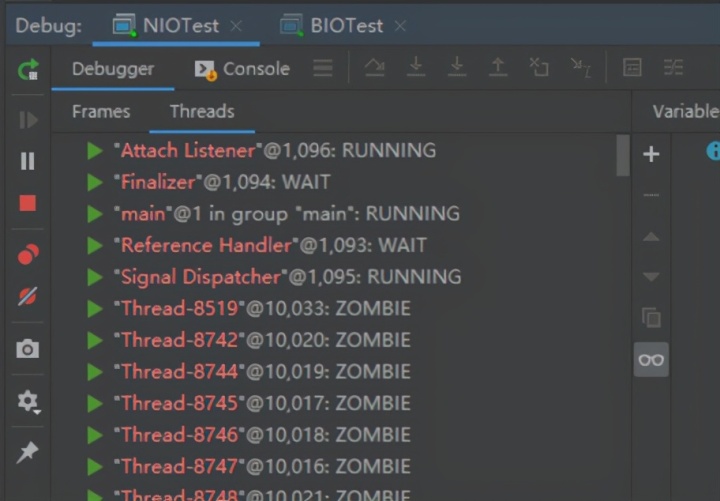
NIO
我们用IDEA的debug启动NIO的服务端,然后在启动多个BIO客户端。
这里启动了多个客户端,服务器上没有多余的几个线程。
修改BIO的TCPClient方法
private static void TCPClient() throws IOException {
        SocketChannel socketChannel = SocketChannel.open();
        //定义地址
        InetSocketAddress inetSocketAddress = new InetSocketAddress(InetAddress.getLocalHost(), port);
        //连接
        socketChannel.connect(inetSocketAddress);
        System.out.println("连接成功:" + inetSocketAddress);
        Scanner scanner = new Scanner(System.in);
        while (true) {
            String next = scanner.next();
            //直接包装一个buffer
//            ByteBuffer wrap = ByteBuffer.wrap(next.getBytes());
            //写入
            while (true) {
                try {
                    //休眠
                    //注意,休眠时间建议调高一点
                    Thread.sleep(1500);
                } catch (InterruptedException e) {
                    e.printStackTrace();
                }
                socketChannel.write(ByteBuffer.wrap(next.getBytes()));
            }
//            if ("exit".equals(next)) {
//                //等于exit时关闭channel
//                socketChannel.close();
//                break;
//            }
        }
    }
休眠时间记得调高点!!!宕机警告!

这样客户端就会在读取到第一次时,一直发送这个数据,可以看到一些线程,也是只有在收到数据之后才会创建这个线程去打印这个数据。如果休眠时间调高一点的话,就会看到有时候这里会一闪一闪的,调低后就会出现一闪而过的很多线程,如下图。
四、总结
BIO的话,每次网络请求过来之后,服务器都是会为这个请求创建一个线程,这个线程会一直等待这个请求后续的数据,等处理完成后才会销毁这个线程;而NIO,当每次网络请求过来时,服务器不会马上创建一个线程去处理这个请求,而是会交给一个Selector线程,只有这个请求后续的数据全部传输过来后,Selector才会去通知其他其他线程或者创建一个线程来处理这个请求。
这就是NIO和BIO最大的差别,只有数据传输到服务器时才会让线程去处理,减少了线程的空等待,大部分情况下可以采用线程池的方式来处理数据,可以提高线程的利用率。


