前言
由于目前组里在升级网关相关的产品,调研了开源框架 APISIX,goku-api-gateway以及Spring Cloud Gateway ,轮性能和资源消耗,Spring Cloud Gateway 都是最不不尽人意的,但是考虑到技术栈的限制和产品迭代更新依赖于Spring Cloud 生态圈,最终还是选择Spring Cloud Gateway做底层进行二开。
在基于 Spring Cloud Gateway做底层开发的时候,针对有些思考和问题,也简单的研究了一下,写下来作为自己的积累也希望可以帮助到看到这篇博客的同学们。
今天主要介绍Spring Cloud Gateway 容器底层Netty的初始化启动和相关组件依赖,为下一篇的 路由流程做铺垫。
内置Netty 容器启动源码分析
首先创建一个只有 Spring Cloud Gateway 的简单的项目来进行源码分析,这里就不介绍如何搭建一个简单的Spring Cloud Gateway 工程了。
其实这一部分跟Spring Cloud Gateway 没有太大的关系,因为启动部分是Spring Boot 的启动流程,但是却是Spring Cloud Gateway中非常重要的一环,因为只有了解启动中的原理才能明白Spring Cloud Gateway 路由原理。话不多说 我们开始吧。
如果对于Spring Boot 启动流程不了解,可以先看一下我之前总结的文章 Spring-boot---SpringApplication运行阶段 。这里就不多做解释,我们直奔主题,Spring Boot 是如何创建Netty 容器的。
我们直接看SpringBoot 默认启动方法。这里以我的项目为例
@SpringBootApplication
public class GatewayApplication {

    public static void main(String[] args) {
        //启动方法
        SpringApplication.run(GatewayApplication.class, args);
    }
}
首先调用的是构造函数
    @SuppressWarnings({ "unchecked", "rawtypes" })
    public SpringApplication(ResourceLoader resourceLoader, Class<?>... primarySources) {
        this.resourceLoader = resourceLoader;
        Assert.notNull(primarySources, "PrimarySources must not be null");
        this.primarySources = new LinkedHashSet<>(Arrays.asList(primarySources));
        //判断当前使用哪种WEB类型的容器启动
        this.webApplicationType = WebApplicationType.deduceFromClasspath();
        this.bootstrappers = new ArrayList<>(getSpringFactoriesInstances(Bootstrapper.class));
        setInitializers((Collection) getSpringFactoriesInstances(ApplicationContextInitializer.class));
        setListeners((Collection) getSpringFactoriesInstances(ApplicationListener.class));
        this.mainApplicationClass = deduceMainApplicationClass();
    }
我们进入到 WebApplicationType.deduceFromClasspath();这个静态方法中看一下
    /**
     * The application should not run as a web application and should not start an
     * embedded web server.
     */
    NONE,

    /**
     * The application should run as a servlet-based web application and should start an
     * embedded servlet web server.
     */
    SERVLET,

    /**
     * The application should run as a reactive web application and should start an
     * embedded reactive web server.
     */
    REACTIVE;
    private static final String WEBMVC_INDICATOR_CLASS = "org.springframework.web.servlet.DispatcherServlet";

    private static final String WEBFLUX_INDICATOR_CLASS = "org.springframework.web.reactive.DispatcherHandler";

    private static final String JERSEY_INDICATOR_CLASS = "org.glassfish.jersey.servlet.ServletContainer";

    static WebApplicationType deduceFromClasspath() {
        //判断当前类中是否有webFlux处理类并且没有webMvc处理类以及 JERSEY处理类,如果没有返回 REACTIVE枚举
        if (ClassUtils.isPresent(WEBFLUX_INDICATOR_CLASS, null) && !ClassUtils.isPresent(WEBMVC_INDICATOR_CLASS, null)
                && !ClassUtils.isPresent(JERSEY_INDICATOR_CLASS, null)) {
            return WebApplicationType.REACTIVE;
        }
        for (String className : SERVLET_INDICATOR_CLASSES) {
            if (!ClassUtils.isPresent(className, null)) {
                return WebApplicationType.NONE;
            }
        }
        return WebApplicationType.SERVLET;
    }
这样其实就已经决定了 当前SpringBoot启动的时候 是用的什么web容器。REACTIVE 就是现在主流的JAVA REACTOR 异步非阻塞模式,也就是使用Netty容器。
介绍完启动容器类型,那我们来简单看一下,Netty 容器是在何时启动的。
我们接下来来看构造函数调用完之后调用的方法
    /**
     * Run the Spring application, creating and refreshing a new
     * {@link ApplicationContext}.
     * @param args the application arguments (usually passed from a Java main method)
     * @return a running {@link ApplicationContext}
     */
    public ConfigurableApplicationContext run(String... args) {
        StopWatch stopWatch = new StopWatch();
        stopWatch.start();
        DefaultBootstrapContext bootstrapContext = createBootstrapContext();
        ConfigurableApplicationContext context = null;
        configureHeadlessProperty();
        SpringApplicationRunListeners listeners = getRunListeners(args);
        listeners.starting(bootstrapContext, this.mainApplicationClass);
        try {
            ApplicationArguments applicationArguments = new DefaultApplicationArguments(args);
            ConfigurableEnvironment environment = prepareEnvironment(listeners, bootstrapContext, applicationArguments);
            configureIgnoreBeanInfo(environment);
            Banner printedBanner = printBanner(environment);
            //创建对应WEB容器的应用上下文
            context = createApplicationContext();
            context.setApplicationStartup(this.applicationStartup);
            //预处理上下文
            prepareContext(bootstrapContext, context, environment, listeners, applicationArguments, printedBanner);
            //刷新上下文
            refreshContext(context);
            //刷新后的上下文处理
            afterRefresh(context, applicationArguments);
            stopWatch.stop();
            if (this.logStartupInfo) {
                new StartupInfoLogger(this.mainApplicationClass).logStarted(getApplicationLog(), stopWatch);
            }
            listeners.started(context);
            callRunners(context, applicationArguments);
        }
        catch (Throwable ex) {
            handleRunFailure(context, ex, listeners);
            throw new IllegalStateException(ex);
        }

        try {
            listeners.running(context);
        }
        catch (Throwable ex) {
            handleRunFailure(context, ex, null);
            throw new IllegalStateException(ex);
        }
        return context;
    }
里面很多方法 这里就不多做解释了,我只关注WEB容器创建的方法 如果想知道其他的方法是干嘛的,可以看看我的其他博客文章然后自己debugger一下,就清楚了。
我们先来看一下创建应用上下文
    /**
     * Strategy method used to create the {@link ApplicationContext}. By default this
     * method will respect any explicitly set application context class or factory before
     * falling back to a suitable default.
     * @return the application context (not yet refreshed)
     * @see #setApplicationContextClass(Class)
     * @see #setApplicationContextFactory(ApplicationContextFactory)
     */
    protected ConfigurableApplicationContext createApplicationContext() {
        return this.applicationContextFactory.create(this.webApplicationType);
    }
这个方法会调用下面这个函数式方法接口
@FunctionalInterface
public interface ApplicationContextFactory {

    /**
     * A default {@link ApplicationContextFactory} implementation that will create an
     * appropriate context for the {@link WebApplicationType}.
     */
    ApplicationContextFactory DEFAULT = (webApplicationType) -> {
        try {
            //通过webApplicationType 判断加载的上下文
            switch (webApplicationType) {
            case SERVLET:
                return new AnnotationConfigServletWebServerApplicationContext();
            case REACTIVE:
                return new AnnotationConfigReactiveWebServerApplicationContext();
            default:
                return new AnnotationConfigApplicationContext();
            }
        }
        catch (Exception ex) {
            throw new IllegalStateException("Unable create a default ApplicationContext instance, "
                    + "you may need a custom ApplicationContextFactory", ex);
        }
    };
从代码中我们可以看到 当WEB类型是 REACTIVE时 创建AnnotationConfigReactiveWebServerApplicationContext上下文类。
确定好 容器上下文后,我们就可以轻轻松松找到如何启动内置Netty 的地方了,我们直接看refreshContext(context); 刷新上下文方法。
    /**
     * Refresh the underlying {@link ApplicationContext}.
     * @param applicationContext the application context to refresh
     */
    protected void refresh(ConfigurableApplicationContext applicationContext) {
        applicationContext.refresh();
    }

这里直接调用 父类 AbstractApplicationContext的refresh方法

        @Override
    public void refresh() throws BeansException, IllegalStateException {
        synchronized (this.startupShutdownMonitor) {
            StartupStep contextRefresh = this.applicationStartup.start("spring.context.refresh");
            prepareRefresh();
            ConfigurableListableBeanFactory beanFactory = obtainFreshBeanFactory();
            prepareBeanFactory(beanFactory);
            try {
                postProcessBeanFactory(beanFactory);
                StartupStep beanPostProcess = this.applicationStartup.start("spring.context.beans.post-process");
                invokeBeanFactoryPostProcessors(beanFactory);
                registerBeanPostProcessors(beanFactory);
                beanPostProcess.end();
                initMessageSource();
                initApplicationEventMulticaster();
                // 在这里调用子类的onRefresh() 方法 也就是我们刚刚确定好的 AnnotationConfigReactiveWebServerApplicationContext 上下文类
                onRefresh();
                registerListeners();
                finishBeanFactoryInitialization(beanFactory);
                finishRefresh();
            }

            catch (BeansException ex) {
                if (logger.isWarnEnabled()) {
                    logger.warn("Exception encountered during context initialization - " +
                            "cancelling refresh attempt: " + ex);
                }
                destroyBeans();
                cancelRefresh(ex);
                throw ex;
            }

            finally {
                resetCommonCaches();
                contextRefresh.end();
            }
        }
    }
在AbstractApplicationContext的refresh方法中调用了 onRefresh(); 在AbstractApplicationContext类中没有这个方法,那么就是各个子类的实现,我们直接看 AnnotationConfigReactiveWebServerApplicationContext 类中的onRefresh()
    @Override
    protected void onRefresh() {
        super.onRefresh();
        try {
            //重点
            createWebServer();
        }
        catch (Throwable ex) {
            throw new ApplicationContextException("Unable to start reactive web server", ex);
        }
    }
几经周折我们终于找到了创建内置容器的方法了 createWebServer();
    private void createWebServer() {
        WebServerManager serverManager = this.serverManager;
        if (serverManager == null) {
            StartupStep createWebServer = this.getApplicationStartup().start("spring.boot.webserver.create");
            String webServerFactoryBeanName = getWebServerFactoryBeanName();
            //通过 ReactiveWebServerFactory 创建 webServerFactory
            ReactiveWebServerFactory webServerFactory = getWebServerFactory(webServerFactoryBeanName);
            createWebServer.tag("factory", webServerFactory.getClass().toString());
            boolean lazyInit = getBeanFactory().getBeanDefinition(webServerFactoryBeanName).isLazyInit();
            //创建内部管理容器类 ,构造方法中调用 ReactiveWebServerFactory#getWebServer(HttpHandler httpHandler);
            this.serverManager = new WebServerManager(this, webServerFactory, this::getHttpHandler, lazyInit);
            getBeanFactory().registerSingleton("webServerGracefulShutdown",
                    new WebServerGracefulShutdownLifecycle(this.serverManager));
            getBeanFactory().registerSingleton("webServerStartStop",
                    new WebServerStartStopLifecycle(this.serverManager));
            createWebServer.end();
        }
        initPropertySources();
    }


//这里是 WebServerManager 类
class WebServerManager {
    WebServerManager(ReactiveWebServerApplicationContext applicationContext, ReactiveWebServerFactory factory,
            Supplier<HttpHandler> handlerSupplier, boolean lazyInit) {
        this.applicationContext = applicationContext;
        Assert.notNull(factory, "Factory must not be null");
        this.handler = new DelayedInitializationHttpHandler(handlerSupplier, lazyInit);
        //调用 ReactiveWebServerFactory的getWebServer(HttpHandler httpHandler);
        this.webServer = factory.getWebServer(this.handler);
    }

    //下面就是ReactiveWebServerFactory的getWebServer 方法。
        @Override
    public WebServer getWebServer(HttpHandler httpHandler) {
        HttpServer httpServer = createHttpServer();
        ReactorHttpHandlerAdapter handlerAdapter = new ReactorHttpHandlerAdapter(httpHandler);
        NettyWebServer webServer = new NettyWebServer(httpServer, handlerAdapter, this.lifecycleTimeout, getShutdown());
        webServer.setRouteProviders(this.routeProviders);
        return webServer;
    }

    //这里需要注意一下 NettyWebServer中有一个回调接口的实现方法,这个就是启动内置Netty的最终方法
   @Override
    public void start() throws WebServerException {
        if (this.disposableServer == null) {
            try {
                this.disposableServer = startHttpServer();
            }
            catch (Exception ex) {
                PortInUseException.ifCausedBy(ex, ChannelBindException.class, (bindException) -> {
                    if (!isPermissionDenied(bindException.getCause())) {
                        throw new PortInUseException(bindException.localPort(), ex);
                    }
                });
                throw new WebServerException("Unable to start Netty", ex);
            }
            //我们在控制台看到的日志 就是这里打印的
            logger.info("Netty started on port(s): " + getPort());
            startDaemonAwaitThread(this.disposableServer);
        }
    }
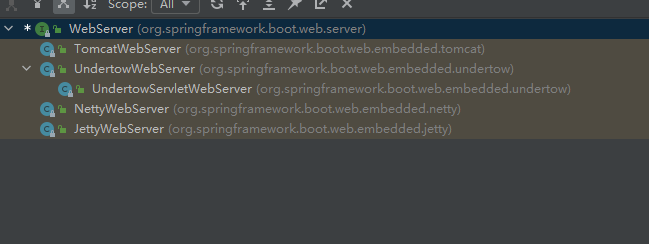
通过上面的代码,我们可以看到 最终我们得到了 NettyWebServer 这个类,在这个类里,实现了内置容器的启动,我们可以看一下都有哪些方法同样实现了 NettyWebServer 一样的接口。
小结
到这里这一步,其实我们已经可以完全找到SpringBoot在何时 判断使用哪种WEB 容器 在何时创建WEB 容器,但是还没有介绍何时回调的上面所说的 start()方法,后面的博文中会有讲解。


