一、前言
上一篇我们介绍了 MQTT 协议格式以及相关的特性:一文读懂物联网 MQTT 协议之基础特性篇,这一篇我们就来实战一番,理论得与实践结合,方能吃透 MQTT。
我的那个读者还提到了讲一下 Mosquitto,这是一款开源消息代理软件,提供轻量级的,支持可发布/可订阅的的消息推送模式,使设备对设备之间的短消息通信变得简单,比如现在应用广泛的低功耗传感器,手机、嵌入式计算机、微型控制器等移动设备。
老周这就来带大家在 CentOS 上搭建 Mosquitto 服务器。
二、搭建准备
Mosquitto 安装版本:Mosquitto1.4.4
Mosquitto 各版本下载地址:https://mosquitto.org/files/source/
MQTT 协议参考网站:MQTT 3.1.1
libwebsockets下载地址:https://github.com/warmcat/libwebsockets/releases
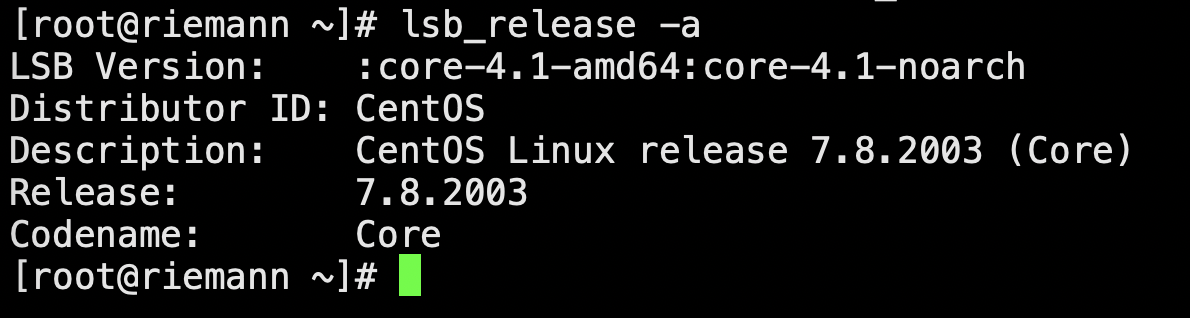
CentOS 版本:CentOS 7.8.2003
2.1 软件准备
从官网获取安装包:
wget http://mosquitto.org/files/source/mosquitto-1.4.14.tar.gz
2.2 安装
tar -zxvf mosquitto-1.4.14.tar.gzcd mosquitto-1.4.14
2.3 修改配置文件
config.mk 包括了多个选项, 可按需关闭或开启,但一旦开启则需要先安装对应的模块。
vim config.mk
| 选项 | 说明 | make时的出错信息 |
|---|---|---|
| WITH_SRV | 启用c-areas库的支持,一个支持异步DNS查找的库,见http://c-ares.haxx.se | missing ares.h |
| WITH_UUID | 启用lib-uuid支持,支持为每个连接的客户端生成唯一的uuid。 | missing uuid.h |
| WITH_WEBSOCKETS | 启用websocket支持,需安装libwebsockets,对于需要使用websocket协议的应用开启。 | missing libwebsockets.h |
WITH_SRV:=yesWITH_UUID:=yesWITH_WEBSOCKETS:=yes
2.3.1 安装 c-areas
yum install c-ares-devel -y
2.3.2 安装 lib-uuid
yum install uuid-devel -yyum install libuuid-devel -y
2.3.3 安装 libwebsockets
cd ~wget https://github.com/warmcat/libwebsockets/archive/v3.2.1.tar.gztar zxvf v3.2.1.tar.gzcd libwebsockets-3.2.1mkdir buildcd buildcmake .. -DLIB_SUFFIX=64make installldconfigcd mosquitto-1.4.14yum install openssl-devel -y
2.4 编译和安装
make && make install
执行编译 make 命令的时候,如果你的终端出现:

那就把把 WITH_WEBSOCKETS 从 yes 改成 no 后,就可以成功编译了。
WITH_WEBSOCKETS:=yes改成WITH_WEBSOCKETS:=no
如果你的应用不需要 websocket 协议,可以把这个参数给设置 no 关掉。
如果终端出现的是这样:

那么恭喜你,Mosquitto 安装成功了。
2.5 说明
程序文件将默认安装到以下位置
| 路径 | 程序文件 |
|---|---|
| /usr/local/sbin | mosquiotto server |
| /etc/mosquitto | configuration |
| /usr/local/bin | utility command |
修正链接库路径
由于操作系统版本及架构原因,很容易出现安装之后的链接库无法被找到,如启动 mosquitto 客户端可能出现找不到 libmosquitto.so.1 文件,因此需要添加链接库路径:
vim /etc/ld.so.conf.d/liblocal.conf
在文件中添加以下内容:
/usr/local/lib64/usr/local/lib# 刷新ldconfig
三、 Mosquitto Server 启动与测试
3.1 启动
3.1.1 mosquitto 默认以 mosquitto 用户启动
可以通过配置文件修改,需添加用户:
groupadd mosquittouseradd -g mosquitto mosquitto
3.1.2 修改配置文件
mv /etc/mosquitto/mosquitto.conf.example /etc/mosquitto/mosquitto.conf
# =================================================================# General configuration# =================================================================# 客户端心跳的间隔时间#retry_interval 20# 系统状态的刷新时间#sys_interval 10# 系统资源的回收时间,0表示尽快处理#store_clean_interval 10# 服务进程的PID#pid_file /var/run/mosquitto.pid# 服务进程的系统用户#user mosquitto# 客户端心跳消息的最大并发数#max_inflight_messages 10# 客户端心跳消息缓存队列#max_queued_messages 100# 用于设置客户端长连接的过期时间,默认永不过期#persistent_client_expiration# =================================================================# Default listener# =================================================================# 服务绑定的IP地址#bind_address# 服务绑定的端口号#port 1883# 允许的最大连接数,-1表示没有限制#max_connections -1# cafile:CA证书文件# capath:CA证书目录# certfile:PEM证书文件# keyfile:PEM密钥文件#cafile#capath#certfile#keyfile# 必须提供证书以保证数据安全性#require_certificate false# 若require_certificate值为true,use_identity_as_username也必须为true#use_identity_as_username false# 启用PSK(Pre-shared-key)支持#psk_hint# SSL/TSL加密算法,可以使用“openssl ciphers”命令获取# as the output of that command.#ciphers# =================================================================# Persistence# =================================================================# 消息自动保存的间隔时间#autosave_interval 1800# 消息自动保存功能的开关#autosave_on_changes false# 持久化功能的开关persistence true# 持久化DB文件persistence_file mosquitto.db# 持久化DB文件目录persistence_location /var/lib/mosquitto/# =================================================================# Logging# =================================================================# 4种日志模式:stdout、stderr、syslog、topic# none 则表示不记日志,此配置可以提升些许性能log_dest none# 选择日志的级别(可设置多项)#log_type error#log_type warning#log_type notice#log_type information# 是否记录客户端连接信息#connection_messages true# 是否记录日志时间#log_timestamp true# =================================================================# Security# =================================================================# 客户端ID的前缀限制,可用于保证安全性#clientid_prefixes# 允许匿名用户#allow_anonymous true# 用户/密码文件,默认格式:username:password#password_file# PSK格式密码文件,默认格式:identity:key#psk_file# pattern write sensor/%u/data# ACL权限配置,常用语法如下:# 用户限制:user <username># 话题限制:topic [read|write] <topic># 正则限制:pattern write sensor/%u/data#acl_file# =================================================================# Bridges# =================================================================# 允许服务之间使用“桥接”模式(可用于分布式部署)#connection <name>#address <host>[:<port>]#topic <topic> [[[out | in | both] qos-level] local-prefix remote-prefix]# 设置桥接的客户端ID#clientid# 桥接断开时,是否清除远程服务器中的消息#cleansession false# 是否发布桥接的状态信息#notifications true# 设置桥接模式下,消息将会发布到的话题地址# $SYS/broker/connection/<clientid>/state#notification_topic# 设置桥接的keepalive数值#keepalive_interval 60# 桥接模式,目前有三种:automatic、lazy、once#start_type automatic# 桥接模式automatic的超时时间#restart_timeout 30# 桥接模式lazy的超时时间#idle_timeout 60# 桥接客户端的用户名#username# 桥接客户端的密码#password# bridge_cafile:桥接客户端的CA证书文件# bridge_capath:桥接客户端的CA证书目录# bridge_certfile:桥接客户端的PEM证书文件# bridge_keyfile:桥接客户端的PEM密钥文件#bridge_cafile#bridge_capath#bridge_certfile#bridge_keyfile
关于详细配置可参考:http://mosquitto.org/man/mosquitto-conf-5.html
3.1.3 设置用户名和密码
将配置文件中 #allow_anonymous true 去掉注释,设置为 false,#password_file 去掉注释并添加密码文件保存的位置:
allow_anonymous falsepassword_file /etc/mosquitto/pwfile.example
mosquitto_passwd -c /etc/mosquitto/pwfile.example 用户名之后需输入两次密码注意如果想添加用户mosquitto_passwd -b /etc/mosquitto/pwfile.example 用户名 密码
同样连续会提示连续输入两次密码。注意第二次创建用户时不用加 -c 如果加 -c 会把第一次创建的用户覆盖。
3.1.4 启动 mosquitto
mosquitto -c /etc/mosquitto/mosquitto.conf -d
成功将启动并监听 1883 端口
3.2 测试
新建两个 shell 窗口 A/B
A 订阅主题:
mosquitto_sub -t 主题名 -h 主机IP -u 用户名 -P 密码例如:mosquitto_sub -t topic-riemann -h localhost -u mosquitto -P mosquitto
B 推送消息:
mosquitto_pub -t 主题名 -h 主机IP -m "消息内容" -u 用户名 -P 密码例如:mosquitto_pub -t topic-riemann -h localhost -m "hello,mqtt" -u mosquitto -P mosquitto
3.3 可能遇到的问题
如果你出现这个错误:
mosquitto_sub: error while loading shared libraries: libmosquitto.so.1: cannot open shared object file: No such file or directory
解决方法:
编译完 mosquitto 之后,进入到 lib 目录下,将编译之后的 libmosquitto.so.1 拷贝到目录 /usr/local/lib下,执行如下命令:
cp libmosquitto.so.1 /usr/local/lib
然后再执行命令:
sudo ln -s /usr/local/lib/libmosquitto.so.1 /usr/lib/libmosquitto.so.1ldconfig
3.4 测试结果


四、Java 实现 Mosquitto 客户端
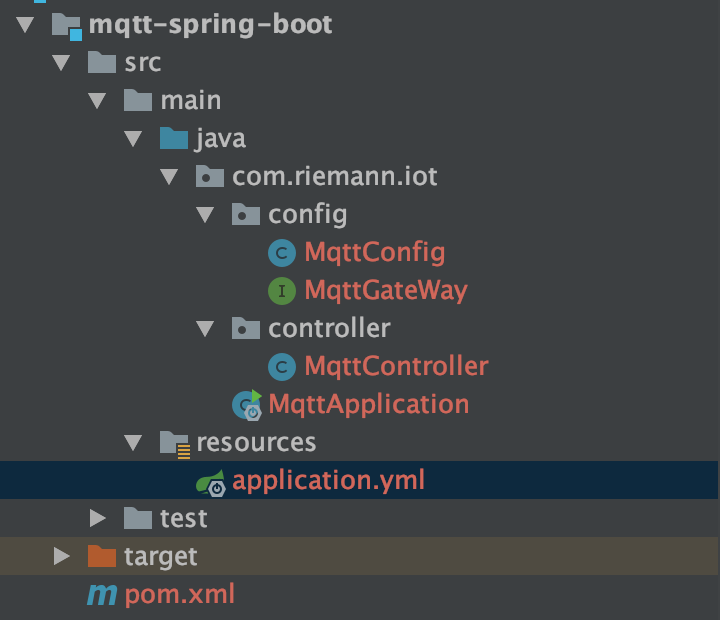
4.1 项目结构图
4.2 添加 pom.xml
<parent> <groupId>org.springframework.boot</groupId> <artifactId>spring-boot-starter-parent</artifactId> <version>2.1.6.RELEASE</version></parent><dependencies> <dependency> <groupId>org.springframework.boot</groupId> <artifactId>spring-boot-starter-web</artifactId> </dependency> <dependency> <groupId>org.springframework.boot</groupId> <artifactId>spring-boot-devtools</artifactId> </dependency> <dependency> <groupId>org.projectlombok</groupId> <artifactId>lombok</artifactId> <optional>true</optional> </dependency> <dependency> <groupId>org.springframework.integration</groupId> <artifactId>spring-integration-mqtt</artifactId> <version>5.2.5.RELEASE</version> </dependency></dependencies>
4.3 application.yml
mqtt: host: tcp://服务器IP:1883 clientId: client_${random.value} topic: test/system/module/biz qoslevel: 1 username: mosquitto password: mosquitto timeout: 10000 keepalive: 20server: port: 8888
4.4 MqttConfig
/** * @author: 微信公众号【老周聊架构】 */@Slf4j@Configuration@IntegrationComponentScanpublic class MqttConfig { @Value("${mqtt.username}") private String username; @Value("${mqtt.password}") private String password; @Value("${mqtt.host}") private String hostUrl; @Value("${mqtt.clientId}") private String clientId; @Value("${mqtt.topic}") private String defaultTopic; // 连接超时 @Value("${mqtt.timeout}") private int completionTimeout; @Bean public MqttConnectOptions getMqttConnectOptions() { MqttConnectOptions mqttConnectOptions = new MqttConnectOptions(); mqttConnectOptions.setCleanSession(true); mqttConnectOptions.setConnectionTimeout(10); mqttConnectOptions.setKeepAliveInterval(90); mqttConnectOptions.setAutomaticReconnect(true); mqttConnectOptions.setUserName(username); mqttConnectOptions.setPassword(password.toCharArray()); mqttConnectOptions.setServerURIs(new String[]{hostUrl}); mqttConnectOptions.setKeepAliveInterval(2); return mqttConnectOptions; } @Bean public MqttPahoClientFactory mqttClientFactory() { DefaultMqttPahoClientFactory factory = new DefaultMqttPahoClientFactory(); factory.setConnectionOptions(getMqttConnectOptions()); return factory; } @Bean @ServiceActivator(inputChannel = "mqttOutboundChannel") public MessageHandler mqttOutbound() { MqttPahoMessageHandler messageHandler = new MqttPahoMessageHandler(clientId, mqttClientFactory()); messageHandler.setAsync(true); messageHandler.setDefaultTopic(defaultTopic); return messageHandler; } @Bean public MessageChannel mqttOutboundChannel() { DirectChannel directChannel = new DirectChannel(); return directChannel; } // 接收通道 @Bean public MessageChannel mqttInputChannel() { DirectChannel directChannel = new DirectChannel(); return directChannel; } // 配置client,监听的topic @Bean public MessageProducer inbound() { MqttPahoMessageDrivenChannelAdapter adapter = new MqttPahoMessageDrivenChannelAdapter(clientId + "_inbound", mqttClientFactory(), "test/#"); adapter.setCompletionTimeout(completionTimeout); adapter.setConverter(new DefaultPahoMessageConverter()); adapter.setQos(1); adapter.setOutputChannel(mqttInputChannel()); return adapter; } // 通过通道获取数据 @Bean @ServiceActivator(inputChannel = "mqttInputChannel") public MessageHandler handler() { return message -> { String topic = (String)message.getHeaders().get("mqtt_receivedTopic"); log.info("主题:{},消息接收到的数据:{}", topic, message.getPayload()); }; }}
4.5 MqttGateWay
/** * @author: 微信公众号【老周聊架构】 */@MessagingGateway(defaultRequestChannel = "mqttOutboundChannel")public interface MqttGateWay { // 定义重载方法,用于消息发送 void sendToMqtt(String payload); // 指定topic进行消息发送 void sendToMqtt(@Header(MqttHeaders.TOPIC) String topic, String payload); void sendToMqtt(@Header(MqttHeaders.TOPIC) String topic, @Header(MqttHeaders.QOS) int qos, String payload);}
4.6 MqttController 控制类
/** * @author: 微信公众号【老周聊架构】 */@Slf4j@RestController@RequestMapping("/api")public class MqttController { @Autowired MqttGateWay mqttGateWay; @PostMapping("/publish") public String publish(@RequestHeader(value = "toplic") String toplic , String message) { log.info(String.format("topic: %s, message: %s", toplic, message)); mqttGateWay.sendToMqtt(toplic, message); return "success"; }}
4.7 MqttApplication 启动类
/** * @author: 微信公众号【老周聊架构】 */@SpringBootApplicationpublic class MqttApplication { public static void main(String[] args) { SpringApplication.run(MqttApplication.class, args); }}
4.8 启动 mosquitto 服务器
mosquitto -c /etc/mosquitto/mosquitto.conf -d
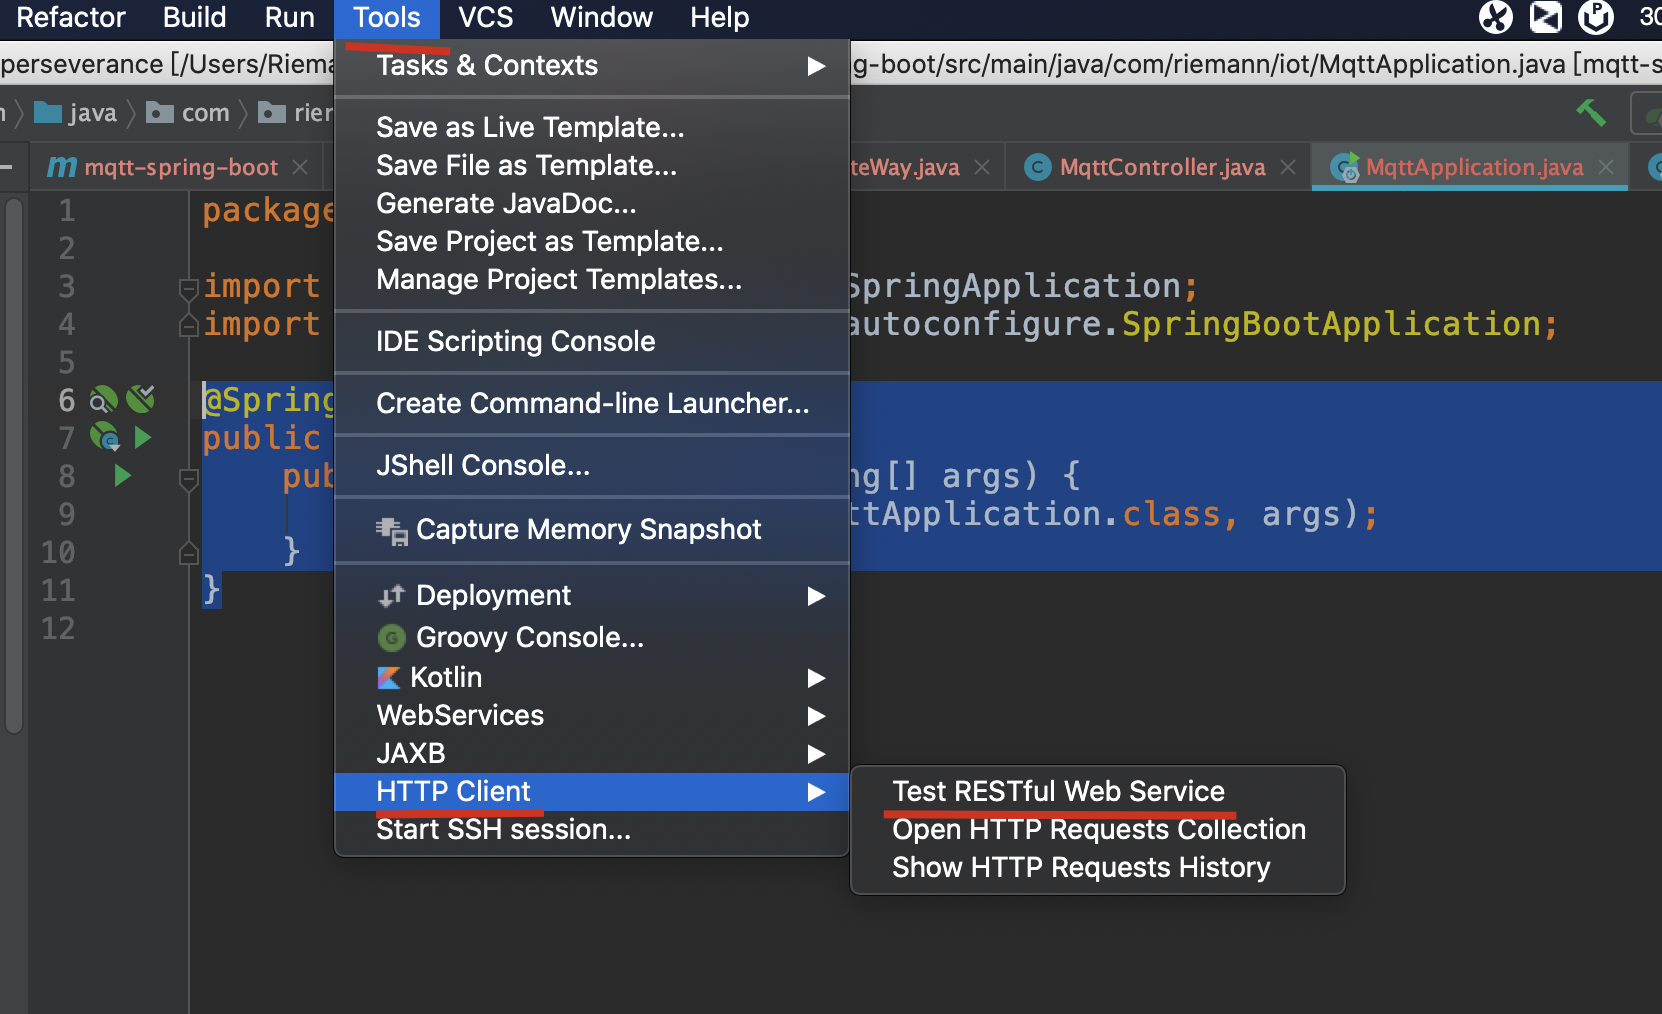
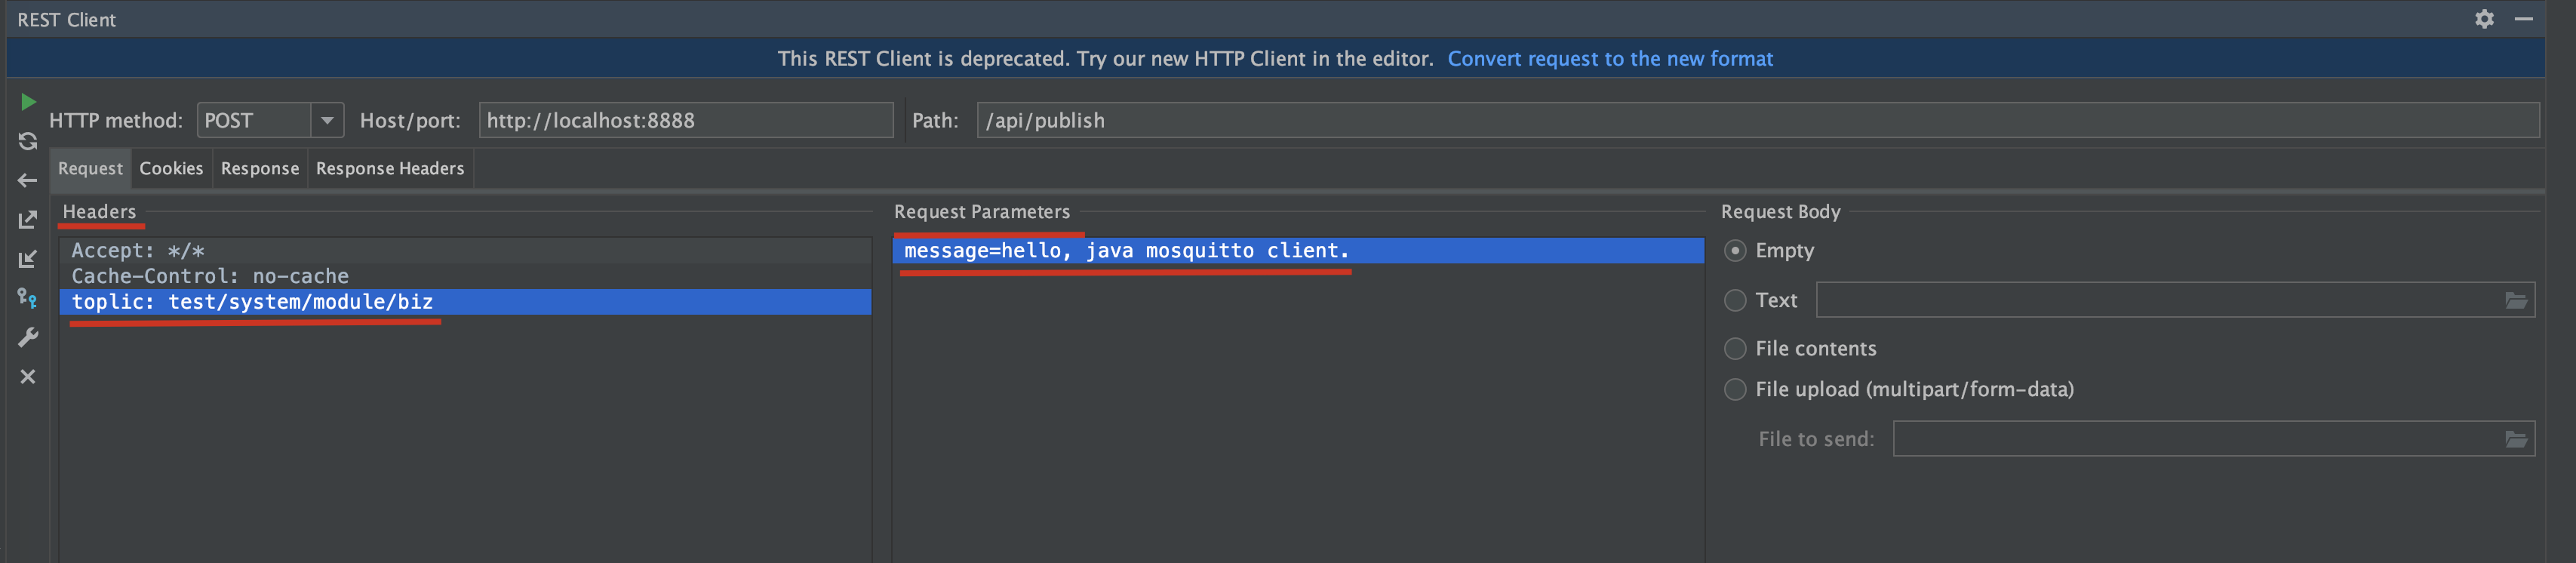
4.9 利用 IDEA 的 HTTP Client 模拟 HTTP 请求
4.10 测试结果
IDEA 控制台接收到该主题的消息:


