Tekton 是用于构建 CI/CD 管道的云原生解决方案。它由提供构建块的 Tekton Pipelines 和支持组件(例如 Tekton CLI 和 Tekton Catalog)组成,它们使 Tekton 成为一个完整的生态系统。Tekton 是Linux Foundation项目CD Foundation的 一部分。
Tekton 作为 Kubernetes 集群上的扩展安装和运行,并包含一组 Kubernetes 自定义资源,这些资源定义了您可以为管道创建和重用的构建块。安装后,Tekton Pipelines 可以通过 Kubernetes CLI (kubectl) 和 API 调用使用,就像 pod 和其他资源一样。
#安装
在 Kubernetes 集群上安装 Tekton Pipelines Triggers Dashboard Interceptors :
kubectl apply --filename https://storage.googleapis.com/tekton-releases/pipeline/latest/release.notags.yaml
kubectl apply --filename https://storage.googleapis.com/tekton-releases/triggers/latest/release.yaml
kubectl apply --filename https://storage.googleapis.com/tekton-releases/dashboard/latest/tekton-dashboard-release.yaml
kubectl apply --filename https://storage.googleapis.com/tekton-releases/triggers/latest/interceptors.yaml
我们这里的环境是centos7,kernel:Linux 5.10.109-1
由于官方使用的镜像是 gcr 的镜像,所以正常情况下我们是获取不到的 如果你的集群由于某些原因获取不到镜像,可以尝试到DockerHub公共仓库查询相关镜像。
上面的资源清单中默认安装一个名为tekton-pipelinesde 命名空间,所有和tekton相关的资源都会在这个命名空间下,查看当前命名空间中安装的Pod是否正常运行:
[root@master ~]# kubectl get po
NAME                                                 READY   STATUS      RESTARTS      AGE
tekton-dashboard-655cfb9cb7-xv64b                    1/1     Running     0             2d20h
tekton-pipelines-controller-cc76bb647-5tvlk          1/1     Running     0             2d20h
tekton-pipelines-webhook-67757b5795-5k5bv            1/1     Running     0             2d20h
tekton-triggers-controller-56df556c75-5qjnc          1/1     Running     0             2d20h
tekton-triggers-core-interceptors-6756b486b5-cllrx   1/1     Running     0             2d20h
tekton-triggers-webhook-dd9595fdb-x2644              1/1     Running     0             2d20h
#组件
Tekton 由以下组件组成:
- **Tekton Pipelines**是 Tekton 的基础。它定义了一组 Kubernetes自定义资源 ,它们充当构建块,您可以从中组装 CI/CD 管道。
- **Tekton Triggers**允许您根据事件实例化管道。例如,您可以在每次 PR 与 GitHub 存储库合并时触发管道的实例化和执行。您还可以构建启动特定 Tekton 触发器的用户界面。
- **Tekton CLI**提供了一个名为 的命令行界面
tkn,它建立在 Kubernetes CLI 之上,允许您与 Tekton 进行交互。 - **Tekton Dashboard**是 Tekton Pipelines 的基于 Web 的图形界面,可显示有关管道执行的信息。它目前正在进行中。
- **Tekton Catalog**是一个高质量的、社区贡献的 Tekton 构建块的存储库 -
Tasks、Pipelines等 - 可以在您自己的管道中使用。 - **Tekton Hub**是一个基于 Web 的图形界面,用于访问 Tekton 目录。
- **Tekton Operator**是一种 Kubernetes Operator 模式 ,允许您在 Kubernetes 集群上安装、更新和删除 Tekton 项目。
#案例
任务流程
git clone -->> make build -->> image build -->> image push registry
我们这里使用一个简单的golang服务,Dockerfiel来进行测试,下面是清单内容
package main

import (
    "fmt"
    "net/http"
    "strings"
    "log"
)

func sayhelloName(w http.ResponseWriter, r *http.Request) {
    r.ParseForm()  // 解析参数,默认是不会解析的
    fmt.Println(r.Form)  // 这些信息是输出到服务器端的打印信息
    fmt.Println("path", r.URL.Path)
    fmt.Println("scheme", r.URL.Scheme)
    fmt.Println(r.Form["url_long"])
    for k, v := range r.Form {
        fmt.Println("key:", k)
        fmt.Println("val:", strings.Join(v, ""))
    }
    fmt.Fprintf(w, "Hello World!") // 这个写入到 w 的是输出到客户端的
}

func main() {
    http.HandleFunc("/", sayhelloName) // 设置访问的路由
    err := http.ListenAndServe(":9090", nil) // 设置监听的端口
    if err != nil {
        log.Fatal("ListenAndServe: ", err)
    }
}
····golang文件·····
FROM  hub.17usoft.com/k8stest/golang:v0.1
MAINTAINER ycloud
ADD web-service /app/
WORKDIR /app
EXPOSE 9090
CMD ["./web-service"]
·····Dockerfile····
在Dockerfile中基础镜像,可用其他golang镜像替代
git clone
接下来我们构建第一个tekton任务tasks,用于从私人代码库中拉去任务。这里需要提示官方提供了一个tekton的资源中心Tekton Hub,上面有各个组织和团队贡献的任务,满足部分需求,可供选择。中间的过程可根据自己的需求来进行调整。当然自己也可根据自己任务的情况,去构建符合自己需求的tasks,并非要用官方提供的。
kubectl apply -f https://raw.githubusercontent.com/tektoncd/catalog/main/task/git-clone/0.8/git-clone.yaml
这里我们需要创建一个pvc,为git提供存放位置,也可添加一个git认证,不过这里我们忽略,自行查询。
apiVersion: v1
kind: PersistentVolumeClaim
metadata:
  name: my-app
spec:
  accessModes:
    - ReadWriteOnce
  resources:
    requests:
      storage: 500Mi
  storageClassName: nfs-sc
make build
第二个tekton任务tasks,用于从代码的打包,因为我们这是使用的golang语言的代码,所以我们在这第二个任务选择golang-build
kubectl apply -f https://raw.githubusercontent.com/tektoncd/catalog/main/task/golang-build/0.3/golang-build.yaml
  params:
  - name: packages
    description: "packages to build (default: ./cmd/...)"
    default: "./cmd/..."
  - name: subdirectory
    description: subdirectory inside the "source"
    default: "./"
我们pipeline中使用的subdirectory字段,源文件中没有,所以需要我们手动添加一下。这个子目录的作用是,不想根据项目创建多个pvc,一个pvc通过不同的目录来区分项目,这样很能很快保障我们文件所存在的位置。
kaniko
kaniko 是 Google 开源的一个工具,旨在帮助开发人员从容器或 Kubernetes 集群内的 Dockerfile 构建容器镜像。我们这里丢弃了以往的docker build。 kaniko可以帮助我们完成镜像的打包和推送工作,也就是流程中的第三和第四部分
kubectl apply -f https://raw.githubusercontent.com/tektoncd/catalog/main/task/kaniko/0.6/kaniko.yaml
在我们推送镜像的过程中,需要我们对其进行登录认证,为了方便我们后续操作,可以将认证保存在kubernetes的secrets资源对象中。首先确保我们本机可以login到我们的镜像仓库中去,我们这里选择的是harbor私人仓库
[root@master]# docker login hub.17usoft.com
Authenticating with existing credentials...
WARNING! Your password will be stored unencrypted in /root/.docker/config.json.
Configure a credential helper to remove this warning. See
https://docs.docker.com/engine/reference/commandline/login/#credentials-store

Login Succeeded
登录成功之后,密钥信息会保存在我们的**/root/.docker/config.json**文件中,接下来创建secrets对象
kubectl create secret generic dockerconfig \
    --from-file=config.json= ~/.docker/config.json \
    --type=kubernetes.io/dockerconfigjson
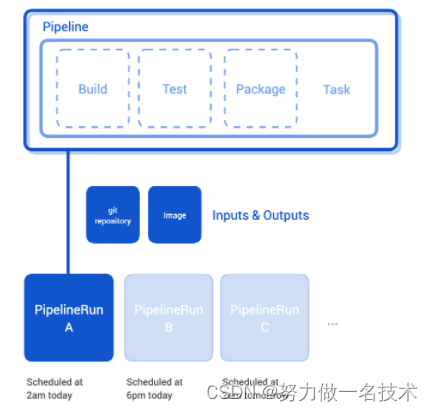
pipeline
Pipeline可以编排多个task,pipeline的params声明了执行时的入参,spec.tasks定义了需要编排的task,通过runAfter可以定义task执行的顺序。在编排task的时候在spec.tasks.params中可以指定传入task的参数。
apiVersion: tekton.dev/v1beta1
kind: Pipeline
metadata:
  name: kaniko-test-pipeline
spec:
  params:
  - name: repo-url
    type: string
    description: The git repository URL to clone from.
  - name: branch-name
    type: string
    description: The git branch to clone.
  - name: image
    type: string
    description: To build the image
  - name: package
    type: string
    description: base package to build in
  - name: subdirectory
    type: string
  workspaces:
  - name: shared-data
  - name: dockerconfig
  tasks:
  - name: fetch-repo
    taskRef:
      name: git-clone
    workspaces:
    - name: output
      workspace: shared-data
    params:
    - name: url
      value: $(params.repo-url)
    - name: revision
      value: $(params.branch-name)
    - name: subdirectory
      value: $(params.subdirectory)
    - name: deleteExisting
      value: "true"
  - name: go-build
    taskRef:
      name: golang-build
    runAfter:
      - fetch-repo
    workspaces:
      - name: source
        workspace: shared-data
    params:
      - name: package
        value: $(params.package)
      - name: subdirectory
        value: $(params.subdirectory)
      - name: packages
        value: "./"
      - name: flags
        value: -v -o $(workspaces.source.path)/$(params.subdirectory)
  - name: kaniko
    taskRef:
      name: kaniko
    runAfter:
    - go-build
    workspaces:
    - name: source
      workspace: shared-data
    - name: dockerconfig
      workspace: dockerconfig
    params:
    - name: IMAGE
      value: $(params.image)
    - name: DOCKERFILE
      value: ./$(params.subdirectory)/Dockerfile
    - name: CONTEXT
      value: ./test/
    - name: EXTRA_ARGS
      value:
        - --skip-tls-verify
pipelinerun
Task和Pipeline都是一些模板,真正执行需要PipelineRun。PipelineRun可以给Pipeline传参,并执行Pipeline。
repo—url是我们git仓库地址,image是我们所构建的镜像名称
apiVersion: tekton.dev/v1beta1
kind: PipelineRun
metadata:
  name: kaniko-test-pipeline-run
spec:
  pipelineRef:
    name: kaniko-test-pipeline
  workspaces:
  - name: shared-data
    persistentVolumeClaim:
      claimName: my-app
  - name: dockerconfig
    secret:
      secretName: dockerconfig
  params:
  - name: repo-url
    value: http://10.177.9.244:31002/root/golang.git
  - name: branch-name
    value: master
  - name: package
    value: golang
  - name: image
    value:  hub.17usoft.com/gstrain/web-service:v0.1
  - name: subdirectory
    value: test
最后我们可以通过kubectl应用这些配置。通过tekton dashboard可查看当前任务进程。
让我们用构建好的镜像来运行一个容器来测试它的功能。
[root@master ~]# docker run --rm -p 9090:9090 hub.17usoft.com/gstrain/web-service:v0.1
[root@master ~]# curl 10.177.9.244:9090
Hello World!
我们这个pipeline流程就走通了,后续我们会添加上tekton 触发器,当条件触发自动运行pipeline,来达到自动化的流程。会更加优化pipleine中琐碎参数,不用再去手动传参,自动获取一些参数让我们使用。
我们还会添加一个新的任务,当我们完成镜像推送后自动修改配置仓库中yaml信息,无需手动修改上传。
引入一个新的工具argocd用作服务的发布,当修改好配置仓库中的yaml是自动触发,来完成我们服务的发布,来达到CI/CD自动化。


