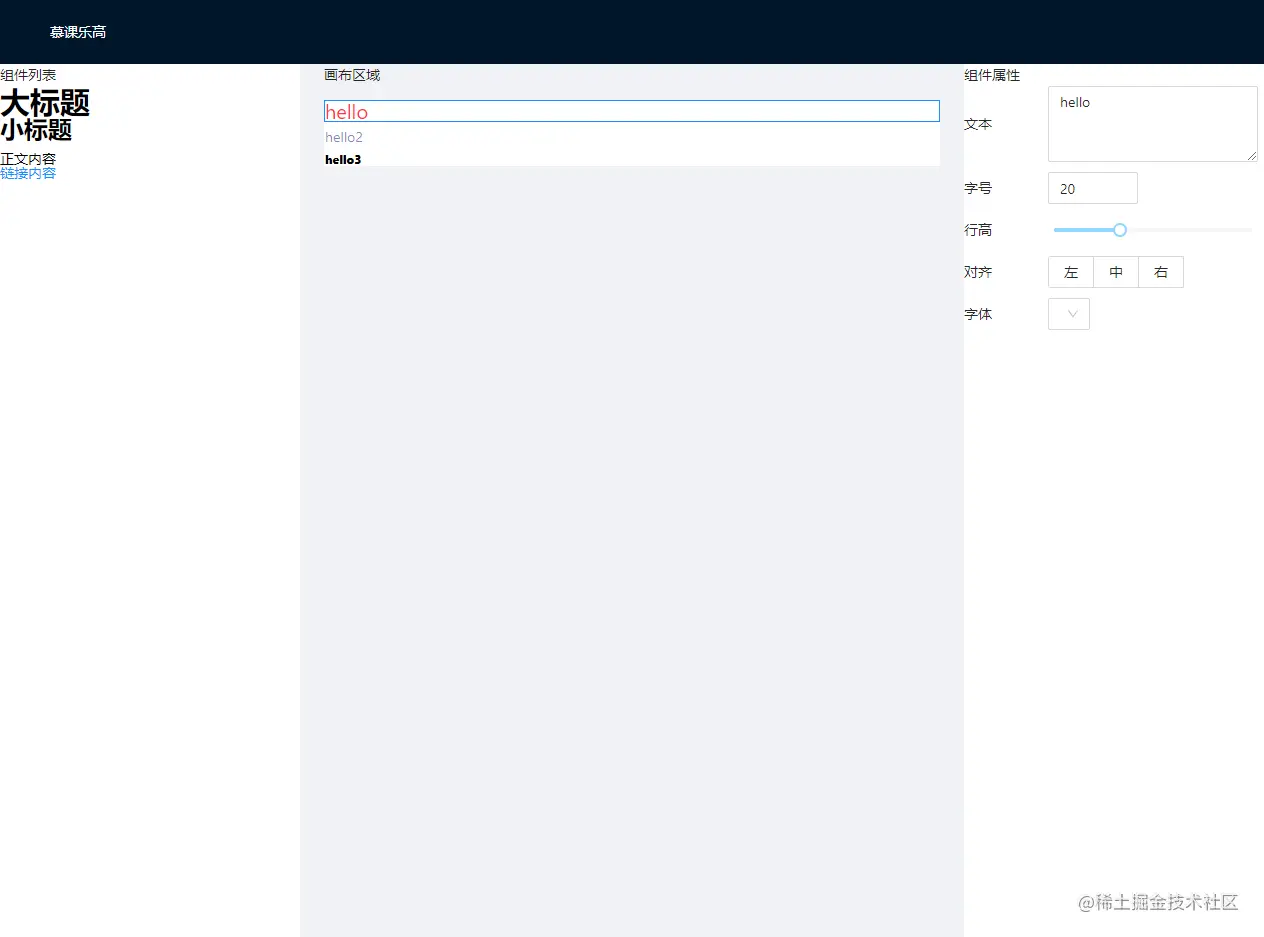
更新属性的过程
- 点击某一个组件,选中组件
- 将它的属性以不同类型的表单呈现在右侧区域
- 编辑表单中的值,在值更新的同时,将数据更新到界面
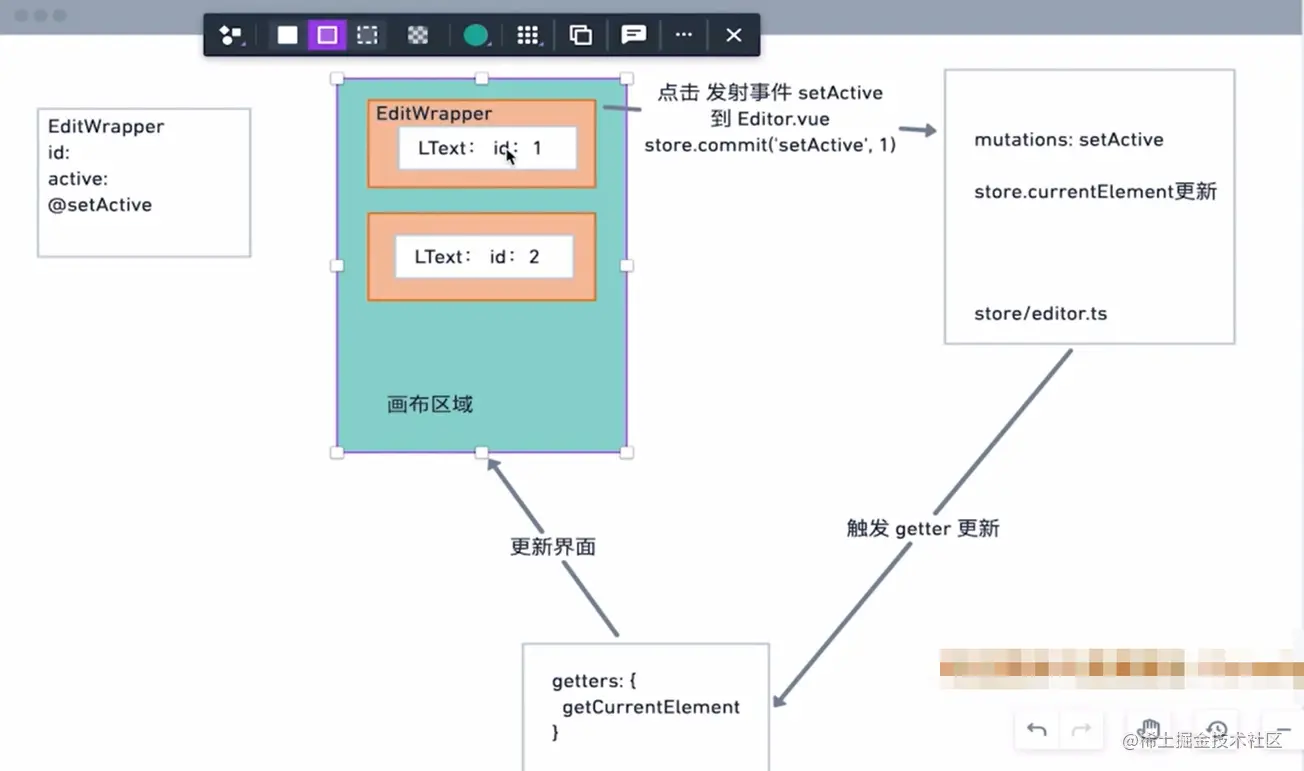
获取正在编辑的元素的属性
- 组件外套一层
wrapper 用来隔离点击事件和组件自身行为 - 鼠标经过组件添加边框样式
- 点击某一个组件,选中组件,选中的组件添加高亮样式
- 点击某一个组件,向父组件
Editor.vue 发射setActive 事件 -
Editor.vue 通过commit 更新store 中的状态 -
store 中接收组件id,计算当前组件的属性 -
Editor.vue 中接收当前组件的属性,并渲染在界面上
EditWarpper.vue
<template>
  <div class="edit-wrapper"
       :class="{ active: active }"
       @click="onItemClick">
       // 插槽 显示组件内容
    <slot></slot>
  </div>
</template>

<script setup lang="ts">
import { defineProps, defineEmits, withDefaults } from 'vue';
interface Props {
  id: string;
  active: boolean;
}
// 接收数据
const props = withDefaults(defineProps<Props>(), {
  // 激活的时候添加样式,默认为 false
  active: false
})

const emit = defineEmits<{
  (e: 'set-active', id: string): void;
}>()
// 发射事件
const onItemClick = () => {
  emit('set-active', props.id)
}
</script>

<style scoped>
.edit-wrapper {
  padding: 0;
  cursor: pointer;
  border: 1px solid transparent;
  user-select: none;
}

.edit-wrapper:hover {
  border: 1px dashed #CCC;
}

.edit-wrapper.active {
  border: 1px solid #1890ff;
  user-select: none;
  z-index: 1000;
}
</style>
Editor.vue
// template
 <!-- 中间画布编辑区域 -->
  <a-layout style="padding:0 24px 24px">
    <a-layout-content class="preview-container">
      <p>画布区域</p>
      <!-- 组件列表 -->
      <div class="preview-list"
           id="canvas-area">
        <!-- 使用动态组件进行渲染 -->
        <edit-warpper v-for="component in components"
                      :id="component.id"
                      @set-active="setActive"
                      :active="component.id === currentElement?.id"
                      :key="component.id">
          <component :is="componentMap[component.name]"
                     v-bind="component.props"></component>
        </edit-warpper>
      </div>
    </a-layout-content>
  </a-layout>

// script
import type { ComponentData } from '../store/editor'

// 点击组件时切换激活状态
const setActive = (id: string) => {
  store.commit('setActive', id)
}

// 获取当前激活的组件
const currentElement = computed<ComponentData | null>(() => store.getters.getCurrentElement)
editor.ts
const editorStore: Module<EditorStore, GlobalStore> = {
  state: {
    // 组件列表
    components: testComponents,
    // 当前操作的组件
    currentElement: '',
  },
  mutations: {
    // 向画布中添加组件
    addComponent(state, props: PartialTextComponentProps) {
      const newComponent: ComponentData = {
        id: uuidv4(),
        name: 'l-text',
        props,
      };
      state.components.push(newComponent);
    },
    // 切换当前激活的组件
    setActive(state, currentId: string) {
      state.currentElement = currentId;
    },
  },
  getters: {
    // 当前激活的组件
    getCurrentElement: (state) => {
      return state.components.find((c) => c.id === state.currentElement);
    },
  },
};
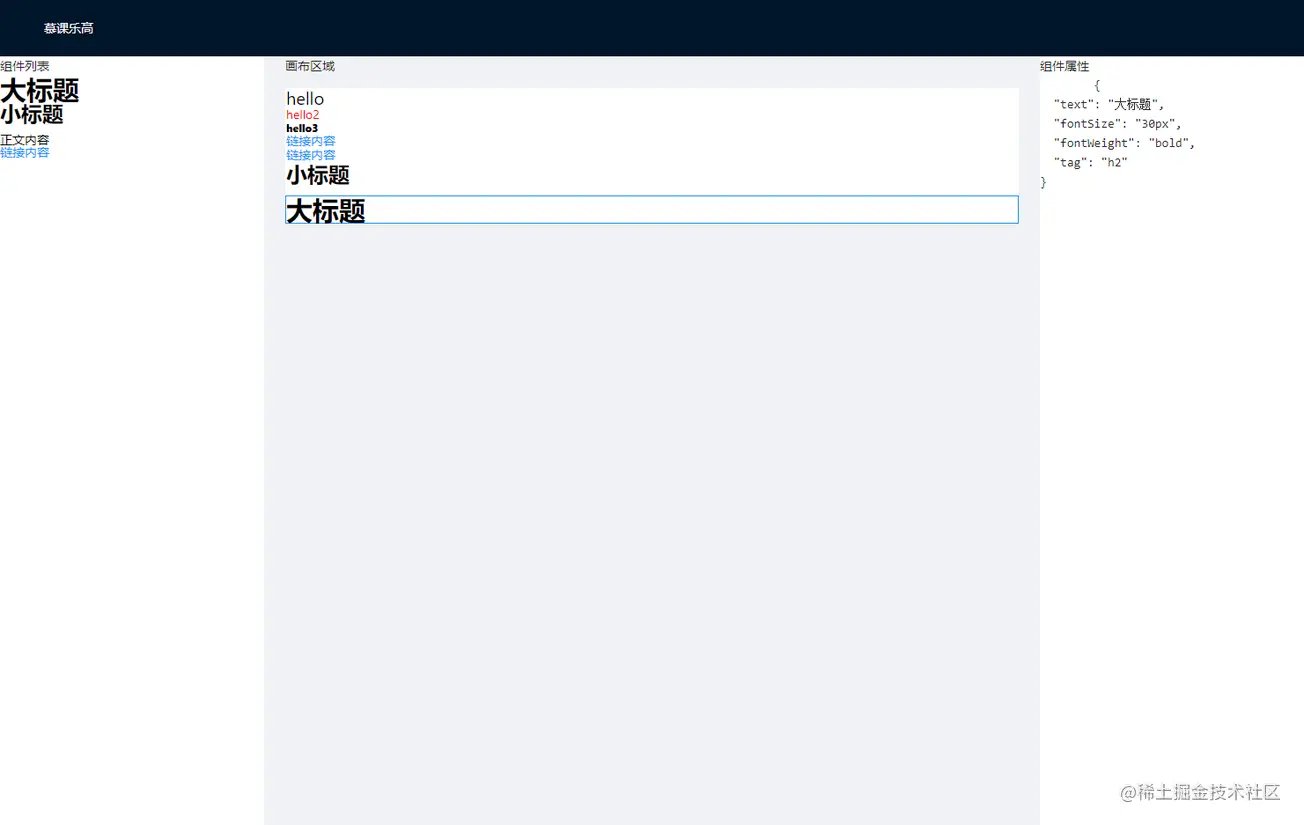
最终实现如下
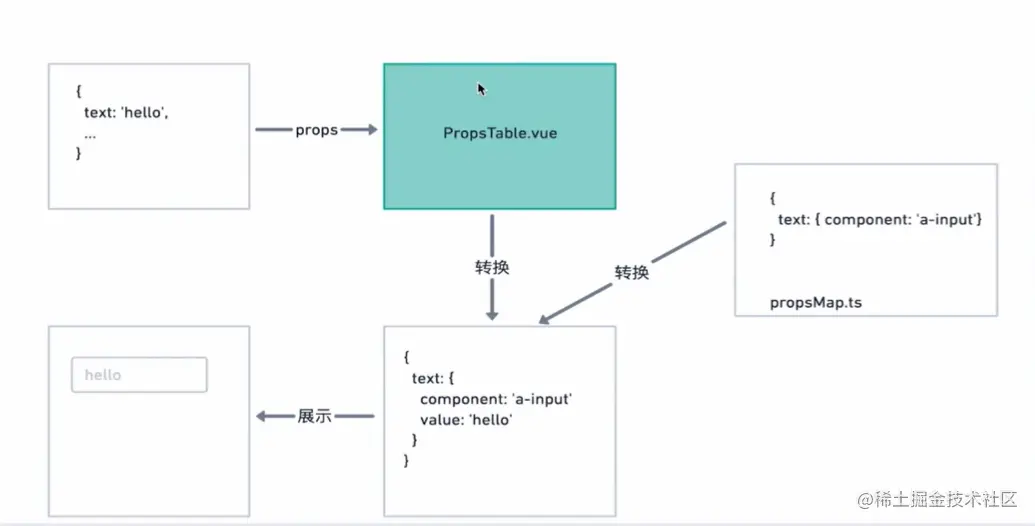
添加属性和表单的基础对应关系并展示
- 需要一个元素属性以及修改属性使用哪一种表单组件的映射表
propsMap.ts 。 - 表单部分
PropsTable.vue 接收到属性后,通过映射表获取对应关系。 - 在右侧的属性编辑区域渲染出属性对应的表单组件。
propsMap.ts
import type { TextComponentProps } from './defaultProps';

// 属性转化成表单 哪个属性使用哪个类型的组件去编辑
export interface PropsToForm {
  component: string;
  value?: string;
}

// 属性列表转化成表单列表
export type PropsToForms = {
  [p in keyof TextComponentProps]?: PropsToForm;
};

// 属性转化成表单的映射表 key:属性  value:使用的组件
export const mapPropsToForms: PropsToForms = {
  // 比如: text 属性,使用 a-input 这个组件去编辑
  text: {
    component: 'a-input',
  },
  color: {
    component: 'a-input',
  },
};
PropsTable.vue
<template>
  <div class="props-table">
    <div v-for="(item, index) in finalProps"
         class="prop-item"
         :key="index">
      <!-- 使用 antd 组件库中的组件 -->
      <component :value="item?.value"
                 :is="item?.component"></component>
    </div>
  </div>
</template>

<script setup lang="ts">
import { defineProps, computed } from 'vue';
import { mapPropsToForms } from '../propsMap'
import { reduce } from 'lodash-es'
import type { PropsToForms } from '../propsMap'
import type { PartialTextComponentProps } from '../defaultProps'
export interface Props {
  props: PartialTextComponentProps;
}
const props = defineProps<Props>()

// 获取属性表单映射列表
const finalProps = computed(() => {
  return reduce(props.props, (result, value, key) => {
    const newKey = key as keyof PartialTextComponentProps
    const item = mapPropsToForms[newKey]
    if (item) {
      item.value = value
      result[newKey] = item
    }
    return result
  }, {} as PropsToForms)
})

</script>
Editor.vue
<!-- 右侧组件属性编辑 -->
  <a-layout-sider width="300"
                  style="background:#fff"
                  class="setting-container">
    组件属性
    <props-table v-if="currentElement"
                 :props="currentElement?.props"></props-table>
  </a-layout-sider>
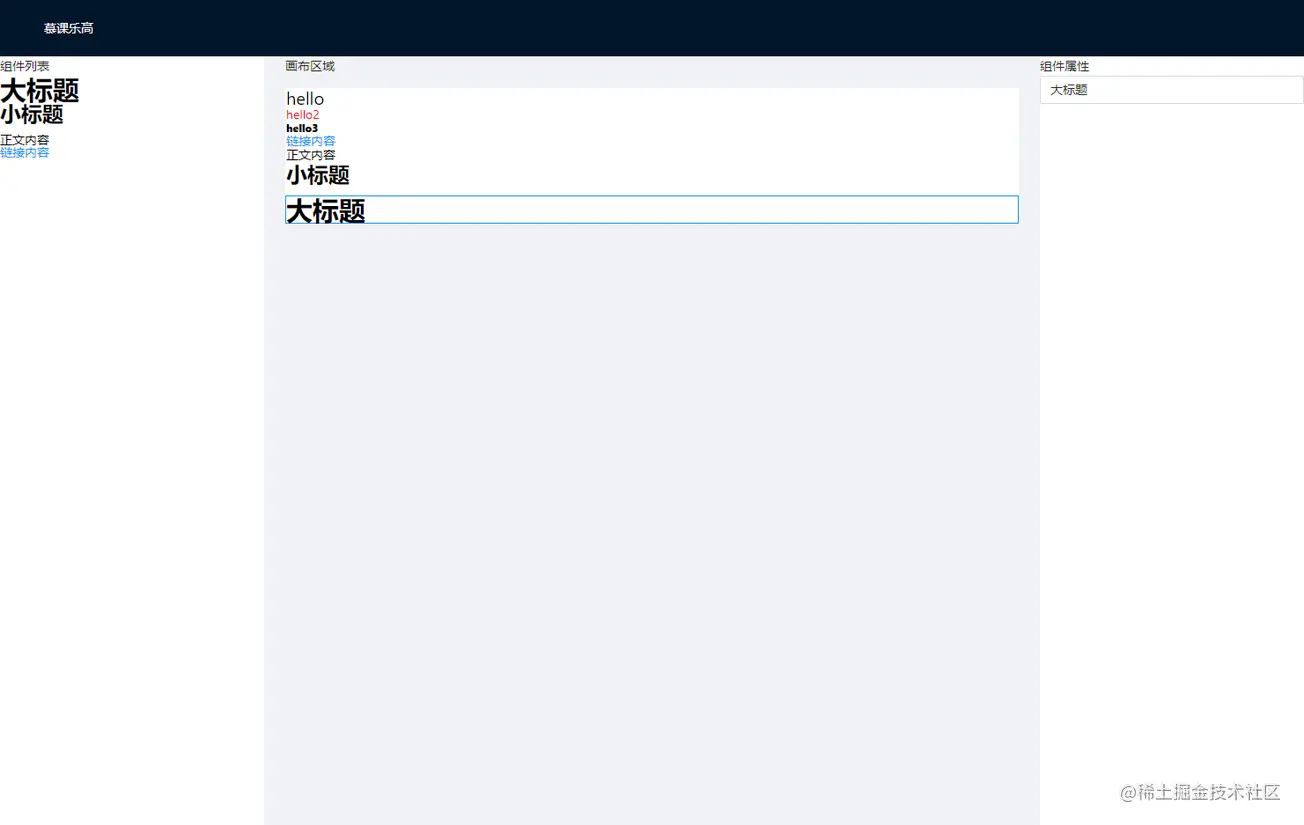
最终实现如下
添加更多对应关系并展示
- 每一个属性的编辑对应的是
antd 组件库的组件 - 需要给组件库的组件添加属性,如最大值,行数等
- 有的组件需要被其它组件包裹使用,需要兼容这种复杂组件
- 支持转换传入组件库属性的类型
- 支持自定义属性名称
editor.ts
修改一下初始数据
// 测试数据
const testComponents: ComponentData[] = [
  {
    id: uuidv4(),
    name: 'l-text',
    props: {
      text: 'hello',
      fontSize: '20px',
      tag: 'div',
      lineHeight: '1',
      color: '#ff3344',
      textAlign: 'left',
      fontFamily: '',
    },
  },
  {
    id: uuidv4(),
    name: 'l-text',
    props: {
      text: 'hello2',
      fontSize: '14px',
      tag: 'div',
      lineHeight: '2',
      color: '#3399',
    },
  },
  {
    id: uuidv4(),
    name: 'l-text',
    props: {
      text: 'hello3',
      tag: 'div',
      fontSize: '12px',
      fontWeight: '800',
      actionType: 'url',
      url: 'http://www.baidu.com',
    },
  },
];
propsMap.ts
import type { TextComponentProps } from './defaultProps';

// 属性转化成表单 哪个属性使用哪个类型的组件去编辑
export interface PropsToForm {
  component: string;
  value?: string;
  // 支持给组件库传入属性
  extraProps?: { [key: string]: any };
  text: string;
  // 支持组件包裹
  subComponent?: string;
  // 包裹的组件选项
  options?: {
    text: string;
    value: any;
  }[];
  // 支持类型转换
  initalTransform?: (v: any) => any;
  // 支持自定义属性名称
  valueProp?: string;
}

// 属性列表转化成表单列表
export type PropsToForms = {
  [p in keyof TextComponentProps]?: PropsToForm;
};

// 属性转化成表单的映射表 key:属性  value:使用的组件
export const mapPropsToForms: PropsToForms = {
  // 比如: text 属性,使用 a-input 这个组件去编辑
  text: {
    component: 'a-textarea',
    extraProps: {
      rows: 3,
    },
    text: '文本',
  },
  fontSize: {
    text: '字号',
    component: 'a-input-number',
    initalTransform: (v: string) => parseInt(v),
  },
  lineHeight: {
    text: '行高',
    component: 'a-slider',
    extraProps: {
      min: 0,
      max: 3,
      step: 0.1,
    },
    initalTransform: (v: string) => parseFloat(v),
  },
  textAlign: {
    component: 'a-radio-group',
    subComponent: 'a-radio-button',
    text: '对齐',
    options: [
      {
        value: 'left',
        text: '左',
      },
      {
        value: 'center',
        text: '中',
      },
      {
        value: 'right',
        text: '右',
      },
    ],
  },
  fontFamily: {
    component: 'a-select',
    subComponent: 'a-select-option',
    text: '字体',
    options: [
      {
        value: '',
        text: '无',
      },
      {
        value: '"SimSun","STSong',
        text: '宋体',
      },
      {
        value: '"SimHei","STHeiti',
        text: '黑体',
      },
    ],
  },
};
PropsTable.vue
<template>
  <div class="props-table">
    <div v-for="(item, index) in finalProps"
         class="prop-item"
         :key="index">
      <span class="label">{{ item.text }}</span>
      <div class="prop-component">
        <!-- 使用 antd 组件库中的组件 -->
        <component
                   v-if="item.valueProp"
                   :[item.valueProp]="item?.value"
                   :value="item?.value"
                   v-bind="item?.extraProps"
                   :is="item?.component">
                   <!--  判断有没有包裹子组件 -->
          <template v-if="item.options">
            <component :is="item.subComponent"
                       v-for="(option, key) in item.options"
                       :key="key"
                       :value="option.text">
              {{ option.text }}
            </component>
          </template>
        </component>
      </div>
    </div>
  </div>
</template>

// script
import { defineProps, computed } from 'vue';
import { mapPropsToForms } from '../propsMap'
import { reduce } from 'lodash-es'
import type { PropsToForms } from '../propsMap'
import type { PartialTextComponentProps } from '../defaultProps'
export interface Props {
  props: PartialTextComponentProps;
}
const props = defineProps<Props>()

// 获取属性表单映射列表
const finalProps = computed(() => {
  return reduce(props.props, (result, value, key) => {
    const newKey = key as keyof PartialTextComponentProps
    const item = mapPropsToForms[newKey]
    if (item) {
      // 判断有没有类型转换
      item.value = item.initalTransform ? item.initalTransform(value) : value
      item.valueProp = item.valueProp || 'value'
      result[newKey] = item
    }
    return result
  }, {} as Required<PropsToForms>)
})
最终实现如下
