[color=red]Spring整合JMS(一)——基于ActiveMQ实现 [/color][url]http://haohaoxuexi.iteye.com/blog/1893038[/url]
Spring整合JMS(二)——三种消息监听器 [url]http://haohaoxuexi.iteye.com/blog/1893676[/url]
Spring整合JMS(三)——MessageConverter介绍 [url]http://haohaoxuexi.iteye.com/blog/1900937[/url]
Spring整合JMS(四)——事务管理 [url]http://haohaoxuexi.iteye.com/blog/1983532[/url]
ActiveMQ使用笔记(三)ActiveMQ消息发送与接收 [url]http://www.huaishao8.com/config/activemq/143.html[/url]
1.1 JMS简介
JMS的全称是Java Message Service,即Java消息服务。它主要用于在生产者和消费者之间进行消息传递,生产者负责产生消息,而消费者负责接收消息。把它应用到实际的业务需求中的话我们可以在特定的时候利用生产者生成一消息,并进行发送,对应的消费者在接收到对应的消息后去完成对应的业务逻辑。对于消息的传递有两种类型,一种是点对点的,即一个生产者和一个消费者一一对应;另一种是发布/订阅模式,即一个生产者产生消息并进行发送后,可以由多个消费者进行接收。
[color=darkblue][b]1.2 Spring整合JMS[/b][/color]
对JMS做了一个简要介绍之后,接下来就讲一下Spring整合JMS的具体过程。JMS只是一个标准,真正在使用它的时候我们需要有它的具体实现,这里我们就使用Apache的activeMQ来作为它的实现。所使用的依赖利用Maven来进行管理,具体依赖如下:
<dependencies>
        <dependency>
            <groupId>junit</groupId>
            <artifactId>junit</artifactId>
            <version>4.10</version>
            <scope>test</scope>
        </dependency>
        <dependency>
            <groupId>org.springframework</groupId>
            <artifactId>spring-context</artifactId>
            <version>${spring-version}</version>
        </dependency>
        <dependency>
            <groupId>org.springframework</groupId>
            <artifactId>spring-jms</artifactId>
            <version>${spring-version}</version>
        </dependency>
        <dependency>
            <groupId>org.springframework</groupId>
            <artifactId>spring-test</artifactId>
            <version>${spring-version}</version>
        </dependency>
        <dependency>
            <groupId>javax.annotation</groupId>
            <artifactId>jsr250-api</artifactId>
            <version>1.0</version>
        </dependency>
        <dependency>
            <groupId>org.apache.activemq</groupId>
            <artifactId>activemq-core</artifactId>
            <version>5.7.0</version>
        </dependency>
</dependencies>
[color=darkblue][b]1.2.1 activeMQ准备[/b][/color]
既然是使用的apache的activeMQ作为JMS的实现,那么首先我们应该到apache官网上下载activeMQ(http://activemq.apache.org/download.html),进行解压后运行其bin目录下面的activemq.bat文件启动activeMQ。
1.2.2配置ConnectionFactory
ConnectionFactory是用于产生到JMS服务器的链接的,Spring为我们提供了多个ConnectionFactory,有SingleConnectionFactory和CachingConnectionFactory。SingleConnectionFactory对于建立JMS服务器链接的请求会一直返回同一个链接,并且会忽略Connection的close方法调用。CachingConnectionFactory继承了SingleConnectionFactory,所以它拥有SingleConnectionFactory的所有功能,同时它还新增了缓存功能,它可以缓存Session、MessageProducer和MessageConsumer。这里我们使用SingleConnectionFactory来作为示例。
<bean id="connectionFactory" class="org.springframework.jms.connection.SingleConnectionFactory"/>
这样就定义好产生JMS服务器链接的ConnectionFactory了吗?答案是非也。Spring提供的ConnectionFactory只是Spring用于管理ConnectionFactory的,真正产生到JMS服务器链接的ConnectionFactory还得是由JMS服务厂商提供,并且需要把它注入到Spring提供的ConnectionFactory中。我们这里使用的是ActiveMQ实现的JMS,所以在我们这里真正的可以产生Connection的就应该是由ActiveMQ提供的ConnectionFactory。所以定义一个ConnectionFactory的完整代码应该如下所示:
<!-- 真正可以产生Connection的ConnectionFactory,由对应的 JMS服务厂商提供-->
<bean id="targetConnectionFactory" class="org.apache.activemq.ActiveMQConnectionFactory">
    <property name="brokerURL" value="tcp://localhost:61616"/>
</bean>

<!-- Spring用于管理真正的ConnectionFactory的ConnectionFactory -->
<bean id="connectionFactory" class="org.springframework.jms.connection.SingleConnectionFactory">
    <!-- 目标ConnectionFactory对应真实的可以产生JMS Connection的ConnectionFactory -->
    <property name="targetConnectionFactory" ref="targetConnectionFactory"/>
</bean>
ActiveMQ为我们提供了一个PooledConnectionFactory,通过往里面注入一个ActiveMQConnectionFactory可以用来将Connection、Session和MessageProducer池化,这样可以大大的减少我们的资源消耗。当使用PooledConnectionFactory时,我们在定义一个ConnectionFactory时应该是如下定义:
<!-- 真正可以产生Connection的ConnectionFactory,由对应的 JMS服务厂商提供-->
<bean id="targetConnectionFactory" class="org.apache.activemq.ActiveMQConnectionFactory">
    <property name="brokerURL" value="tcp://localhost:61616"/>
</bean>

<bean id="pooledConnectionFactory" class="org.apache.activemq.pool.PooledConnectionFactory">
    <property name="connectionFactory" ref="targetConnectionFactory"/>
    <property name="maxConnections" value="10"/>
</bean>

<bean id="connectionFactory" class="org.springframework.jms.connection.SingleConnectionFactory">
    <property name="targetConnectionFactory" ref="pooledConnectionFactory"/>
</bean>
[color=darkblue][b]1.2.3配置生产者[/b][/color]
配置好ConnectionFactory之后我们就需要配置生产者。生产者负责产生消息并发送到JMS服务器,这通常对应的是我们的一个业务逻辑服务实现类。但是我们的服务实现类是怎么进行消息的发送的呢?这通常是利用Spring为我们提供的JmsTemplate类来实现的,所以配置生产者其实最核心的就是配置进行消息发送的JmsTemplate。对于消息发送者而言,它在发送消息的时候要知道自己该往哪里发,为此,我们在定义JmsTemplate的时候需要往里面注入一个Spring提供的ConnectionFactory对象。
<!-- Spring提供的JMS工具类,它可以进行消息发送、接收等 -->
<bean id="jmsTemplate" class="org.springframework.jms.core.JmsTemplate">
    <!-- 这个connectionFactory对应的是我们定义的Spring提供的那个ConnectionFactory对象 -->
    <property name="connectionFactory" ref="connectionFactory"/>
</bean>
在真正利用JmsTemplate进行消息发送的时候,我们需要知道消息发送的目的地,即destination。在Jms中有一个用来表示目的地的Destination接口,它里面没有任何方法定义,只是用来做一个标识而已。当我们在使用JmsTemplate进行消息发送时没有指定destination的时候将使用默认的Destination。默认Destination可以通过在定义jmsTemplate bean对象时通过属性defaultDestination或defaultDestinationName来进行注入,defaultDestinationName对应的就是一个普通字符串。在ActiveMQ中实现了两种类型的Destination,一个是点对点的ActiveMQQueue,另一个就是支持订阅/发布模式的ActiveMQTopic。在定义这两种类型的Destination时我们都可以通过一个name属性来进行构造,如:
<!--这个是队列目的地,点对点的-->
<bean id="queueDestination" class="org.apache.activemq.command.ActiveMQQueue">
    <constructor-arg>
        <value>queue</value>
    </constructor-arg>
</bean>
<!--这个是主题目的地,一对多的-->
<bean id="topicDestination" class="org.apache.activemq.command.ActiveMQTopic">
    <constructor-arg value="topic"/>
</bean>
假设我们定义了一个ProducerService,里面有一个向Destination发送纯文本消息的方法sendMessage,那么我们的代码就大概是这个样子:
package com.tiantian.springintejms.service.impl;

import javax.annotation.Resource;
import javax.jms.Destination;
import javax.jms.JMSException;
import javax.jms.Message;
import javax.jms.Session;

import org.springframework.jms.core.JmsTemplate;
import org.springframework.jms.core.MessageCreator;
import org.springframework.stereotype.Component;

import com.tiantian.springintejms.service.ProducerService;

@Component
public class ProducerServiceImpl implements ProducerService {

    private JmsTemplate jmsTemplate;

    public void sendMessage(Destination destination, final String message) {
        System.out.println("---------------生产者发送消息-----------------");
        System.out.println("---------------生产者发了一个消息:" + message);
        jmsTemplate.send(destination, new MessageCreator() {
            public Message createMessage(Session session) throws JMSException {
                return session.createTextMessage(message);
            }
        });
    }

    public JmsTemplate getJmsTemplate() {
        returnjmsTemplate;
    }

    @Resource
    public void setJmsTemplate(JmsTemplate jmsTemplate) {
        this.jmsTemplate = jmsTemplate;
    }

}
我们可以看到在sendMessage方法体里面我们是通过jmsTemplate来发送消息到对应的Destination的。到此,我们生成一个简单的文本消息并把它发送到指定目的地Destination的生产者就配置好了。
[color=darkblue][b]1.2.4配置消费者[/b][/color]
生产者往指定目的地Destination发送消息后,接下来就是消费者对指定目的地的消息进行消费了。那么消费者是如何知道有生产者发送消息到指定目的地Destination了呢?这是通过Spring为我们封装的消息监听容器MessageListenerContainer实现的,它负责接收信息,并把接收到的信息分发给真正的MessageListener进行处理。每个消费者对应每个目的地都需要有对应的MessageListenerContainer。对于消息监听容器而言,除了要知道监听哪个目的地之外,还需要知道到哪里去监听,也就是说它还需要知道去监听哪个JMS服务器,这是通过在配置MessageConnectionFactory的时候往里面注入一个ConnectionFactory来实现的。所以我们[color=red]在配置一个MessageListenerContainer的时候有三个属性必须指定,
一个是表示从哪里监听的ConnectionFactory;
一个是表示监听什么的Destination;
一个是接收到消息以后进行消息处理的MessageListener。[/color]
Spring一共为我们提供了两种类型的MessageListenerContainer,SimpleMessageListenerContainer和DefaultMessageListenerContainer。
SimpleMessageListenerContainer会在一开始的时候就创建一个会话session和消费者Consumer,并且会使用标准的JMS MessageConsumer.setMessageListener()方法注册监听器让JMS提供者调用监听器的回调函数。它不会动态的适应运行时需要和参与外部的事务管理。兼容性方面,它非常接近于独立的JMS规范,但一般不兼容Java EE的JMS限制。
大多数情况下我们还是使用的DefaultMessageListenerContainer,跟SimpleMessageListenerContainer相比,DefaultMessageListenerContainer会动态的适应运行时需要,并且能够参与外部的事务管理。它很好的平衡了对JMS提供者要求低、先进功能如事务参与和兼容Java EE环境。
定义处理消息的MessageListener
要定义处理消息的MessageListener我们只需要实现JMS规范中的MessageListener接口就可以了。MessageListener接口中只有一个方法onMessage方法,当接收到消息的时候会自动调用该方法。
package com.tiantian.springintejms.listener;

import javax.jms.JMSException;
import javax.jms.Message;
import javax.jms.MessageListener;
import javax.jms.TextMessage;

public class ConsumerMessageListener implements MessageListener {

    public void onMessage(Message message) {
        //这里我们知道生产者发送的就是一个纯文本消息,所以这里可以直接进行强制转换
        TextMessage textMsg = (TextMessage) message;
        System.out.println("接收到一个纯文本消息。");
        try {
            System.out.println("消息内容是:" + textMsg.getText());
        } catch (JMSException e) {
            e.printStackTrace();
        }
    }

}
有了MessageListener之后我们就可以在Spring的配置文件中配置一个消息监听容器了。
<!--这个是队列目的地-->
<bean id="queueDestination" class="org.apache.activemq.command.ActiveMQQueue">
    <constructor-arg>
        <value>queue</value>
    </constructor-arg>
</bean>
<!-- 消息监听器 -->
<bean id="consumerMessageListener" class="com.tiantian.springintejms.listener.ConsumerMessageListener"/>

<!-- 消息监听容器 -->
<bean id="jmsContainer"        class="org.springframework.jms.listener.DefaultMessageListenerContainer">
    <property name="connectionFactory" ref="connectionFactory" />
    <property name="destination" ref="queueDestination" />
    <property name="messageListener" ref="consumerMessageListener" />
</bean>
我们可以看到我们定义了一个名叫queue的ActiveMQQueue目的地,我们的监听器就是监听了发送到这个目的地的消息。
至此我们的生成者和消费者都配置完成了,这也就意味着我们的整合已经完成了。这个时候完整的Spring的配置文件应该是这样的:
<?xml version="1.0" encoding="UTF-8"?>
<beans xmlns="http://www.springframework.org/schema/beans"
    xmlns:xsi="http://www.w3.org/2001/XMLSchema-instance" xmlns:context="http://www.springframework.org/schema/context"
    xmlns:jms="http://www.springframework.org/schema/jms"
    xsi:schemaLocation="http://www.springframework.org/schema/beans
     http://www.springframework.org/schema/beans/spring-beans-3.0.xsd
     http://www.springframework.org/schema/context
     http://www.springframework.org/schema/context/spring-context-3.0.xsd
    http://www.springframework.org/schema/beans http://www.springframework.org/schema/beans/spring-beans-3.0.xsd
    http://www.springframework.org/schema/jms http://www.springframework.org/schema/jms/spring-jms-3.0.xsd">

    <context:component-scan base-package="com.tiantian" />

    <!-- Spring提供的JMS工具类,它可以进行消息发送、接收等 -->
    <bean id="jmsTemplate" class="org.springframework.jms.core.JmsTemplate">
        <!-- 这个connectionFactory对应的是我们定义的Spring提供的那个ConnectionFactory对象 -->
        <property name="connectionFactory" ref="connectionFactory"/>
    </bean>

    <!-- 真正可以产生Connection的ConnectionFactory,由对应的 JMS服务厂商提供-->
    <bean id="targetConnectionFactory" class="org.apache.activemq.ActiveMQConnectionFactory">
        <property name="brokerURL" value="tcp://localhost:61616"/>
    </bean>

    <!-- Spring用于管理真正的ConnectionFactory的ConnectionFactory -->
    <bean id="connectionFactory" class="org.springframework.jms.connection.SingleConnectionFactory">
        <!-- 目标ConnectionFactory对应真实的可以产生JMS Connection的ConnectionFactory -->
        <property name="targetConnectionFactory" ref="targetConnectionFactory"/>
    </bean>

    <!--这个是队列目的地-->
    <bean id="queueDestination" class="org.apache.activemq.command.ActiveMQQueue">
        <constructor-arg>
            <value>queue</value>
        </constructor-arg>
    </bean>
    <!-- 消息监听器 -->
    <bean id="consumerMessageListener" class="com.tiantian.springintejms.listener.ConsumerMessageListener"/>
    <!-- 消息监听容器 -->
    <bean id="jmsContainer"
        class="org.springframework.jms.listener.DefaultMessageListenerContainer">
        <property name="connectionFactory" ref="connectionFactory" />
        <property name="destination" ref="queueDestination" />
        <property name="messageListener" ref="consumerMessageListener" />
    </bean>
</beans>
接着我们来测试一下,看看我们的整合是否真的成功了,测试代码如下:
package com.tiantian.springintejms.test;

import javax.jms.Destination;

import org.junit.Test;
import org.junit.runner.RunWith;
import org.springframework.beans.factory.annotation.Autowired;
import org.springframework.beans.factory.annotation.Qualifier;
import org.springframework.test.context.ContextConfiguration;
import org.springframework.test.context.junit4.SpringJUnit4ClassRunner;
import com.tiantian.springintejms.service.ProducerService;

@RunWith(SpringJUnit4ClassRunner.class)
@ContextConfiguration("/applicationContext.xml")
public class ProducerConsumerTest {

    @Autowired
    private ProducerService producerService;
    @Autowired
    @Qualifier("queueDestination")
    private Destination destination;

    @Test
    public void testSend() {
        for (int i=0; i<2; i++) {
            producerService.sendMessage(destination, "你好,生产者!这是消息:" + (i+1));
        }
    }

}
在上面的测试代码中我们利用生产者发送了两个消息,正常来说,消费者应该可以接收到这两个消息。运行测试代码后控制台输出如下:
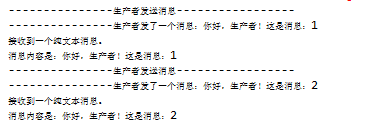
看,控制台已经进行了正确的输出,这说明我们的整合确实是已经成功了。


