TodoApp 切换全选
点击全选按钮,修改全部任务项的状态,并且按钮的样式随着全部任务项的选中状态改变。
编写测试用例
test('Toggle All', async () => {
  const toggleAll = wrapper.findComponent('input[data-testid="toggle-all"]')

  // 选中全选按钮
  await toggleAll.setChecked()

  // 断言所有的任务都被选中
  wrapper.vm.todos.forEach(todo => {
    expect(todo.done).toBeTruthy()
  })

  // 取消完成状态
  await toggleAll.setChecked(false)
  wrapper.vm.todos.forEach(todo => {
    expect(todo.done).toBeFalsy()
  })
})

test('Toggle All State', async () => {
  const toggleAll = wrapper.findComponent('input[data-testid="toggle-all"]')

  // 让所有任务都变成完成状态
  wrapper.vm.todos.forEach(todo => {
    todo.done = true
  })
  // 等待视图更新
  await wrapper.vm.$nextTick()
  // 断言 toggleAll 选中
  expect(toggleAll.element.checked).toBeTruthy()

  // 取消某个任务未完成,断言 toggleAll 未选中
  wrapper.vm.todos[0].done = false
  await wrapper.vm.$nextTick()
  expect(toggleAll.element.checked).toBeFalsy()

  // 当没有任务的时候,断言 toggleAll 未选中
  await wrapper.setData({
    todos: [],
  })
  expect(toggleAll.element.checked).toBeFalsy()
})
完善组件功能
// template
<input
  id="toggle-all"
  v-model="toggleAll"
  data-testid="toggle-all"
  class="toggle-all"
  type="checkbox"
/>

// js
computed: {
  toggleAll: {
    get() {
      // 获取 toggleAll 的选中状态
      return this.todos.length && this.todos.every(t => t.done)
    },
    set(checked) {
      this.todos.forEach(todo => {
        todo.done = checked
      })
    },
  },
},
TodoFooter 未完成任务数量
编写测试用例
// src\components\TodoApp\__tests__\TodoFooter.js
import { shallowMount } from '@vue/test-utils'
import TodoFooter from '@/components/TodoApp/TodoFooter'

describe('TodoFooter.js', () => {
  /** @type {import('@vue/test-utils').Wrapper} */
  let wrapper = null

  beforeEach(async () => {
    const todos = [
      { id: 1, text: 'eat', done: false },
      { id: 2, text: 'play', done: true },
      { id: 3, text: 'sleep', done: false },
    ]
    wrapper = shallowMount(TodoFooter, {
      propsData: {
        todos,
      },
    })
  })

  test('Done Todos Count', () => {
    const count = wrapper.vm.todos.filter(t => !t.done).length
    const countEl = wrapper.findComponent('[data-testid="done-todos-count"]')

    expect(Number.parseInt(countEl.text())).toBe(count)
  })
})
完善组件功能
<!-- src\components\TodoApp\TodoFooter.vue -->
<template>
  <footer class="footer">
    <!-- This should be `0 items left` by default -->
    <span class="todo-count"><strong data-testid="done-todos-count">{{ doneTodosCount }}</strong> item left</span>
    <!-- Remove this if you don't implement routing -->
    <ul class="filters">
      <li>
        <a class="selected" href="#/">All</a>
      </li>
      <li>
        <a href="#/active">Active</a>
      </li>
      <li>
        <a href="#/completed">Completed</a>
      </li>
    </ul>
    <!-- Hidden if no completed items are left ↓ -->
    <button class="clear-completed">Clear completed</button>
  </footer>
</template>

<script>
export default {
  name: 'TodoFooter',
  props: {
    todos: {
      type: Array,
      required: true,
    },
  },
  computed: {
    doneTodosCount() {
      return this.todos.filter(t => !t.done).length
    },
  },
}
</script>
TodoFooter 清除已完成任务按钮显示状态
编写测试用例
test('Clear Completed Show', () => {
  // beforeEach 中初始化的数据是 props
  // 而 props 是不能被子组件直接修改的
  // 所以这里要单独初始化数据
  const todos = [
    { id: 1, text: 'eat', done: false },
    { id: 2, text: 'play', done: false },
    { id: 3, text: 'sleep', done: false },
  ]
  wrapper = shallowMount(TodoFooter, {
    propsData: {
      todos,
    },
  })

  const button = wrapper.findComponent('[data-testid="clear-completed"]')

  expect(button.exists()).toBeFalsy()
})
完善组件功能
// template
<button
  v-if="isClearCompletedShow"
  data-testid="clear-completed"
  class="clear-completed"
  @click="$emit('clear-completed')"
>
  Clear completed
</button>

// js
computed: {
  ...
  isClearCompletedShow() {
    return this.todos.some(t => t.done)
  },
},
清除已完成任务
TodoFooter
编写测试用例
test('Clear Completed', async () => {
  const button = wrapper.findComponent('[data-testid="clear-completed"]')

  await button.trigger('click')

  expect(wrapper.emitted()['clear-completed']).toBeTruthy()
})
完善组件功能
// template
<button
  v-if="isClearCompletedShow"
  data-testid="clear-completed"
  class="clear-completed"
  @click="$emit('clear-completed')"
>
  Clear completed
</button>
TodoApp
编写测试用例
test('Clear All Completed', async () => {
  wrapper.vm.handleClearCompleted()
  await wrapper.vm.$nextTick()

  expect(wrapper.vm.todos).toEqual([
    { id: 1, text: 'eat', done: false },
    { id: 3, text: 'sleep', done: false },
  ])
})
完善组件功能
// template
<TodoFooter
  :todos="todos"
  @clear-completed="handleClearCompleted"
/>

// js
methods: {
  ...
  handleClearCompleted() {
    // 清除所有已完成的任务项
    this.todos = this.todos.filter(t => !t.done)
  },
},
TodoApp 数据筛选($route)
根据路由路径筛选任务项,需要配合 Vue Router 使用:
- 可以创建一个局部的 Vue(localVue),为其注册 vue-router,只对这个局部的 Vue 生效
- 不过这样又会增加外部依赖(vue-router 实例),并且每次测试都要加载 vue-router 还会存在性能损耗
- 建议伪造(mock)
$route和$router
将组件配置为路由
<!-- src\App.vue -->
<template>
  <div id="app">
    <!-- <TodoApp /> -->
    <<router-view />
  </div>
</template>

<script>
// import TodoApp from '@/components/TodoApp'

export default {
  name: 'App',
  // components: { TodoApp },
}
</script>
// src\router\index.js
import Vue from 'vue'
import VueRouter from 'vue-router'
import TodoApp from '@/components/TodoApp'

Vue.use(VueRouter)

const routes = [
  {
    path: '/',
    component: TodoApp,
  },
  {
    path: '/active',
    component: TodoApp,
  },
  {
    path: '/completed',
    component: TodoApp,
  },
]

const router = new VueRouter({
  routes,
})

export default router
编写测试用例
beforeEach(async () => {
  const $route = {
    path: '/',
  }

  wrapper = shallowMount(TodoApp, {
    mocks: {
    // 伪造 $route
      $route,
    },
  })

  const todos = [
    { id: 1, text: 'eat', done: false },
    { id: 2, text: 'play', done: true },
    { id: 3, text: 'sleep', done: false },
  ]

  // 初始化默认数据,并等待视图更新
  await wrapper.setData({
    todos,
  })
})

...

test('Filter Todos', async () => {
  // 将路由导航到 /
  wrapper.vm.$route.path = '/'
  await wrapper.vm.$nextTick()
  // 断言 filterTodos = 所有的任务
  expect(wrapper.vm.filterTodos).toEqual([
    { id: 1, text: 'eat', done: false },
    { id: 2, text: 'play', done: true },
    { id: 3, text: 'sleep', done: false },
  ])

  // 将路由导航到 /active
  wrapper.vm.$route.path = '/active'
  await wrapper.vm.$nextTick()
  // 断言 filterTodos = 所有的未完成任务
  expect(wrapper.vm.filterTodos).toEqual([
    { id: 1, text: 'eat', done: false },
    { id: 3, text: 'sleep', done: false },
  ])

  // 将路由导航到 /completed
  wrapper.vm.$route.path = '/completed'
  await wrapper.vm.$nextTick()
  // 断言 filterTodos = 所有的已完成任务
  expect(wrapper.vm.filterTodos).toEqual([
    { id: 2, text: 'play', done: true },
  ])
})
完善组件功能
// template
<TodoItem
  v-for="todo in filterTodos"
  :key="todo.id"
  :todo="todo"
  @delete-todo="handleDeleteTodo"
  @edit-todo="handleEditTodo"
/>

// js
computed: {
  ...
  // 过滤数据
  filterTodos() {
    // 获取路由路径
    const path = this.$route.path

    // 根据路由路径过滤数据
    switch (path) {
      // 所有未完成任务
      case '/active':
        return this.todos.filter(t => !t.done)
      // 所有已完成任务
      case '/completed':
        return this.todos.filter(t => t.done)
      // 所有任务列表
      default:
        return this.todos
    }
  },
},
TodoFooter 高亮导航链接(router-link)
完善导航高亮功能
因为要使用路由导航,可以先实现功能,再编写测试
<ul class="filters">
  <li>
    <router-link to="/" exact>All</router-link>
  </li>
  <li>
    <router-link to="/active">Active</router-link>
  </li>
  <li>
    <router-link to="/completed">Completed</router-link>
  </li>
</ul>
设置路由高亮样式:
// src\router\index.js
...
const router = new VueRouter({
  routes,
  linkActiveClass: 'selected',
})

export default router
编写测试用例
现在 TodoFooter 组件使用了 <router-link> 组件,就需要引入 Vue Router 了,否则运行测试会报错组件未注册。
测试的行为可以是只有需要高亮的导航链接有 selected classname。
// src\components\TodoApp\__tests__\TodoFooter.js
import { shallowMount, createLocalVue, mount } from '@vue/test-utils'
import TodoFooter from '@/components/TodoApp/TodoFooter'
import VueRouter from 'vue-router'

// 创建局部 Vue
const localVue = createLocalVue()
// 为局部 Vue 注册 VueRouter,不影响其他 Vue
localVue.use(VueRouter)
const router = new VueRouter({
  linkActiveClass: 'selected',
})

describe('TodoFooter.js', () => {
  /** @type {import('@vue/test-utils').Wrapper} */
  let wrapper = null

  beforeEach(async () => {
    const todos = [
      { id: 1, text: 'eat', done: false },
      { id: 2, text: 'play', done: true },
      { id: 3, text: 'sleep', done: false },
    ]

    // 注意:使用原来的 shallowMount 不会渲染 router-link 子组件
    // 这里需改用 mount
    wrapper = mount(TodoFooter, {
      propsData: {
        todos,
      },
      // 挂载局部 Vue 和 router
      localVue,
      router,
    })
  })

  test('Done Todos Count', () => {
    ...
  })

  test('Clear Completed Show', () => {
    ...
    wrapper = shallowMount(TodoFooter, {
      propsData: {
        todos,
      },
      // 挂载局部 Vue 和 router
      localVue,
      router,
    })

    ...
  })

  test('Clear Completed', async () => {
    ...
  })

  test('Router Link ActiveClass', async () => {
    // findAllComponents 返回 WrapperArray,它并不是一个数组类型
    // 需要使用内部方法来访问
    const links = wrapper.findAllComponents({ name: 'RouterLink' })

    // 切换路由
    router.push('/completed')
    await localVue.nextTick()

    for (let i = 0; i < links.length; i++) {
      const link = links.at(i)
      if (link.vm.to === '/completed') {
        expect(link.classes()).toContain('selected')
      } else {
        expect(link.classes()).not.toContain('selected')
      }
    }

    // 切换路由
    router.push('/active')
    await localVue.nextTick()

    for (let i = 0; i < links.length; i++) {
      const link = links.at(i)
      if (link.vm.to === '/active') {
        expect(link.classes()).toContain('selected')
      } else {
        expect(link.classes()).not.toContain('selected')
      }
    }

    // 切换路由
    router.push('/')
    await localVue.nextTick()

    for (let i = 0; i < links.length; i++) {
      const link = links.at(i)
      if (link.vm.to === '/') {
        expect(link.classes()).toContain('selected')
      } else {
        expect(link.classes()).not.toContain('selected')
      }
    }
  })
})
快照测试
现在这个应用的业务功能基本已经开发完成了,之后希望在这些组件开发的比较稳定的时候(样式、结构不再需要做大量改动),可以给它们加上快照测试,可以保证在无意中修改了 UI 结构时及时的测试出来。
编写测试用例
// src\components\TodoApp\__tests__\TodoHeader.js
import { shallowMount } from '@vue/test-utils'
import TodoHeader from '@/components/TodoApp/TodoHeader'

describe('TodoHeader.vue', () => {
  // 将渲染组件放到 beforeEach
  let wrapper = null

  beforeEach(() => {
    wrapper = shallowMount(TodoHeader)
  })

  test('New todo', async () => {
    // 可以给元素添加一个专门用于测试的 `data-testid`,方便测试的时候获取这个元素
    const input = wrapper.findComponent('input[data-testid="new-todo"]')
    const text = 'play'

    ...
  })

  test('snapshot', () => {
    expect(wrapper.html()).toMatchSnapshot()
  })
})
默认会在编写了快照测试的测试文件所在目录下创建一个 __snapshots__ 文件夹,存放快照文件,例如 src\components\TodoApp\__tests__\__snapshots__\TodoHeader.js.snap。
下面给其他组件添加快照测试:
// src\components\TodoApp\__tests__\TodoApp.js
// src\components\TodoApp\__tests__\TodoFooter.js
// src\components\TodoApp\__tests__\TodoItem.js

// 添加
test('snapshot', () => {
  expect(wrapper.html()).toMatchSnapshot()
})
更新快照
在监视模式下,如果快照测试失败,且修改是有意的,可以使用 u 命令更新所有快照文件。
也可以使用 i 命令,进入交互式快照模式,它会重新执行测试用例,每个测试失败后都会询问如何处理,然后再执行下一个:
u更新当前测试的快照文件s跳过当前测试q退出交互式快照模式Enter重新运行当前测试r重新运行交互式快照模式
配置代码覆盖率统计
可能有的代码并没有测试,在运行的过程中可能会有 BUG,所以最好让测试覆盖率保持在 80% 以上。
建议新增一个脚本运行 Jest 测试,使用命令参数指定统计代码覆盖率,避免开发时实时统计消耗性能:
"scripts": {
  ...
  "coverage": "vue-cli-service test:unit --coverage"
},
npm run coverage 运行脚本会在命令行打印统计结果
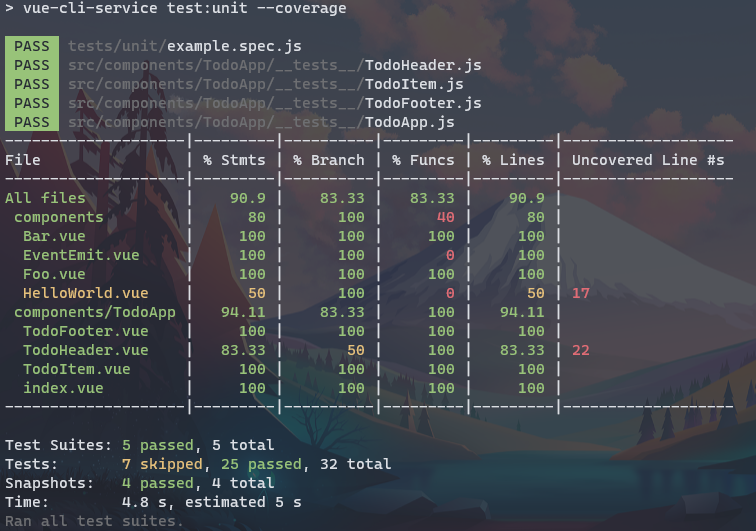
并在项目根目录生成 coverage 文件夹,存放覆盖率报告,可以打开 coverage\lcov-report\index.html 在页面上查看:
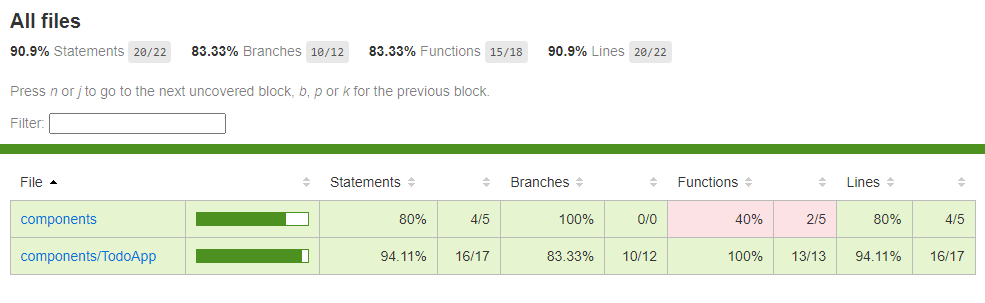
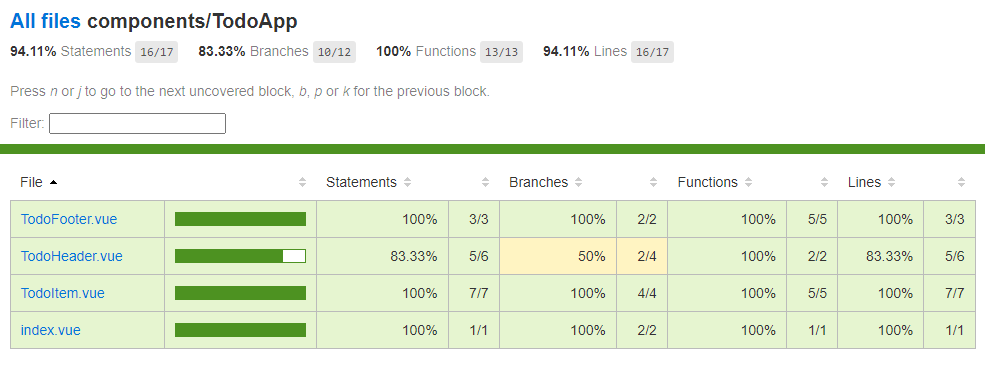
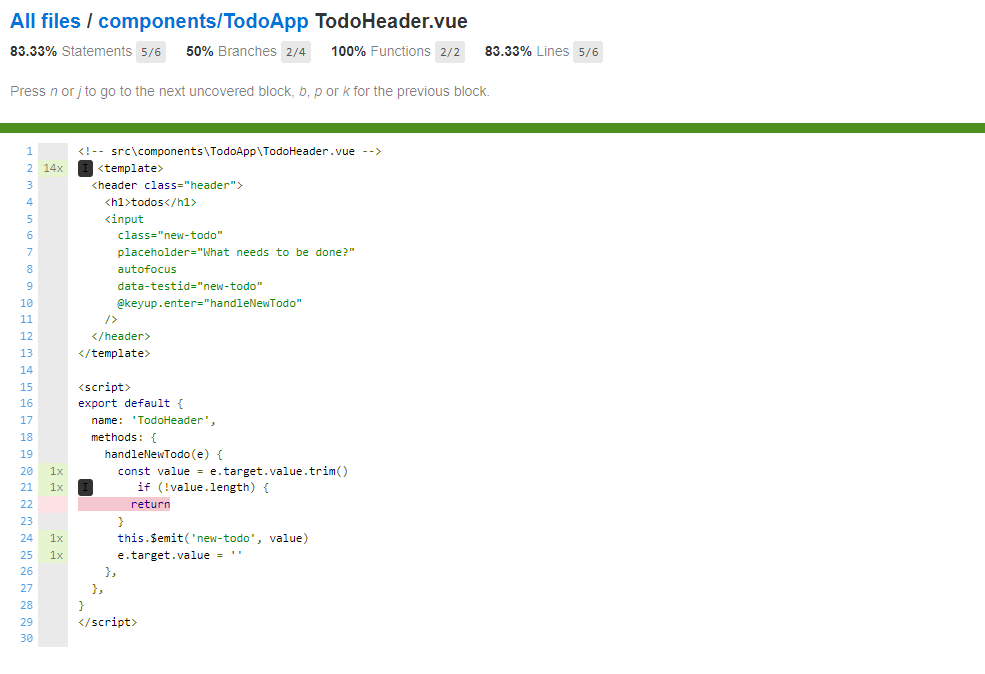
可以看到 TodoHeader 组件中有一个 if 分支未测试,补充测试用例:
// src\components\TodoApp\__tests__\TodoHeader.js
test('New todo with empty text', async () => {
  const input = wrapper.findComponent('input[data-testid="new-todo"]')
  const text = ''
  await input.setValue(text)
  await input.trigger('keyup.enter')
  // 断言不会对外发布自定义事件
  expect(wrapper.emitted()['new-todo']).toBeFalsy()
})
npm run coverage 重新统计测试覆盖率,刷新报告页面重新查看 TodoHeader 的覆盖率。
上传测试覆盖率到 codecov
通常情况下不建议将测试覆盖率报告保存在项目仓库中,在 .gitignore 中添加忽略 coverage 目录:
# .gitignore
coverage
可以将报告上传到专业的报告分析平台,例如 Codecov。
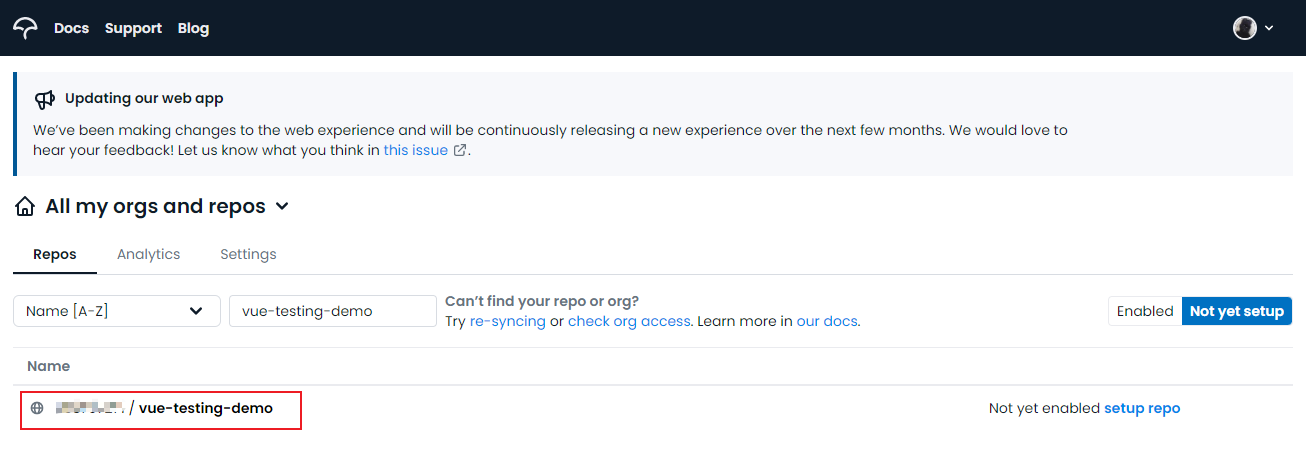
打开 Codecov 官网,绑定 Github 账号登录之后,选择要展示测试覆盖率的仓库
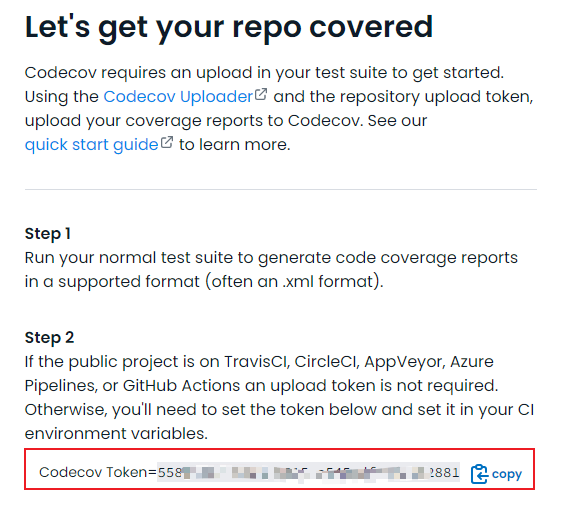
拷贝 Codecov token(未上传过报告的仓库默认会显示入门指南,Step2 中有 token;上传过报告的仓库可以从 Settings 面板复制 token)
然后安装 Codecov:
npm i -D codecov
# 或者安装到全局
# npm i -g codecov
生成测试覆盖率报告:
# coverage 是运行 `jest -- coverrage` 的脚本
npm run coverage
将测试覆盖率报告上传到 codecov:
# 运行项目安装的 codecov 上传报告
npx codecov --token=xxx
# 使用全局安装的 codecov
codecov --token=xxx
重新查看 Codecov 可以看到报告分析,同样包括每个组件的测试覆盖率。

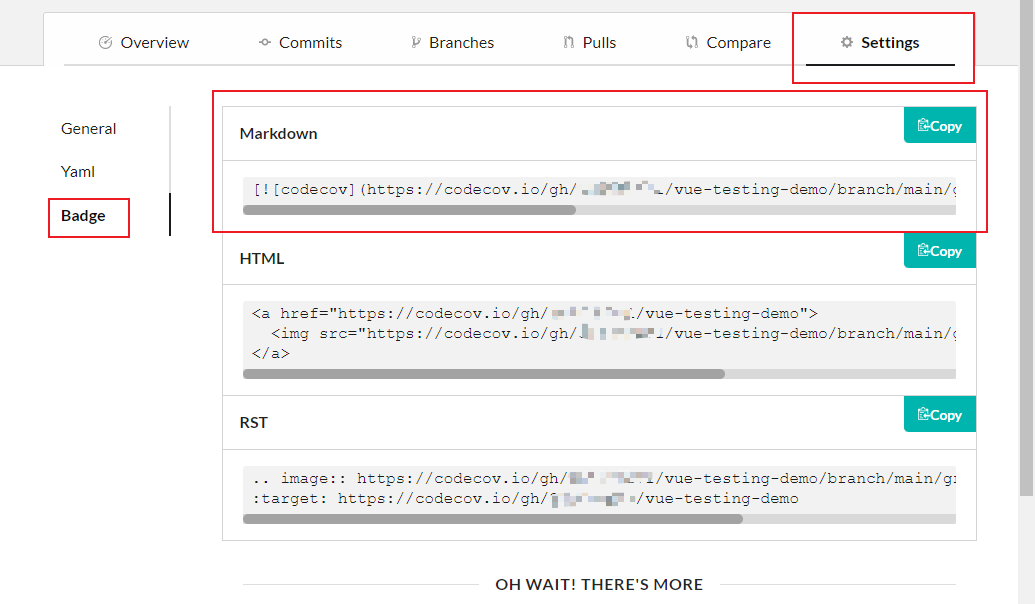
在 Settings 面板复制 Badge 链接到 README.md 中可以展示 codecov 徽章,显示测试覆盖率,可以让其他开发者了解应用是否安全可靠。
效果如下
自动化测试和持续集成
本项目使用 Github Actions 实现持续集成。
配置 Github Actions
项目根目录新建目录和文件 .github/workflows/main.yml:
# .github\workflows\main.yml
name: Publish And Deploy Demo

on:
  # 当提交 main 分支的代码的时候触发 action
  push:
    branches:
      - main
  # 或对 main 分支进行 pull request 的时候
  pull_request:
    branches:
      - main

jobs:
  build-and-deploy:
    # 运行环境
    runs-on: ubuntu-latest
    steps:
      # 下载仓库源码
      - name: Checkout
        uses: actions/checkout@main

      # 安装依赖 & 运行测试并生成覆盖率报告 & 项目打包
      - name: Install and Build
        run: |
          npm install
          npm run coverage
          npm run build

      # 发布到 GitHub Pages
      - name: Deploy
        uses: JamesIves/github-pages-deploy-action@4.1.0
        with:
          branch: gh-pages # The branch the action should deploy to.
          folder: dist # The folder the action should deploy.

      # 上传测试覆盖率报告到 codecov
      - name: codecov
        # 使用 codecov 官方提供的 action
        uses: codecov/codecov-action@v1
        with:
          token: ${{ secrets.CODECOV_TOKEN }}
如果测试失败,自动构建就会中断,不会部署 Github Pages 和上传覆盖率报告。
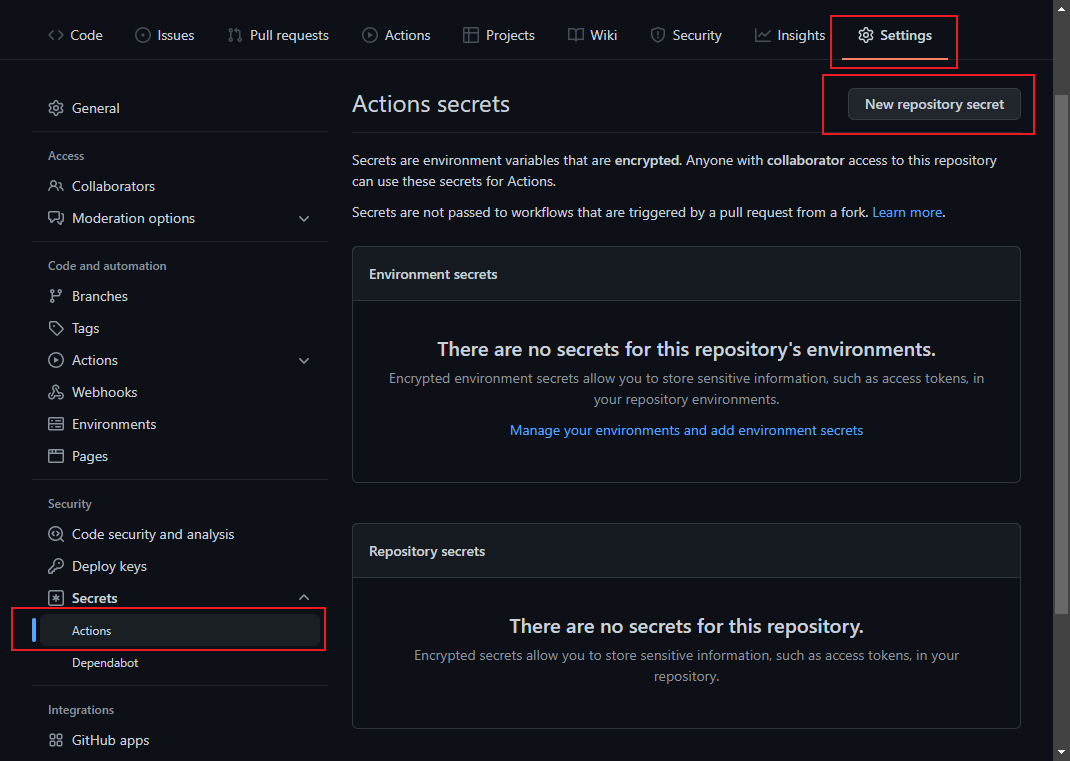
Github 添加存储 codecov Token 的环境变量
修改打包路径
Github Pages 访问地址默认会带二级域名(仓库名),例如http://xxx.github.io/vue-testing-demo/,需要修改打包路径:
// vue.config.js
const { defineConfig } = require('@vue/cli-service')
module.exports = defineConfig({
  transpileDependencies: true,
  // 添加
  publicPath: '/vue-testing-demo'
})
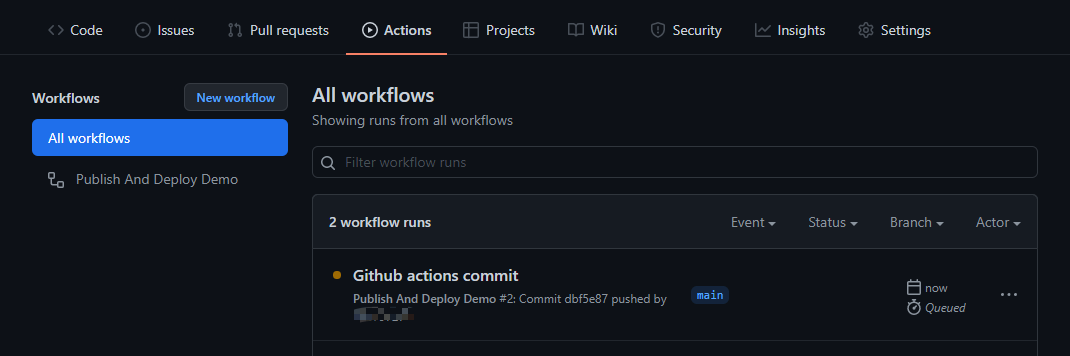
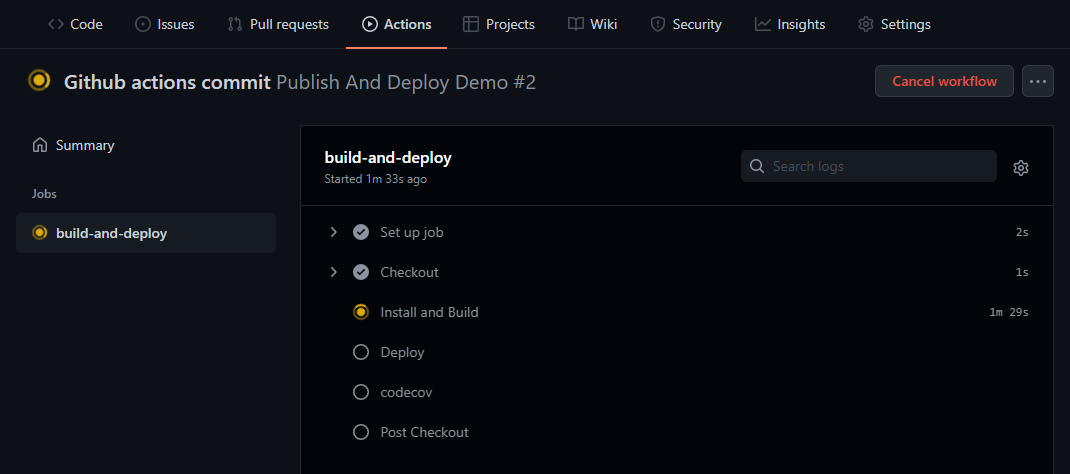
提交代码
push 代码,触发 action
运行成功后,可以访问 Codecov 查看覆盖率报告。
指定托管 Github Pages 的分支
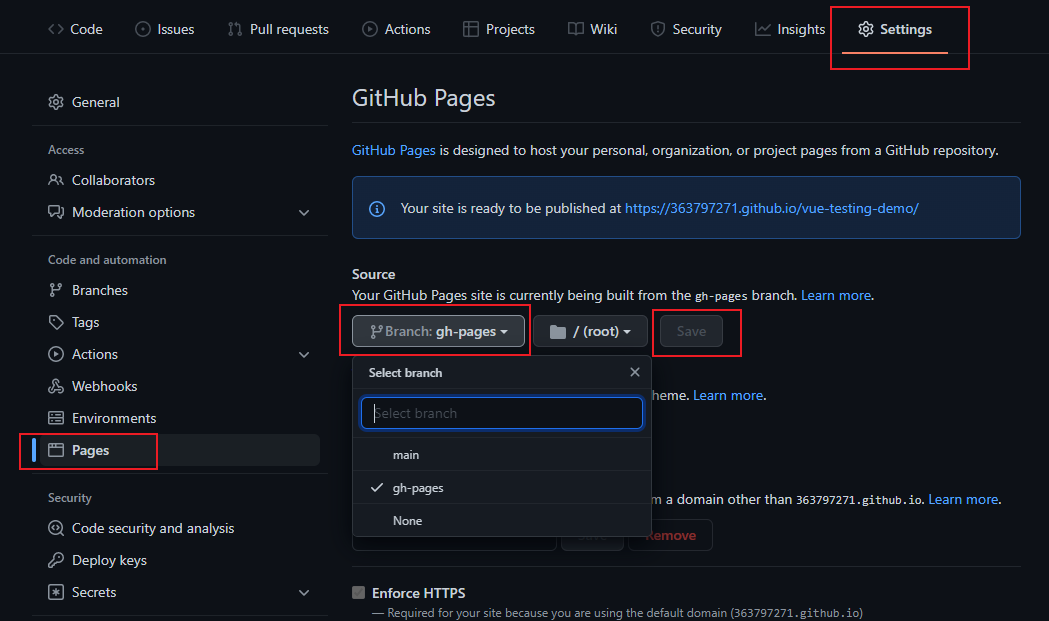
修改完成后,需要重新 push 触发 Github Action 自动构建,发布 Github Pages。
添加工作流程状态徽章
添加 Github Actions 状态徽章,向 README.md 添加链接:
<WORKFLOW_FILE>:.github/workflows/目录下的.yml工作流程文件名。<OWNER>:github组织名<REPOSITORY>:仓库名
对应当前项目就是:
效果: