HTTPS作用
作用:数据加密传输
OSI七层模型:表示层加密/解密
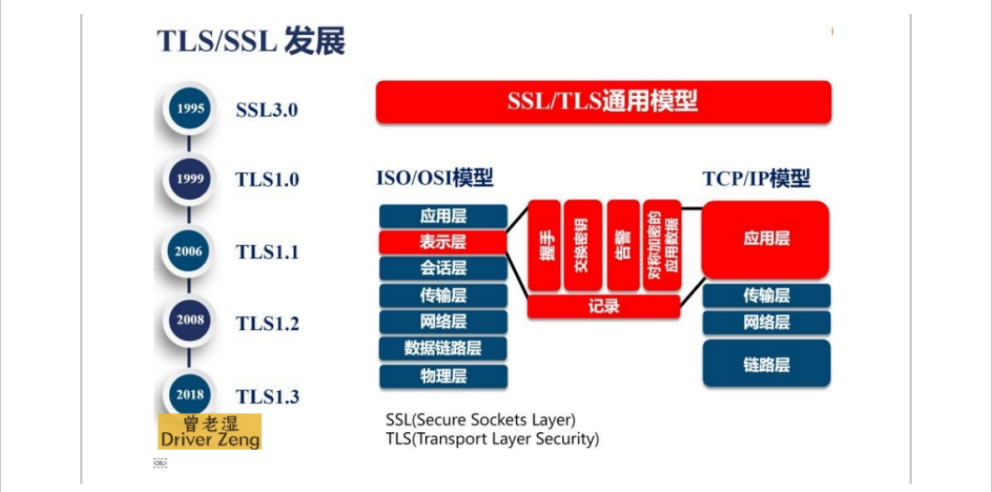
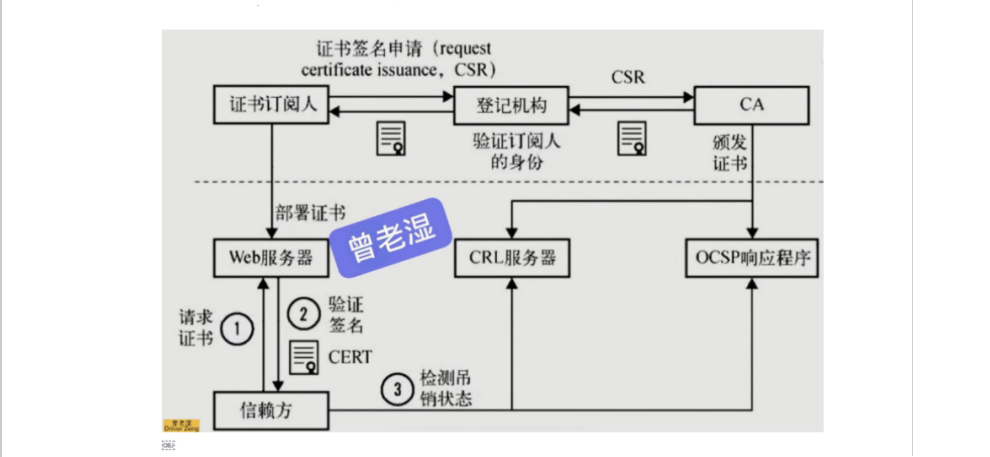
证书申请流程
证书类型介绍
对比 | 域名型DV | 企业型OV | 增强型EV |
地址栏 | 锁标记+绿色https | 锁标记+绿色https | 锁标记+绿色https+企业名称(logo) |
用途 | 个人网站 | 电子商务网站,中小型企业 | 大型金融平台,大公司,政府机构 |
审核内容 | 域名所有权验证 | 全面的企业身份验证;域名所有权验证 | 最高等级的企业身份验证;域名所有权验证 |
颁发时长 | 不到10分钟 | 3-5个工作日 | 5-7个工作日 |
首次申请/年限 | 1年 | 1-2年 | 1-2年 |
赔付保障金 | 125-175万美金 | 150-175万美金 |
证书购买
- 单域名
- 只能单个域名使用
- www.jin.com
- 混合域名
- 多个域名都可以使用该证书
- www.jin.com www.nan.com
- 泛域名
- 通配符域名证书
- www.jin.com
- blog.jin.com
- rewrite.jin.com
- ***.jin.com
HTTPS注意事项
1):证书过期,无法续费
2):三级域名无法使用https
3):注意证书的颜色:
- 绿色:全站的URL都是https加密的
- 红色:假证书或者证书过期
- 黄色:并非全站的URL都是https加密的
单台nginx实现https
# 1.编辑nginx配置文件
[root@web01 conf.d]# vim www.jin.com.conf
server {
        listen 80;
        server_name www.jin.com;
        root /code/test;
        index index.html;
}

# 2.重新加载nginx
[root@web01 conf.d]# nginx -t
nginx: the configuration file /etc/nginx/nginx.conf syntax is ok
nginx: configuration file /etc/nginx/nginx.conf test is successful
[root@web01 conf.d]# systemctl reload nginx

# 3.创建站点目录
[root@web01 code]# mkdir /code/test

# 4.部署代码
[root@web01 code]# echo 'tets htpps' > /code/test/index.html

# 5.域名解析
10.0.0.7 www.jin.com

# 6.浏览器访问:http://www.jin.com/
跟CA机构申请证书(模拟假证书)
# 1.CA机构创建证书
[root@web01 <sub>]# openssl genrsa -idea -out server.key 2048
Generating RSA private key, 2048 bit long modulus
...........................................................................+++
....+++
e is 65537 (0x10001)
Enter pass phrase for server.key: 1234                    #(输入密码)
Verifying - Enter pass phrase for server.key: 1234        #(确认密码)

# 2.查看当前目录生成的证书
[root@web01 </sub>]# ll
-rw-r--r--  1 root root 1747 Jun 22 14:56 server.key

# 3.跟CA机构填写个人信息,签发证书
[root@web01 <sub>]# openssl req -days 36500 -x509 -sha256 -nodes -newkey rsa:2048 -keyout server.key -out server.crt
Generating a 2048 bit RSA private key
........................................................+++
.......................................................................................................................+++
writing new private key to 'server.key'
-----
You are about to be asked to enter information that will be incorporated
into your certificate request.
What you are about to enter is what is called a Distinguished Name or a DN.
There are quite a few fields but you can leave some blank
For some fields there will be a default value,
If you enter '.', the field will be left blank.
-----
Country Name (2 letter code) [XX]:cn                     # 国家代码 简写:2个字符
State or Province Name (full name) []:shanghai           # 所在省
Locality Name (eg, city) [Default City]:shanghai         # 所在市
Organization Name (eg, company) [Default Company Ltd]:oldboy  # 公司名字
Organizational Unit Name (eg, section) []:oldboy       # 公司名字
Common Name (eg, your name or your server's hostname) []:www.jin.com  # 域名
Email Address []:123@qq.com                 # 邮箱

# 4.查看证书文件
[root@web01 </sub>]# ll
-rw-r--r--  1 root root 1407 Jun 22 14:59 server.crt
-rw-r--r--  1 root root 1704 Jun 22 14:59 server.key
配置SSl证书语法
## 启动SSL功能
http {
    ...
    server {
        listen              443 ssl;
        ...
    }

## 证书文件
Syntax: ssl_certificate file;
Default:    —
Context:    http, server

## 私钥文件
Syntax: ssl_certificate_key file;
Default:    —
Context:    http, server
修改nginx配置文件
# 1.创建证书存放的目录
[root@web01 <sub>]# mkdir /etc/nginx/ssl -p
[root@web01 </sub>]# mv server.* /etc/nginx/ssl/

# 2.配置nginx证书
[root@web01 <sub>]# vim /etc/nginx/conf.d/www.jin.com.conf
server {
        listen 443 ssl;
        server_name www.jin.com;
        root /code/test;
        index index.html;
        ssl_certificate ssl/server.crt;
        ssl_certificate_key ssl/server.key;
}

# 3.检测语法,重新加载nginx
[root@web01 </sub>]# nginx -t
nginx: the configuration file /etc/nginx/nginx.conf syntax is ok
nginx: configuration file /etc/nginx/nginx.conf test is successful
[root@web01 ~]# systemctl reload nginx

# 4.浏览器访问:https://www.jin.com
使用rewrite协议跳转(提高用户体验)
## 80端口强转443
[root@web01 <sub>]#vim /etc/nginx/conf.d/www.jin.com.conf
server {
        listen 80;
        server_name www.jin.com;
        rewrite (.*) https://www.jin.com$1 redirect;
}
server {
        listen 443 ssl;
        server_name www.jin.com;
        root /code/test;
        index index.html;
        ssl_certificate ssl/server.crt;
        ssl_certificate_key ssl/server.key;
}

## 第二种写法
[root@web01 </sub>]#vim /etc/nginx/conf.d/www.jin.com.conf
server {
        listen 80;
        server_name www.jin.com;
        #rewrite (.*) https://www.jin.com$1 redirect;
        return 302 https://$server_name$request_uri;
}
server {
        listen 443 ssl;
        server_name www.jin.com;
        root /code/test;
        index index.html;
        ssl_certificate ssl/server.crt;
        ssl_certificate_key ssl/server.key;
}
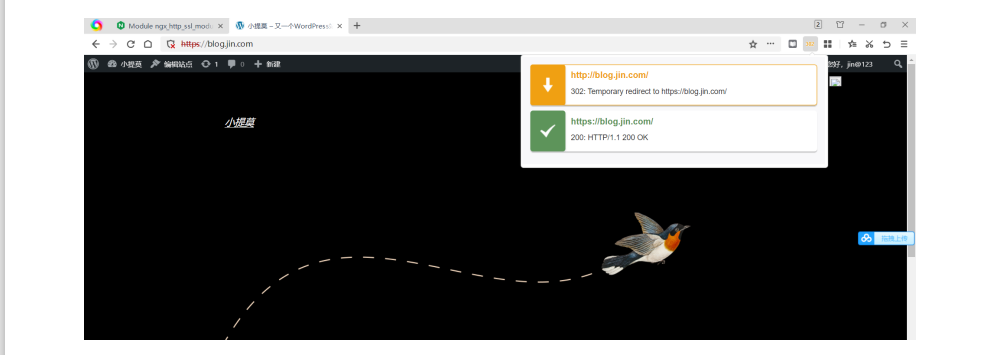
给wordpress博客加证书
# 1.生成证书
[root@web01 ssl]# openssl genrsa -idea -out blog.jin.com.key 2048
Generating RSA private key, 2048 bit long modulus
.........................................+++
....................................+++
e is 65537 (0x10001)
Enter pass phrase for blog.jin.com.key:
Verifying - Enter pass phrase for blog.jin.com.key: 1234

[root@web01 ssl]# openssl req -days 36500 -x509 -sha256 -nodes -newkey rsa:2048 -keyout blog.jin.com.key -out blog.jin.com.pem
Generating a 2048 bit RSA private key
............+++
.+++
writing new private key to 'blog.jin.com.key'
-----
You are about to be asked to enter information that will be incorporated
into your certificate request.
What you are about to enter is what is called a Distinguished Name or a DN.
There are quite a few fields but you can leave some blank
For some fields there will be a default value,
If you enter '.', the field will be left blank.
-----
Country Name (2 letter code) [XX]:cn
State or Province Name (full name) []:shanghai
Locality Name (eg, city) [Default City]:shanghai
Organization Name (eg, company) [Default Company Ltd]:oldboy
Organizational Unit Name (eg, section) []:oldboy
Common Name (eg, your name or your server's hostname) []:blog.jin.com
Email Address []:123@qq.com

# 2.证书存放位置(自定义)
[root@web01 ssl]# pwd
/etc/nginx/ssl
[root@web01 conf.d]# ll /etc/nginx/ssl/
total 16
-rw-r--r-- 1 root root 1708 Jun 22 15:25 blog.jin.com.key
-rw-r--r-- 1 root root 1411 Jun 22 15:25 blog.jin.com.pem

req -days 36500 -x509 -sha256 -nodes -newkey rsa:2048 -keyout blog.jin.com.key -out blog.jin.com.pem

# 3.配置nginx配置文件
[root@web01 conf.d]# cat blog.jin.com.conf
server {
        listen 80;
        server_name blog.jin.com;
      #rewrite (.*) https://blog.jin.com$1 redirect;
      return 302 https://$server_name$request_uri;
}
server {
        listen 443 ssl;
        server_name blog.jin.com;
        root /blog/wordpress;
        index index.html;
        ssl_certificate ssl/blog.jin.com.pem;
        ssl_certificate_key ssl/blog.jin.com.key;
        index index.php index.html;

  location / {
    if ( -f $request_filename/index.html ){
          rewrite (.*) $1/index.html break;
  }
    if ( -f $request_filename/index.php ){
          rewrite (.*) $1/index.php;
  }
    if ( !-f $request_filename ){
          rewrite (.*) /index.php;
  }
  }

        location ~ \.php$ {
                fastcgi_pass 127.0.0.1:9000;
                fastcgi_param SCRIPT_FILENAME $document_root$fastcgi_script_name;
                include /etc/nginx/fastcgi_params;
        }

}
解决php破图现象
## 修改nginx配置文件:fastcgi_param HTTPS on;
[root@web01 conf.d]# cat blog.jin.com.conf
server {
        listen 80;
        server_name blog.jin.com;
  #rewrite (.*) https://blog.jin.com$1 redirect;
  return 302 https://$server_name$request_uri;
}
server {
        listen 443 ssl;
        server_name blog.jin.com;
        root /blog/wordpress;
        index index.html;
        ssl_certificate ssl/blog.jin.com.pem;
        ssl_certificate_key ssl/blog.jin.com.key;
        index index.php index.html;

  location / {
    if ( -f $request_filename/index.html ){
          rewrite (.*) $1/index.html break;
  }
    if ( -f $request_filename/index.php ){
          rewrite (.*) $1/index.php;
  }
    if ( !-f $request_filename ){
          rewrite (.*) /index.php;
  }
  }

        location ~ \.php$ {
                fastcgi_pass 127.0.0.1:9000;
                fastcgi_param SCRIPT_FILENAME $document_root$fastcgi_script_name;
           ## 让nginx访问php时,也要使用https
         fastcgi_param HTTPS on;
                include /etc/nginx/fastcgi_params;
        }

}
多台nginx配置ssl证书
环境准备
主机 | WanIp | LanIp | 角色 | 应用 |
web01 | 10.0.0.7 | 172.16.1.7 | web网站 | nginx |
web02 | 10.0.0.8 | 172.16.1.8 | web网站 | nginx |
lb01 | 10.0.0.5 | 172.16.1.5 | 负载均衡 | nginx |
部署web网站
## 添加nginx配置文件
[root@web01 conf.d]# vim www.jin.conf
server {
        listen 80;
        server_name www.jin.com;
        root /code、test;
        index index.html;
}
# web02
[root@web02 ~]# vim /etc/nginx/conf.d/www.jin.conf
server {
        listen 80;
        server_name www.jin.com;
        root /code/test;
        index index.html;
}
部署负载均衡
# 1.负载均衡配置证书
[root@lb01 ~]# cd /etc/nginx/ssl/
[root@lb01 ssl]# ll
total 8
-rw-r--r-- 1 root root 1407 Jun 22 15:45 server.crt
-rw-r--r-- 1 root root 1704 Jun 22 15:45 server.key

# 2.添加nginx配置文件
[root@lb01 conf.d]# cat www.jin.conf
upstream www.jin.com {
  server 172.16.1.7;
  server 172.16.1.8;
}

server {
  listen 80;
  server_name www.jin.com;
  rewrite (.*) https://www.jin.com$1 redirect;
}

server {
  listen 443 ssl;
  server_name www.jin.com;
  ssl_certificate ssl/server.crt;
  ssl_certificate_key ssl/server.key;

  location /{
    proxy_pass http://www.jin.com;
    include proxy_params;
  }
}

#######  proxy_params(优化)
[root@lb01 conf.d]# cat /etc/nginx/proxy_params
## 在代理服务器的请求头中,加上域名,携带域名去访问后端的web01服务器
proxy_set_header Host $host;

## 在代理服务器的请求头中,透传用户的真实IP地址给web01
proxy_set_header X-Forwarded-For $proxy_add_x_forwarded_for;

## lb01连接web01的超时时间(代理服务器,连接后端服务的超时时间)
proxy_connect_timeout 60s;

## lb01代理服务器读取web01返回的数据超时时间(代理后端的服务器响应代理服务器的超时时间)
proxy_read_timeout 60s;

## 后端服务器回传给代理服务器数据的超时时间
proxy_send_timeout 60s;

# 开启代理服务器的缓冲区,代理服务器接收到web01返回的数据,接收一条,返回给用户一条
proxy_buffering on;

## 开启存放头部信息的缓冲区大小为 32k
proxy_buffer_size 32k;

## 开启存放头部信息的缓冲区大小为 32k
proxy_buffers 4 128k;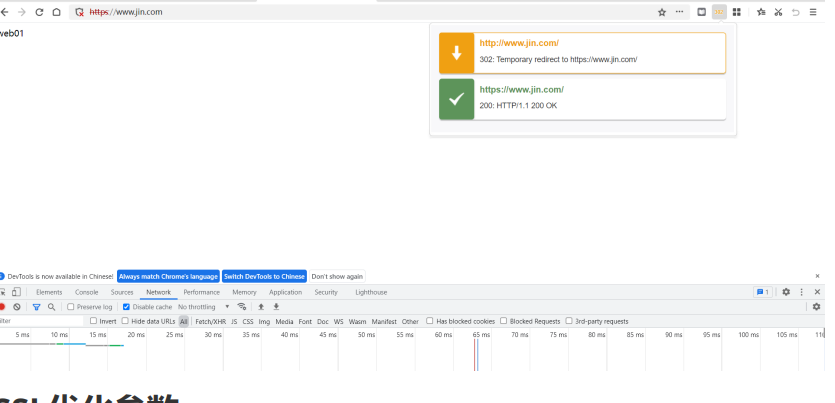
SSL优化参数
ssl_session_cache shared:SSL:10m; #在建立完ssl握手后如果断开连接,在session_timeout时间内再次连接,是不需要再次获取公钥建立握手的,可以服用之前的连接
ssl_session_timeout 1440m;  #ssl连接断开后的超时时间
ssl_ciphers ECDHE-RSA-AES128-GCM-SHA256:ECDHE:ECDH:AES:HIGH:!NULL:!aNULL:!MD5:!ADH:!RC4;  #配置加密套接协议
ssl_protocols TLSv1 TLSv1.1 TLSv1.2;  #使用TLS版本协议
ssl_prefer_server_ciphers on;  #nginx决定使用哪些协议与浏览器通信

## 优化后的nginx配置文件
[root@lb01 conf.d]# cat www.jin.conf
upstream www.jin.com {
  server 172.16.1.7;
  server 172.16.1.8;
}

server {
  listen 80;
  server_name www.jin.com;
  rewrite (.*) https://www.jin.com$1 redirect;
  ssl_session_cache shared:SSL:10m;
  ssl_session_timeout 1440m;
  ssl_ciphers ECDHE-RSA-AES128-GCM-SHA256:ECDHE:ECDH:AES:HIGH:!NULL:!aNULL:!MD5:!ADH:!RC4;
  ssl_protocols TLSv1 TLSv1.1 TLSv1.2;
  ssl_prefer_server_ciphers on;
}

server {
  listen 443 ssl;
  server_name www.jin.com;
  ssl_certificate ssl/server.crt;
  ssl_certificate_key ssl/server.key;

  location /{
    proxy_pass http://www.jin.com;
    include proxy_params;
  }
}


