推荐系统实战6——EasyRec 搭建WideAndDeep排序模型实现CTR点击平台
学习前言
一般的推荐系统至少需要两步来完成,基本流程为召回=>排序,当然大型的推荐系统远远不止于此。排序是其中的第二步,目的是对感兴趣的item进行排序,找出其中最重要的item。

EasyRec仓库地址
官方库地址:
https://github.com/alibaba/EasyRec
带注释的Config地址:
https://github.com/bubbliiiing/EasyRec-Config
WideAndDeep实现思路
一、WideAndDeep整体结构解析
WideAndDeep的论文地址为:
Wide & Deep Learning for Recommender Systems
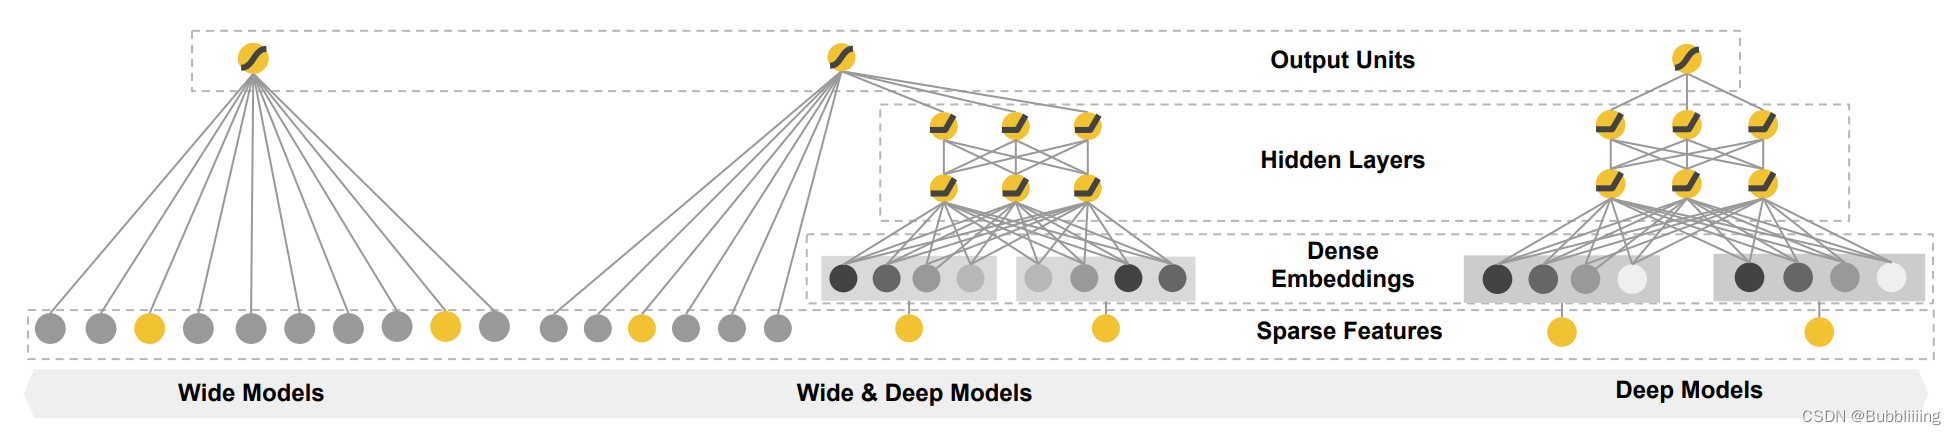
Wide&Deep 是 Google 在2016年提出的模型,一个线性模型与深度模型结合的产物。Google将线性模型与深度模型通过并行结构的方式来进行特征的融合,线性模型用于提取浅层的交互信息,深度模型提取更高语义信息的交互信息,收益明显。
其实更简单的理解就是使用浅层特征和深层特征进行共同预测。
浅层特征意味着仅仅经过简单处理,常见的处理方式为Embedding;
深层特征则通过更多的全连接进行处理。
在输出部分,浅层特征和深层特征利用cat堆叠起来,然后再最后进行若干次全连接,输出结果。
二、网络结构解析
1、Embedding层的构建
a、字符串形式的输入
对于推荐系统而言,输入常常是字符串形式,因为不是矩阵,字符串本身无法被网络直接处理,EasyRec是基于tensorflow构建的,在tensorflow中,可以使用tf.string_to_hash_bucket_fast将输入进来的字符串转化成一个固定的数字。具体转换方式如下所示:
import tensorflow as tf
if tf.__version__ >= '2.0':
    tf = tf.compat.v1
sparse_id_values = tf.string_to_hash_bucket_fast("hello", 10)
# 此时的输出为:
sparse_id_values = 6
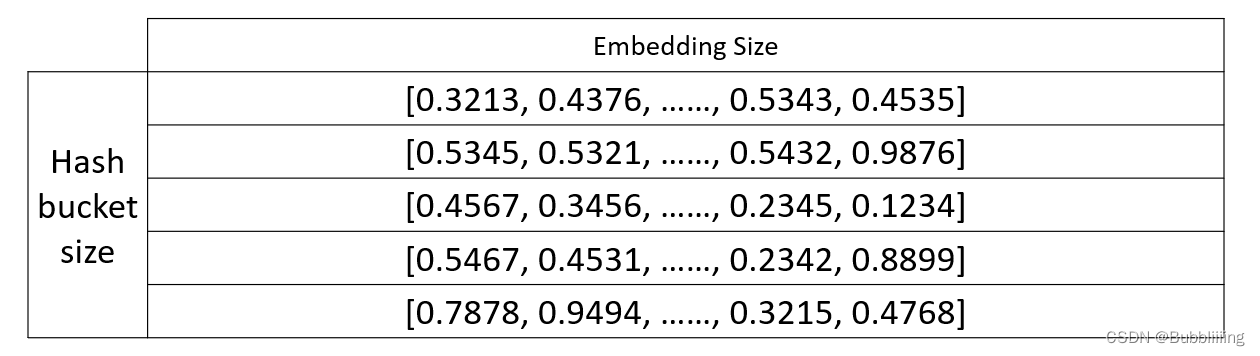
对任意一个字符串,我们都可以将其转化成固定的数字,这个数字处于0到hash_bucket_size之间,之后在代码中会建立一个可查询的embedding表,他的shape为:
(hash_bucket_size, embedding_dim)
这是一个hash_bucket_size行,embedding_dim列的矩阵,当我们通过一个字符串获得一个固定的数字后,我们会通过这个固定的数字sparse_id_values,获得其中第sparse_id_values行。
比如上述的例子中,我们假设hash_bucket_size等于10,embedding_dim等于32。如果输入的字符串为hello,我们获得的sparse_id_values=6。我们此时就会获取embedding表的第6行,作为这个数据的embedding。
在EasyRec的Config中,我们只需要在feature_config指定对应的标签名、embedding_dim、hash_bucket_size就读取数据,将数据转化成特定长度的Embedding了。
如下所示:
#------------------------------------------------------#
#   用于作为特征的数据,不包括label
#------------------------------------------------------#
feature_config: {
  features: {
    input_names: "site_id"
    feature_type: IdFeature
    embedding_dim: 32
    hash_bucket_size: 10000
  }
}
b、连续值(特定范围值)的输入

除去字符串形式的输入,如果有些值存在于特定范围内,那么我们可以直接将其进行规定,举个简单的例子,比如我们现在的物品主要是车辆,那么车辆的种类就可以规定为连续值(特定范围值)的输入。
我们直接就可以将车分为[自行车,越野车,小轿车,公交车,大货车],这里只说了五个,实际上不止这么多,此时,我们就可以设定自行车就是0,越野车就是1,小轿车就是2,公交车就是3,大货车就是4。这样就不会存在hash冲突的问题,几就是几。
如果是连续值,可以先进行离散化,同样是直接进行映射。
之后在代码中会建立一个可查询的embedding表,他的shape为:
(boundaries_size, embedding_dim)
这是一个boundaries_size行,embedding_dim列的矩阵,当我们获得某个个体的cat_id,就可以获得其中第cat_id行。
在EasyRec的Config中,我们只需要在feature_config指定对应的标签名、embedding_dim、boundaries就可以读取此类数据,boundaries指的就是数据的范围。
如下所示:
#------------------------------------------------------#
#   用于作为特征的数据,不包括label
#------------------------------------------------------#
feature_config: {
  features: {
    input_names: "hour"
    feature_type: RawFeature
    boundaries: [1,2,3,4,5,6,7,8,9,10,11,12,13,14,15,16,17,18,19,20,21,22,23]
    embedding_dim: 16
  }
}
c、Wide网络和Deep网络的Embedding
Wide网络和Deep网络的Embedding不同。
Wide网络进行Embedding时需要固定Embedding的输出长度为特定值,如16、32等,因为后续处理时会将Wide网络的所有特征直接相加为一个特征;
Deep网络则没有这样的限制,每个特征的Embedding的输出长度不固定,因为后续处理时会将Deep网络的所有特征进行堆叠。
2、网络层的构建
a、Wide网络的构建
wide网络其实不需要怎么处理就可以构建完成,由于在构建Wide网络的Embedding时,Embedding的输出长度为特定值,我们只需要将所有的Embedding特征进行相加,就可以获得Wide网络的输出。
本博文使用EasyRec自带的淘宝演示数据集为例子进行解析,每个特征embedding后的长度为16,以batch为4096为例,在Wide获得的特征的shape为[4096, 16]。
在EasyRec的Config中,我们只需要在model_config部分指定wide_output_dim的值,就可以指定Embedding的输出长度了
model_config:{
  model_class: "WideAndDeep"
  ...
  wide_and_deep {
    wide_output_dim: 16
    dnn {
      hidden_units: [128, 64, 32]
    }
    final_dnn {
      hidden_units: [128, 64]
    }
    l2_regularization: 1e-5
  }
  embedding_regularization: 1e-7
}
在代码中,我们使用tf.add_n函数来进行Embedding特征的相加。如下所示。
wide_fea = tf.add_n(self._wide_features)
b、Deep网络的构建
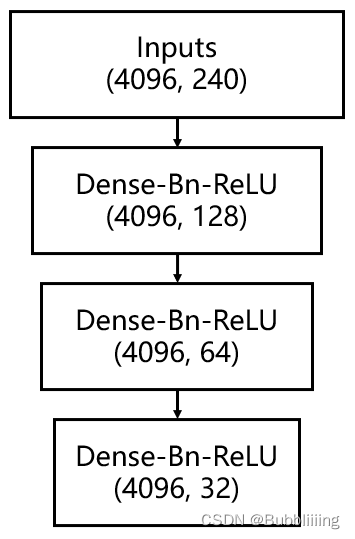
本博文使用EasyRec自带的淘宝演示数据集为例子进行解析,每个特征embedding后的长度为16,每个组合有15个特征,以batch为4096为例,在Deep获得的Embedding后的特征shape为[4096, 240]。
Deep网络的构建也较为简单,主要是几层全连接,在本博文的例子中设有三层全连接,神经元个数分别为[128, 64, 32],三层全连接后,最终输出的特征为[4096, 32]。
在EasyRec的Config中,我们只需要在model_config部分指定对应的模型名称、每个模型所需的特征以及每个模型的构建方式,就可以进行构建了。如下所示,model_class表示的是模型类别,wide_and_deep 是模型下的模型参数,dnn指的是deep模型的全连接情况。
model_config:{
  model_class: "WideAndDeep"
  ...
  wide_and_deep {
    wide_output_dim: 16
    dnn {
      hidden_units: [128, 64, 32]
    }
    final_dnn {
      hidden_units: [128, 64]
    }
    l2_regularization: 1e-5
  }
  embedding_regularization: 1e-7
}
在EasyRec的源码中,DNN部分的构建代码为,在代码中,只是对hidden_units进行循环,循环时构建Dense、BN、Relu层:
# -*- encoding:utf-8 -*-
# Copyright (c) Alibaba, Inc. and its affiliates.
import logging
import tensorflow as tf
from easy_rec.python.utils.load_class import load_by_path

if tf.__version__ >= '2.0':
  tf = tf.compat.v1
class DNN:
  def __init__(self, dnn_config, l2_reg, name='dnn', is_training=False):
    """Initializes a `DNN` Layer.

    Args:
      dnn_config: instance of easy_rec.python.protos.dnn_pb2.DNN
      l2_reg: l2 regularizer
      name: scope of the DNN, so that the parameters could be separated from other dnns
      is_training: train phase or not, impact batchnorm and dropout
    """
    self._config = dnn_config
    self._l2_reg = l2_reg
    self._name = name
    self._is_training = is_training
    logging.info('dnn activation function = %s' % self._config.activation)
    self.activation = load_by_path(self._config.activation)

  @property
  def hidden_units(self):
    return self._config.hidden_units

  @property
  def dropout_ratio(self):
    return self._config.dropout_ratio

  def __call__(self, deep_fea, hidden_layer_feature_output=False):
    hidden_units_len = len(self.hidden_units)
    if hidden_units_len == 1 and self.hidden_units[0] == 0:
      return deep_fea

    hidden_feature_dict = {}
    for i, unit in enumerate(self.hidden_units):
      deep_fea = tf.layers.dense(
          inputs=deep_fea,
          units=unit,
          kernel_regularizer=self._l2_reg,
          activation=None,
          name='%s/dnn_%d' % (self._name, i))
      if self._config.use_bn:
        deep_fea = tf.layers.batch_normalization(
            deep_fea,
            training=self._is_training,
            trainable=True,
            name='%s/dnn_%d/bn' % (self._name, i))
      deep_fea = self.activation(
          deep_fea, name='%s/dnn_%d/act' % (self._name, i))
      if len(self.dropout_ratio) > 0 and self._is_training:
        assert self.dropout_ratio[
            i] < 1, 'invalid dropout_ratio: %.3f' % self.dropout_ratio[i]
        deep_fea = tf.nn.dropout(
            deep_fea,
            keep_prob=1 - self.dropout_ratio[i],
            name='%s/%d/dropout' % (self._name, i))

      if hidden_layer_feature_output:
        hidden_feature_dict['hidden_layer' + str(i)] = deep_fea
        if (i + 1 == hidden_units_len):
          hidden_feature_dict['hidden_layer_end'] = deep_fea
          return hidden_feature_dict
    else:
      return deep_fea
c、输出网络的构建
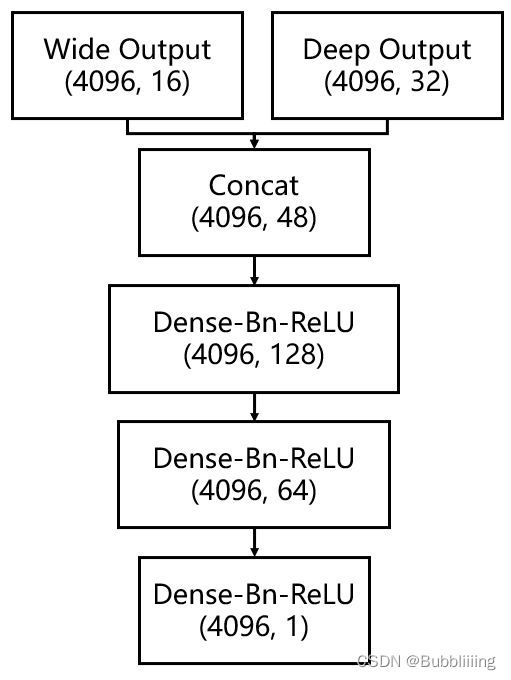
在经过wide网络和deep网络后,我们分别获得了两个特征,一个特征的shape为[4096, 16],一个特征的shape为[4096, 32]。
在构建输出网络前,我们需要对两个特征进行堆叠,获得一个[4096, 48]的特征。
然后构建输出网络,在本博文的例子中神经元个数分别为[128, 64],两层全连接后,输出特征为[4096, 64],最终利用一层全连接到我们需要分类的个数上,由于本博文实现的是CTR点击平台,因此num_classes=1。最终输出为[4096, 1]。
对输出取一个sigmoid,就可以获得对应的得分,得分越高,代表越可能点击,越要推荐。
在EasyRec的Config中,我们只需要在model_config部分指定对应的模型名称、每个模型所需的特征以及每个模型的构建方式,就可以进行构建了。如下所示,model_class表示的是模型类别,wide_and_deep 是模型下的模型参数,final_dnn指的是输出模型的全连接情况。
model_config:{
  model_class: "WideAndDeep"
  ...
  wide_and_deep {
    wide_output_dim: 16
    dnn {
      hidden_units: [128, 64, 32]
    }
    final_dnn {
      hidden_units: [128, 64]
    }
    l2_regularization: 1e-5
  }
  embedding_regularization: 1e-7
}
三、训练部分解析
网络的训练部分并不复杂,我们对最终取sigmoid的结果通过事先设定好的标签进行交叉熵的计算。
由于CTR点击任务只需要找到哪些item是感兴趣的目标,本质上是一个二分类任务,系统认为user感兴趣,输出就为1,系统认为user不感兴趣,输出就为0。此处我们只需要使用普通的二分类交叉熵即可。

在代码中的实现方式为:
tf.losses.sigmoid_cross_entropy(label, logits=pred, weights=loss_weight, **kwargs)
训练自己的WideAndDeep模型
在训练自己的WideAndDeep模型之前,需要首先配置好EasyRec环境。
本博文以EasyRec自带的淘宝示例数据集进行解析。数据集位于EasyRec根目录下,分别位于下面两个位置。
“data/test/tb_data/taobao_train_data”
“data/test/tb_data/taobao_test_data”
淘宝示例数据集包含若干特征,保存在文本文件中,尽管后缀不是csv,但实际上是csv格式,具体如下所示:
clk:点击记录
buy:是否购买
以下为商品特征:
pid:商品pid码
adgroup_id:商品广告单元id
cate_id:商品种类id
campaign_id:商品公司id
customer:商品顾客
brand:商品品牌
price:商品价格
以下为用户特征:
user_id:用户id
cms_segid:微群ID
cms_group_id:一个特征
final gender code:性别
age level:年龄层次
pvalue level:消费档次
shopping level:购物深度
occupation:是否工作
new_user_class_level:城市等级
tag_category_list:点击的种类列表
tag_brand_list:点击的品牌列表
一、数据集的准备
本文使用文本格式进行训练,训练前需要自己制作好数据集,如果没有自己的数据集,可以通过示例的淘宝数据集进行尝试。
准备好的数据集一般存放在data/test文件夹中。在示例数据集里:
data/test/tb_data/taobao_train_data代表的是训练集,模型基于该文件进行梯度下降。
data/test/tb_data/taobao_test_data代表的是验证集(测试集),这里不单独划分一个测试集,验证集和测试集共用。
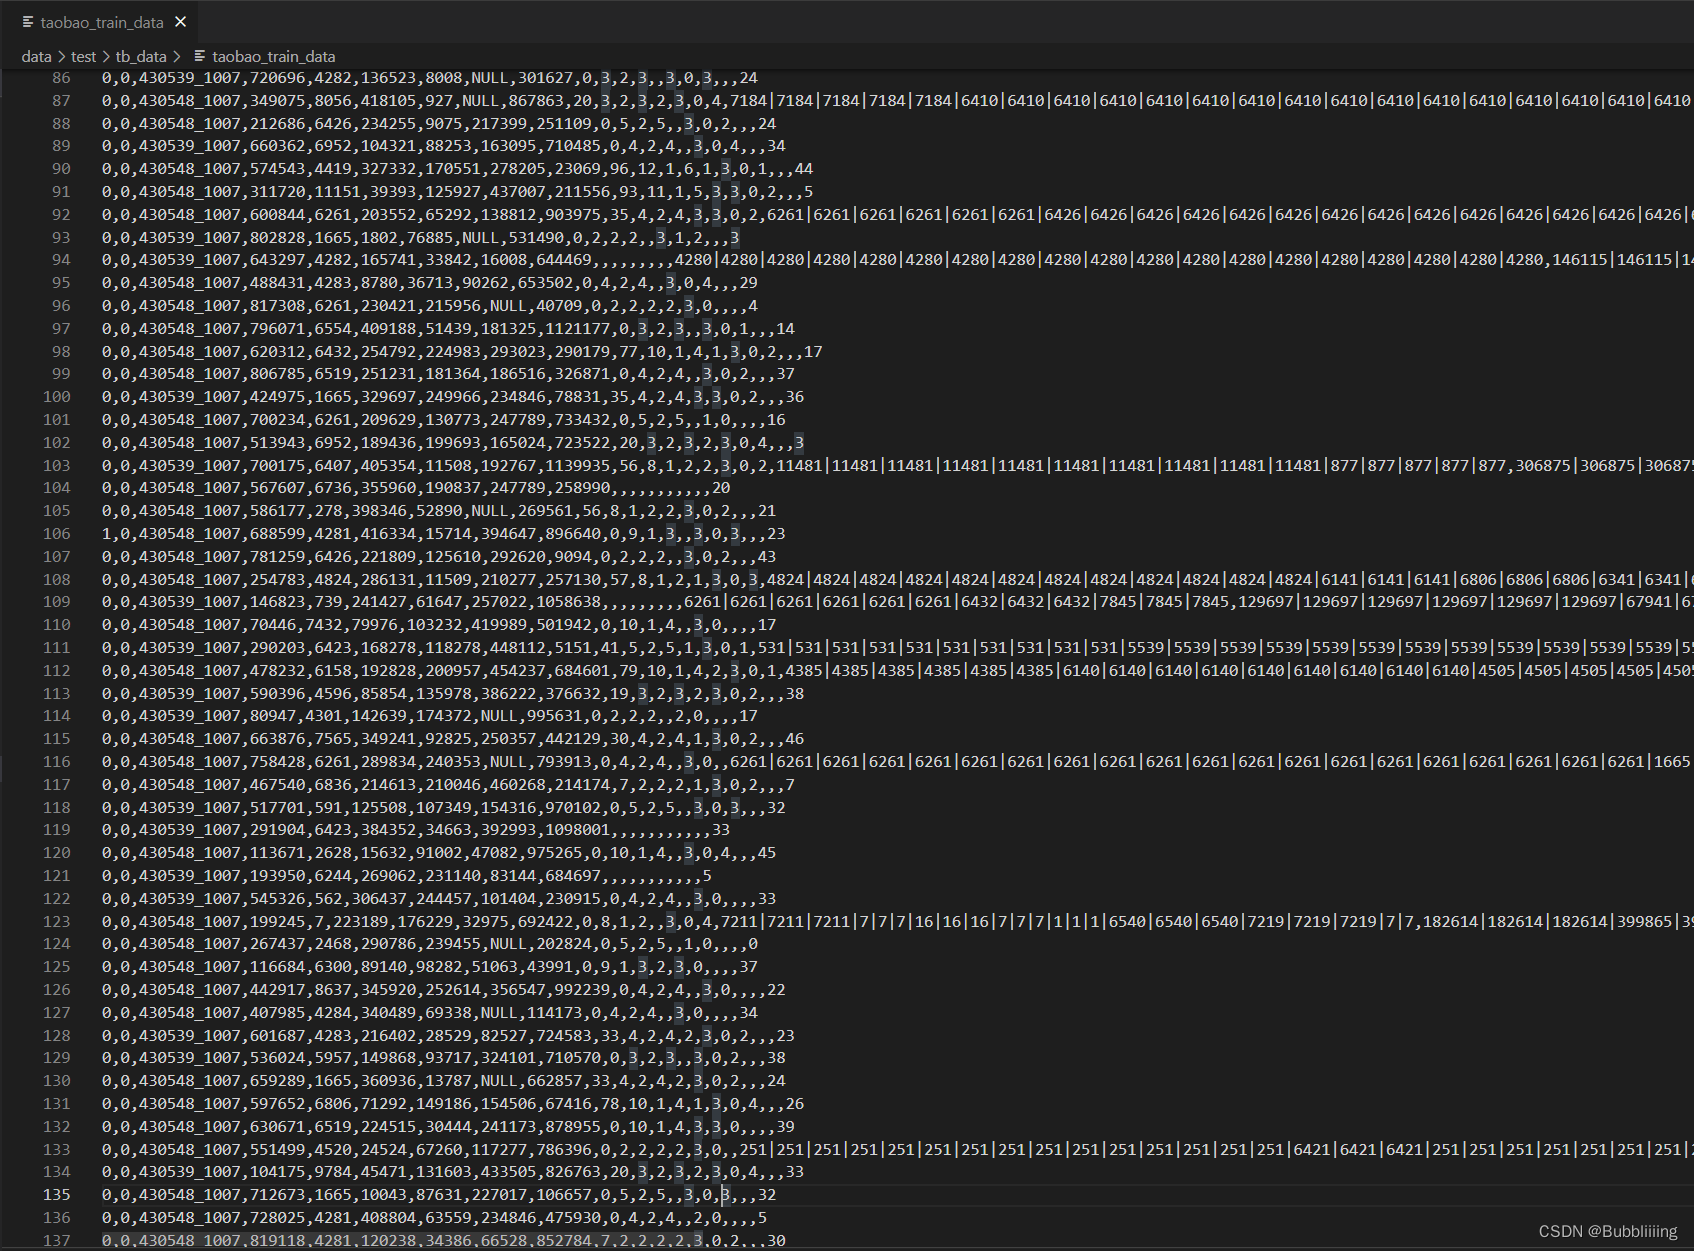
csv中直接存放特征的值即可,特征之间以’,'隔开,不需要存放特征名,如图所示,每一列的数据代表什么特征我们自己需要清楚。
二、Config配置文件的设置
Config配置文件中需要设置多方面的内容,采用prototxt格式,配置顺序为:
数据集的地址、模型保存的地址、训练相关参数设置、评估情况、数据集内容情况、数据集特征情况、模型情况。
具体的构建方式如下:
#------------------------------------------------------#
#   训练用的数据文件地址
#------------------------------------------------------#
train_input_path: "data/test/tb_data/taobao_train_data"
#------------------------------------------------------#
#   评估用的数据文件地址
#------------------------------------------------------#
eval_input_path: "data/test/tb_data/taobao_test_data"
#------------------------------------------------------#
#   训练好的权值保存的路径
#------------------------------------------------------#
model_dir: "experiments/wide_and_deep_on_taobao_ckpt"

#------------------------------------------------------#
#   训练相关的参数
#------------------------------------------------------#
train_config {
  #------------------------------------------------------#
  #   optimizer_config      优化器参数
  #------------------------------------------------------#
  optimizer_config: {
    #------------------------------------------------------#
    #   adam_optimizer                    Adam优化器
    #   learning_rate                     学习率下降方式
    #   exponential_decay_learning_rate   指数下降
    #   initial_learning_rate             初始学习率
    #   decay_steps                       学习率衰减步长
    #   decay_factor                      衰减倍数
    #   min_learning_rate                 最低学习率
    #------------------------------------------------------#
    adam_optimizer: {
      learning_rate: {
        exponential_decay_learning_rate {
          initial_learning_rate: 0.001
          decay_steps: 1000
          decay_factor: 0.5
          min_learning_rate: 0.00001
        }
      }
    }
    use_moving_average: false
  }
  #------------------------------------------------------#
  #   sync_replicas
  #   save_checkpoints_steps    保存周期
  #   log_step_count_steps      log记录周期
  #   num_steps                 总训练步长
  #------------------------------------------------------#
  save_checkpoints_steps: 100
  log_step_count_steps: 100
  sync_replicas: True
  num_steps: 2500
}

#------------------------------------------------------#
#   评估参数
#   推荐系统一般使用AUC进行评估
#------------------------------------------------------#
eval_config {
  metrics_set: {
    auc {}
  }
}

#------------------------------------------------------#
#   数据集的各类数据情况
#------------------------------------------------------#
data_config {
  #------------------------------------------------------#
  #   需要注意的时,此处的数据顺序需要和csv中一样。
  #   input_name  代表该列数据的名称
  #   input_type  代表该列数据的数据类别,默认是STRING。
  #   default_val 代表默认值,可以不设置
  #------------------------------------------------------#
  input_fields {
    input_name:'clk'
    input_type: INT32
  }
  input_fields {
    input_name:'buy'
    input_type: INT32
  }
  input_fields {
    input_name: 'pid'
    input_type: STRING
  }
  input_fields {
    input_name: 'adgroup_id'
    input_type: STRING
  }
  input_fields {
    input_name: 'cate_id'
    input_type: STRING
  }
  input_fields {
    input_name: 'campaign_id'
    input_type: STRING
  }
  input_fields {
    input_name: 'customer'
    input_type: STRING
  }
  input_fields {
    input_name: 'brand'
    input_type: STRING
  }
  input_fields {
    input_name: 'user_id'
    input_type: STRING
  }
  input_fields {
    input_name: 'cms_segid'
    input_type: STRING
  }
  input_fields {
    input_name: 'cms_group_id'
    input_type: STRING
  }
  input_fields {
    input_name: 'final_gender_code'
    input_type: STRING
  }
  input_fields {
    input_name: 'age_level'
    input_type: STRING
  }
  input_fields {
    input_name: 'pvalue_level'
    input_type: STRING
  }
  input_fields {
    input_name: 'shopping_level'
    input_type: STRING
  }
  input_fields {
    input_name: 'occupation'
    input_type: STRING
  }
  input_fields {
    input_name: 'new_user_class_level'
    input_type: STRING
  }
  input_fields {
    input_name: 'tag_category_list'
    input_type: STRING
  }
  input_fields {
    input_name: 'tag_brand_list'
    input_type: STRING
  }
  input_fields {
    input_name: 'price'
    input_type: INT32
  }

  #------------------------------------------------------#
  #   列名必须在data_config中出现过,代表为标签
  #------------------------------------------------------#
  label_fields: 'clk'
  #------------------------------------------------------#
  #   batch_size    批次大小
  #   prefetch_size 提高数据加载的速度,防止数据瓶颈
  #	  num_epochs    训练时取num_steps和num_epochs中的小值
  #					看哪个先达到就结束
  #------------------------------------------------------#
  batch_size: 4096
  num_epochs: 10000
  prefetch_size: 32
  #---------------------------------------------------------------------------#
  #   CSVInput      表示数据格式是CSV,注意要配合separator使用
  #   OdpsInputV2   如果在MaxCompute上运行EasyRec, 则使用OdpsInputV2
  #   OdpsInputV3   如果在本地或者EMR上访问MaxCompute Table, 则使用OdpsInputV3
  #---------------------------------------------------------------------------#
  input_type: CSVInput
}

#------------------------------------------------------#
#   用于作为特征的数据,不包括label
#------------------------------------------------------#
feature_configs : {
  #---------------------------------------------------------------------------#
  #   具体设置可参考https://easyrec.readthedocs.io/en/latest/feature/feature.html
  #   input_names       代表该列数据的名称
  #   feature_type      特征类别
  #   embedding_dim     该列数据在经过Embedding处理后的特征长度
  #   hash_bucket_size  将变量hash之后去模
  #---------------------------------------------------------------------------#
  input_names: 'pid'
  feature_type: IdFeature
  embedding_dim: 16
  hash_bucket_size: 10
}
feature_configs : {
  input_names: 'adgroup_id'
  feature_type: IdFeature
  embedding_dim: 16
  hash_bucket_size: 100000
}
feature_configs : {
  input_names: 'cate_id'
  feature_type: IdFeature
  embedding_dim: 16
  hash_bucket_size: 10000
}
feature_configs : {
  input_names: 'campaign_id'
  feature_type: IdFeature
  embedding_dim: 16
  hash_bucket_size: 100000
}
feature_configs : {
  input_names: 'customer'
  feature_type: IdFeature
  embedding_dim: 16
  hash_bucket_size: 100000
}
feature_configs : {
  input_names: 'brand'
  feature_type: IdFeature
  embedding_dim: 16
  hash_bucket_size: 100000
}
feature_configs : {
  input_names: 'user_id'
  feature_type: IdFeature
  embedding_dim: 16
  hash_bucket_size: 100000
}
feature_configs : {
  input_names: 'cms_segid'
  feature_type: IdFeature
  embedding_dim: 16
  hash_bucket_size: 100
}
feature_configs : {
  input_names: 'cms_group_id'
  feature_type: IdFeature
  embedding_dim: 16
  hash_bucket_size: 100
}
feature_configs : {
  input_names: 'final_gender_code'
  feature_type: IdFeature
  embedding_dim: 16
  hash_bucket_size: 10
}
feature_configs : {
  input_names: 'age_level'
  feature_type: IdFeature
  embedding_dim: 16
  hash_bucket_size: 10
}
feature_configs : {
  input_names: 'pvalue_level'
  feature_type: IdFeature
  embedding_dim: 16
  hash_bucket_size: 10
}
feature_configs : {
  input_names: 'shopping_level'
  feature_type: IdFeature
  embedding_dim: 16
  hash_bucket_size: 10
}
feature_configs : {
  input_names: 'occupation'
  feature_type: IdFeature
  embedding_dim: 16
  hash_bucket_size: 10
}
feature_configs : {
  input_names: 'new_user_class_level'
  feature_type: IdFeature
  embedding_dim: 16
  hash_bucket_size: 10
}
feature_configs : {
   input_names: 'tag_category_list'
   feature_type: SequenceFeature
   separator: '|'
   hash_bucket_size: 10000
   embedding_dim: 16
}
feature_configs : {
   input_names: 'tag_brand_list'
   feature_type: SequenceFeature
   separator: '|'
   hash_bucket_size: 100000
   embedding_dim: 16
}
feature_configs : {
  input_names: 'price'
  feature_type: IdFeature
  embedding_dim: 16
  num_buckets: 50
}

#------------------------------------------------------#
#   模型参数设置
#------------------------------------------------------#
model_config:{
  #------------------------------------------------------#
  #   模型种类
  #------------------------------------------------------#
  model_class: "WideAndDeep"
  #------------------------------------------------------#
  #   group_name      指定组名
  #   feature_names   该组的特征
  #   wide_deep       模型的记忆能力和泛化能力
  #------------------------------------------------------#
  feature_groups: {
    group_name: 'wide'
    feature_names: 'user_id'
    feature_names: 'cms_segid'
    feature_names: 'cms_group_id'
    feature_names: 'age_level'
    feature_names: 'pvalue_level'
    feature_names: 'shopping_level'
    feature_names: 'occupation'
    feature_names: 'new_user_class_level'
    feature_names: 'adgroup_id'
    feature_names: 'cate_id'
    feature_names: 'campaign_id'
    feature_names: 'customer'
    feature_names: 'brand'
    feature_names: 'price'
    feature_names: 'pid'
    wide_deep: WIDE
  }
  feature_groups: {
    group_name: 'deep'
    feature_names: 'user_id'
    feature_names: 'cms_segid'
    feature_names: 'cms_group_id'
    feature_names: 'age_level'
    feature_names: 'pvalue_level'
    feature_names: 'shopping_level'
    feature_names: 'occupation'
    feature_names: 'new_user_class_level'
    feature_names: 'adgroup_id'
    feature_names: 'cate_id'
    feature_names: 'campaign_id'
    feature_names: 'customer'
    feature_names: 'brand'
    feature_names: 'price'
    feature_names: 'pid'
    wide_deep: DEEP
    sequence_features: {
      group_name: "seq_fea"
      tf_summary: false
      allow_key_search:true
      seq_att_map: {
        key: "brand"
        key: "cate_id"
        hist_seq: "tag_brand_list"
        hist_seq: "tag_category_list"
      }
    }
  }
  #------------------------------------------------------#
  #   dnn                 代表全连接网络的神经元个数
  #   l2_regularization   l2正则化情况
  #------------------------------------------------------#
  wide_and_deep {
    wide_output_dim: 16


    dnn {
      hidden_units: [128, 64, 32]
    }

    final_dnn {
      hidden_units: [128, 64]
    }

    l2_regularization: 1e-5
  }
  embedding_regularization: 1e-5
}

export_config {
}
三、开始网络训练
设置好训练所需的config后,就可以开始模型的训练了,单卡用户可以使用如下指令进行训练:
CUDA_VISIBLE_DEVICES=0 python -m easy_rec.python.train_eval --pipeline_config_path samples/model_config/wide_and_deep_on_sequence_feature_taobao.config
CPU用户可以使用如下指令进行训练:
python -m easy_rec.python.train_eval --pipeline_config_path samples/model_config/wide_and_deep_on_sequence_feature_taobao.config
四、训练结果的评估
在完成模型的训练后,我们可以使用如下指令进行评估:
CUDA_VISIBLE_DEVICES=0 python -m easy_rec.python.eval --pipeline_config_path samples/model_config/wide_and_deep_on_sequence_feature_taobao.config
CPU用户可以使用如下指令进行评估:
python -m easy_rec.python.eval --pipeline_config_path samples/model_config/wide_and_deep_on_sequence_feature_taobao.config
五、训练结果的预测
1、训练模型的导出
无论是否使用GPU,都可以使用以下代码将模型导出为PB模式。下列指令的导出路径为dssm_on_taobao_export。
CUDA_VISIBLE_DEVICES='' python -m easy_rec.python.export --pipeline_config_path samples/model_config/wide_and_deep_on_sequence_feature_taobao.config --export_dir dssm_on_taobao_export
2、导出模型的预测
在完成模型的导出后,就可以利用导出的模型进行预测了,离线预测方式如下:
CUDA_VISIBLE_DEVICES=0 python -m easy_rec.python.predict --input_path 'data/test/tb_data/taobao_test_data' --output_path 'data/test/taobao_test_data_pred_result' --saved_model_dir experiments/dssm_taobao_ckpt/export/final --reserved_cols 'ALL_COLUMNS' --output_cols 'ALL_COLUMNS'
在这里中涉及到大量的参数,常用的参数如下。
- input_path: 输入文件路径;
- output_path: 输出文件路径,不需要提前创建,会自动创建;
- save_modeld_dir: 导出的模型目录;
- reserved_cols: 输入文件需要拷贝到输出文件的列,默认为’ALL_COLUMNS’,则所有的列都被copy到输出文件中。如果不想输入文件拷贝任何信息到输出文件,可以设置其为’';
- output_cols: 输出文件自身需要保留预测结果中的列,默认’ALL_COLUMNS’,则所有的列都被copy到输出文件中,可以使用下方的设置方式output_cols=“probs double”,代表输出probs,数据类型为double;
- input_sep: 输入文件的分隔符,默认",";
- output_sep: 输出文件的分隔符,默认"|"。


