使劲夸Redis
DB-Engines排名
Redis是一款优秀的,现在非常流行的一款基于内存结构的数据存储方案,并且产品开源【BSD 许可】。从下方的一个排名中可以看出,Redis在全部数据库层面属于上升状态,并且热度不减
而单单从K-V数据库类型就更不用说了,直接看排名
To Be No.1

DB-ENGINES
Redis能够如此受欢迎是有原因的
对比老牌产品,Redis能够从中脱颖而出,被广泛应用于不同领域下的不同场景,主要有如下特性:
性能优越
基于内存存储
先来介绍数据可以存储的两种方式:
在计算机中,数据是存储在磁盘中的,包括我现在写作的这篇文章,也是落地到磁盘中的。
而影响磁盘性能的维度有两个方面:
- 寻址: 磁盘寻址的速度是毫秒级别的
- 带宽: 也就是说单位时间内有多少字节流过去,现在基本上都是MB级别,更好的能达到GB级
而内存的寻址时间是纳秒,从时间单位上来看:内存比磁盘快了整整10W倍。因而各种数据存储在内存中当然是有很大优势的
而Redis:首先是基于内存存储,先天条件上优于磁盘存储的数据库。
单线程模式
Redis设计者将其工作线程为单线程模式,这样能够减少多线程上下文切换的消耗。
这也就是禁止在Redis中操作keys *这样阻塞式命令的原因
其次,单线程模式下不需要考虑数据安全等问题
当然,这里要声明一点:在Redis6.x的版本,为了提高计算机服务资源的利用,设计出了多线程方式,但是需要清楚的一点是:核心工作线程还是单线程的
实际工作中想要支持多线程,需要通过如下配置:
# 默认为no
io-threads-do-reads yes
# 设置线程数 小于CPU数
io-threads 4
计算向数据移动
现在有这样的需求:从存储的数据中取出第N条数据项

Memcached是通过字符串来存储的,所以我们想要取其中的某一个数据项,只能将全部存储数据传输到客户端,再从中取出我们想要的数据
而Redis提供了丰富的数据类型,包括string,list,hash,set,sorted set等五大基础类型。并且不同的数据类型提供了很多内置的Commands,这样将计算更加靠近数据,并且仅仅返回自己需要的数据项能够在最大程度上减少数据在网络中的传输,减少IO和带宽
原子性
虽然Redis的每一个指令都属于原子性操作,但是:
set k1 abc
expire k1 100
在某种极端条件下,这两个指令一起并不能保证它的原子性,所以在Redis 2.6.0之后支持lua脚本执行,那么上面的命令就可以写成
eval "redis.call('SET', KEYS[1], ARGV[1]) return redis.call('EXPIRE', KEYS[1], ARGV[2])" 1 k1 abc 100关于lua脚本的入门语法和使用,教程已经在路上了。莫慌!!!
退后,我要开始装逼了
这里关于Redis的介绍就到这里,毕竟相信大家都是有Redis的使用基础的,下面直接进入下一个阶段
前置准备
工欲善其事,必先利其器。我们先来做Redis的基本安装,这里我们准备了6.0.16的版本来使用,在安装之前,需要先升级gcc
升级gcc
yum -y install centos-release-scl
yum -y install devtoolset-9-gcc devtoolset-9-gcc-c++ devtoolset-9-binutils && scl enable devtoolset-9 bash

# 设置永久生效
echo "source /opt/rh/devtoolset-9/enable" >>/etc/profile
开始安装
除了上一步,安装过程和5.x没有任何区别
wget https://download.redis.io/releases/redis-6.0.16.tar.gz
# 解压到/opt下
tar xf redis-6.0.16.tar.gz -C /opt/
# 进入到解压目录下,执行编译安装
cd /opt/redis-6.0.16/

make && make PREFIX=/usr/local/redis-6.0.16 install如果在执行make的过程中出现错误,需要重新编译,那么执行make distclean先清除之前的编译缓存,再次执行make
# 添加到环境变量
vim /etc/profile

export REDIS_HOME=/usr/local/redis-6.0.16
export PATH=$REDIS_HOME/bin:$PATH

source /etc/profile之前的安装都是从源目录下将redis.conf复制到/usr/local/redis-6.0.16下,然后进行修改。我们换一种可视化交互方式来完成最终的安装过程:
# 进入到源redis下utils目录
cd /opt/redis-6.0.16/utils

vim install_server.sh
# 建议注释一下内容

#if [ "${_pid_1_exe##*/}" = systemd ]
#then
#       echo "This systems seems to use systemd."
#       echo "Please take a look at the provided example service unit files in this directory, and adapt and install them. Sorry!"
#       exit 1
#fi

# 执行该脚本,下面就进入到交互式界面
./install_server.sh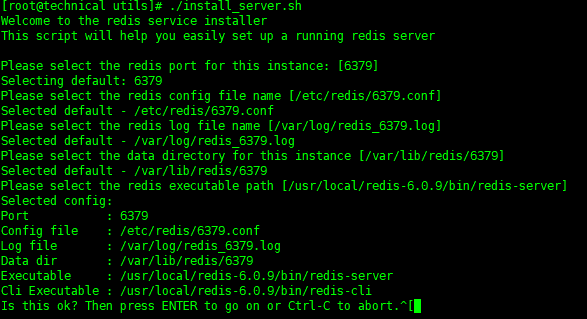
最后Enter键,确定该配置;如果想要取消通过Ctrl + C来操作

默认情况下,Redis启动,我们本地使用,就简单做一些配置,以下配置不建议在生产环境使用
vim /etc/redis/6379.conf

# 注释掉或者将127.0.0.1 改为0.0.0.0
# 也可以改为客户端指定IP
bind 127.0.0.1

# 保护模式,默认开启
protected-mode no

# 作为守护进程执行
daemonize yes
好了,配置就改到这里,这里多线程并没有开启,不需要。下面我们重新启动Redis
# 这样就重新启动了
/etc/rc.d/init.d/redis_6379 start
这种方式安装下来的Redis默认开机自启动
保护我的蛋糕,不要让“它们”乱动
我们会先手写一版,让大家明白实现原理,然后再调用开源框架Redisson来实现
在Redis官网中存在专门一节内容介绍了分布式锁,并且其中强调的三点特性非常重要:
- 安全:一定要保证在同一时刻只能有一个线程获得到锁
- 无死锁:即时Redis崩溃掉,当重新恢复之后该锁也一定要失效
- 容错:只要大多数节点启动,客户端就可以获取和释放锁
一支独苗
在《分布式锁原理》一文中我们曾经介绍过基于Redis锁的实现思路,那种属于是单机版的加锁方式
先拿过来看一看
加锁过程
SET lock:1 1 NX EX 60释放锁过程
if redis.call("get",KEYS[1]) == ARGV[1] then
    return redis.call("del",KEYS[1])
else
    return 0
end关于为什么通过lua脚本来操作相信大家都明白:原子性
自己写的
那么,我们接下来就通过代码编写来实现一下这个过程吧,同时会引入看门狗机制
其实就是开启了一个定时任务
// 基础抽象类,方便之后使用
// juc.locks.Lock
// 自定义ILifeCycle
//  start()
//  destory()
public abstract class AbstractLock implements Lock, ILifeCycle {

    @Override
    public void lock() {
        throw new BusException("this is not lock");
    }

    @Override
    public void lockInterruptibly() throws InterruptedException {
        throw new BusException("this is not lockInterruptibly");
    }

    @Override
    public boolean tryLock() {
        throw new BusException("this is not tryLock");
    }

    @Override
    public boolean tryLock(long time, TimeUnit unit) throws InterruptedException {
        throw new BusException("this is not tryLock");
    }

    @Override
    public void unlock() {
        throw new BusException("this is not unlock");
    }

    @Override
    public Condition newCondition() {
        throw new BusException("this is not newCondition");
    }

    @Override
    public void start() {
        throw new BusException("this is not start");
    }

    @Override
    public void destory() {
        throw new BusException("this is not destory");
    }
}
来看看我们自己的实现锁方式
建议大概看个意思就好
// 基于Redis的锁实现:基础版本
public class RedisLock extends AbstractLock {

    private final String lockKey;
    private final String host;
    private final int port;

    private static final long EXPIRE = 30L;

    private Jedis jedis;
    private ScheduledExecutorService service;

    public RedisLock(String host, int port, String lockKey) {
        this.host = host;
        this.port = port;
        this.lockKey = lockKey;
    }

    @Override
    public void lock() {
        final String ok = jedis.set(lockKey, Thread.currentThread().getName(), SetParams.setParams().nx().ex(EXPIRE));
        if ("OK".equals(ok.toUpperCase(Locale.ROOT))) {
            // 开启自动续期
            this.service.scheduleAtFixedRate(() -> {
                // 这里少了相同KEY的验证
                jedis.expire(lockKey, EXPIRE);
            }, 10, 10, TimeUnit.SECONDS);
        }
    }

    @Override
    public void unlock() {
        // 释放锁
        String luaScript = "if redis.call(\"get\",KEYS[1]) == ARGV[1] then\n" +
                "    return redis.call(\"del\",KEYS[1])\n" +
                "else\n" +
                "    return 0\n" +
                "end";

        final long eval = (long) jedis.eval(luaScript, 1, lockKey, Thread.currentThread().getName());
        if (0L != eval) {
            service.shutdown();
        }
    }

    @Override
    public void start() {
        this.jedis = new Jedis(host, port);
        this.service = new ScheduledThreadPoolExecutor(
                Runtime.getRuntime().availableProcessors(),
                r -> {
                    final Thread thread = new Thread(r, "Redis-Lock");
                    thread.setDaemon(true);
                    return thread;
                }
        );
    }

    @Override
    public void destory() {
        if (null != this.jedis) {
            jedis.close();
        }
    }
}
RedissonClient实现的锁
下面我们来看看人家的代码是怎么实现出来的
public class RedisLock extends AbstractLock {

    private final RedissonClient client;
    private final boolean isFair;
    private final RLock lock;
    private String key;

    public RedisLock(RedissonClient client, String key, boolean isFair) {
        this.client = client;
        this.isFair = isFair;
        this.key = StringUtils.isNotBlank(key) ? key : "lock";
        this.lock = getLock();
    }

    RLock getLock() {
        return isFair ? this.client.getFairLock(this.key) : this.client.getLock(this.key);
    }

    @Override
    public void lock() {
        this.lock.lock();
    }

    @Override
    public void lockInterruptibly() throws InterruptedException {
        this.lock.lockInterruptibly();
    }

    @Override
    public boolean tryLock() {
        return this.lock.tryLock();
    }

    @Override
    public boolean tryLock(long time, TimeUnit unit) throws InterruptedException {
        return this.lock.tryLock(time, unit);
    }

    @Override
    public void unlock() {
        this.lock.unlock();
    }
}
这里做了一个简单的封装,方便将统一做调用
private static RedissonClient getClient() {
    Config config = new Config();
    config.useSingleServer().setAddress("redis://192.168.10.200:6379");
    RedissonClient redissonClient = Redisson.create(config);
    return redissonClient;
}

private static ExecutorService executorService = Executors.newCachedThreadPool();

public static void main(String[] args) throws InterruptedException {
    int[] count = {0};
    final RedisLock redisLock = new RedisLock(getClient(), "lock_key", false);

    for (int i = 0; i < 10000; i++) {
        executorService.submit(() -> {
            try {
                redisLock.lock();
                count[0]++;
            } catch (Exception e) {
                e.printStackTrace();
            } finally {
                try {
                    redisLock.unlock();
                } catch (Exception e) {
                    e.printStackTrace();
                }
            }
        });
    }
    executorService.shutdown();
    executorService.awaitTermination(1, TimeUnit.HOURS);
    System.out.println(count[0]);
}
完全没有问题
分布式
上面的只是在单机情况下玩一玩,单机情况最怕出现单点故障,那么整个分布式锁就无法使用,从而涉及到整个业务无法使用
这也是为什么说实际开发中引入的第三方组件越多,越容易出现问题
那接下来我们就不自己实现了,来看看大名鼎鼎的红锁算法是如何解决这个问题的
Redlock
我们知道Redis的集群方式包括:
- 主从集群
- 哨兵集群
- Cluster模式
除Cluster模式之外,数据都需要一个同步复制的过程,这样无形中存在一定的时间差
而Redlock的每个节点可以是独立存在的,不使用复制或任何其他隐式协调系统。也就是说在加锁的时候和单机版本是一模一样的,只不过由之前的单节点变为了N个节点,一般情况下,可以将N设置为5。
获取锁过程
那么,Redlock在获取锁的过程中,客户端会执行如下操作:
- 以毫秒为单位获取当前时间
- 尝试顺序获取所有 N 个实例节点中的锁,在N个实例节点中使用相同的键名和随机值。客户端在每个实例节点设置锁时,客户端使用一个比设置的超时时间更小的超时来获取它,这样可以防止客户端长时间保持阻塞状态。如果某个实例节点不可用,那么能够尽快和下一个节点进行通信
- 客户端通过从当前时间中减去【第一步获得的时间戳】来计算获取锁所用的时间。当客户端能够在大多数实例节点(至少 3 个)中获取锁,并且获取锁所用的总时间小于锁有效时间【超时时间】,则认为该锁被获取
而以下两种情况下会被判定客户端获取锁失败:
- 锁设置的总超时时间 - 获取锁所用的时间为负,那么认为锁获取失败
- 无法从
N/2 + 1个实例节点中获取到锁,那么就认定其获取锁失败
释放锁过程
释放锁的过程非常简单,在N个实例节点中将key删除,锁就释放成功
能动手的尽量别哔哔
下面我们通过Redisson来实现加锁过程。需要说明的是:Redisson中已经有了关于红锁的实现,不需要我们额外导入其他包
关于Redis如何多实例安装我就不多介绍了,土豪的你可以起N台机器,我就用端口来区分了
// 这里继承的是上面的抽象类
public class RedisRedLock extends AbstractLock {

    // 红锁客户端
    private final RedissonRedLock client;

    public RedisRedLock(RedissonRedLock client) {
        this.client = client;
    }

    @Override
    public void lock() {
        this.client.lock();
    }

    @Override
    public void lockInterruptibly() throws InterruptedException {
        this.client.lockInterruptibly();
    }

    @Override
    public boolean tryLock() {
        return this.client.tryLock();
    }

    @Override
    public boolean tryLock(long time, TimeUnit unit) throws InterruptedException {
        return this.client.tryLock(time, unit);
    }

    @Override
    public void unlock() {
        this.client.unlock();
    }
}
我们来这样测试
public static void main(String[] args) throws InterruptedException {
    ExecutorService executorService = Executors.newCachedThreadPool();

    RedissonRedLock redissonRedLock = new RedissonRedLock(
        create("redis://192.168.10.200:6379", "lock_key1"),
        create("redis://192.168.10.200:6380", "lock_key2"),
        create("redis://192.168.10.200:6381", "lock_key3"),
        create("redis://192.168.10.200:6382", "lock_key4"),
        create("redis://192.168.10.200:6383", "lock_key5")
    );

    RedisRedLock redLock = new RedisRedLock(redissonRedLock);

    int[] count = {0};
    for (int i = 0; i < 10000; i++) {
        executorService.submit(() -> {
            try {
                redLock.lock();
                count[0]++;
            } catch (Exception e) {
                e.printStackTrace();
            } finally {
                try {
                    redLock.unlock();
                } catch (Exception e) {
                    e.printStackTrace();
                }
            }
        });
    }
    executorService.shutdown();
    executorService.awaitTermination(1, TimeUnit.HOURS);
    System.out.println(count[0]);
}

public static RLock create(String url, String key) {
    Config config = new Config();
    config.useSingleServer().setAddress(url);
    RedissonClient redissonClient = Redisson.create(config);
    return redissonClient.getLock(key);
}
最后
Redisson自称是Redis的亲儿子,可以说提供的功能是非常强大的,如果大家对Redisson不是很熟悉,我们之后抽时间专门来介绍一下这款强大的框架
到这里,基于Redis的分布式锁实现就结束了,我们之后见


