目录
4.1 @Resource 和 @AutoWired 的区别:

为什么要使用注解
使用这五种类注解可以简化对 Bean 的存储和读取。其实不仅限于五大类注解,其他注解、注入方式都是相同原理来简化操作的,可以直接将 Bean 存储到 Spring 容器中。
在上一篇中,我们每存储一个新的 Bean 时,都需要在配置文件 spring-config.xml 中添加一行新的 <bean><bean> 标签,这样明显很麻烦,于是在本篇中主要介绍一劳永逸的方法:配置扫描文件-路径;
配置扫描文件:
配置扫描文件是必须的操作;
1.配置扫描路径:
先要建好 Spring 项目,接着理解下面的内容:
① 在 resources 包里创建配置文件,名为:spring-config.xml;
② 在配置文件里添加 Spring 配置内容:
<?xml version="1.0" encoding="UTF-8"?>
<beans xmlns="http://www.springframework.org/schema/beans"
       xmlns:xsi="http://www.w3.org/2001/XMLSchema-instance"
       xmlns:content="http://www.springframework.org/schema/context"
       xsi:schemaLocation="http://www.springframework.org/schema/beans http://www.springframework.org/schema/beans/spring-beans.xsd http://www.springframework.org/schema/context https://www.springframework.org/schema/context/spring-context.xsd">
    <content:component-scan base-package="com.java.demo"></content:component-scan>
</beans>
需要注意的是 <content:component-scan><content:component-scan> 标签,其内部最重要的就是 base-package 这个路径,这个路径的含义见下图:
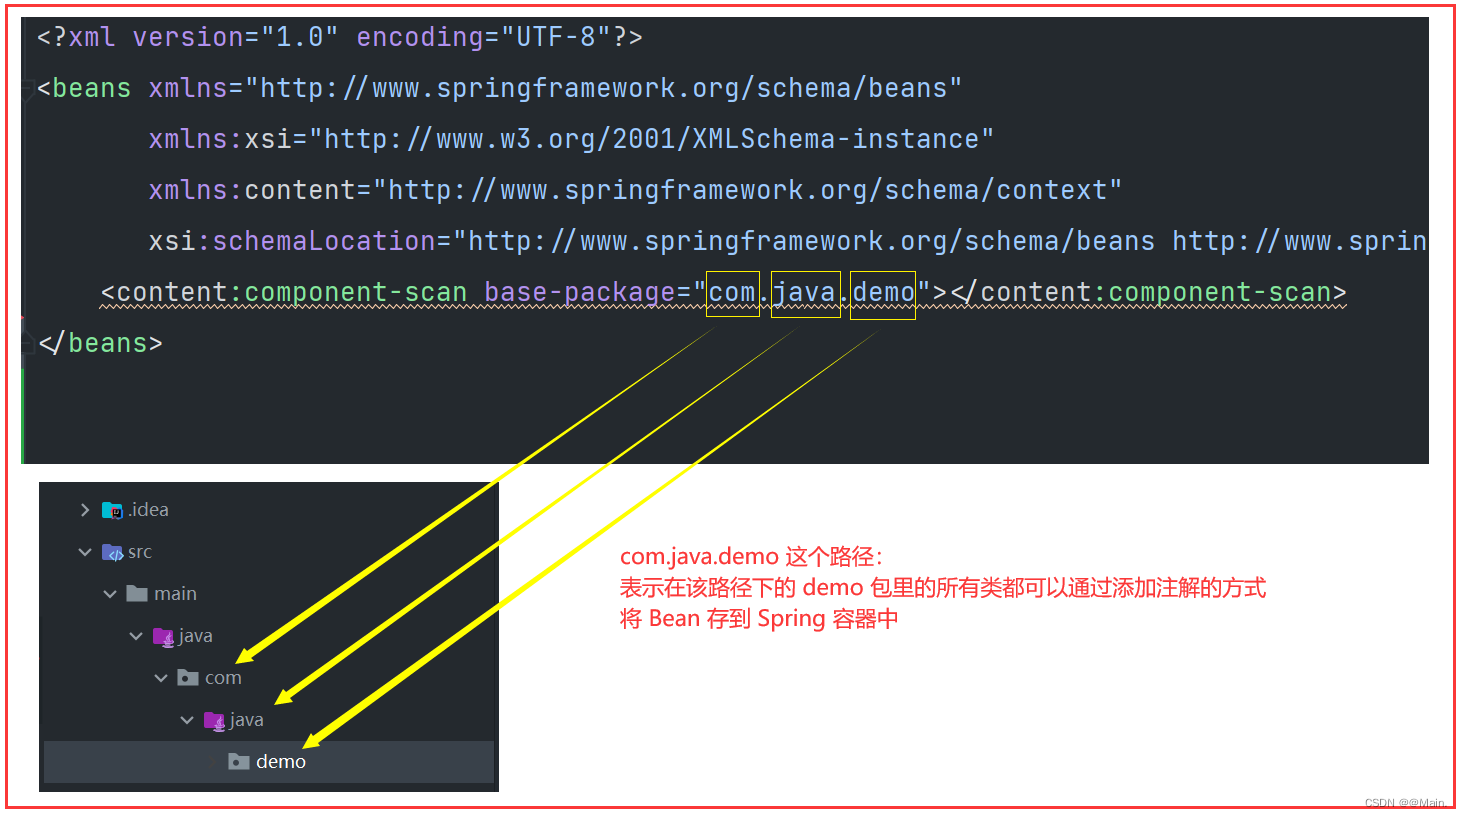
换个角度来讲:对于不在该最终路径下的类或对象,即使为它加了注解,也不能做为 Bean 存储到 Spring 容器中;
----------------------------------------------前置工作完成--------------------------------------------------
1. 五大类注解:
五大类注解有哪些?
1.1 @Controller:
为了适应 javaEE 标准分层,演示代码前先创建响应层级的包,在包内创建类(后面同理、标准分层下面介绍);
1.1.1 存储 Bean:
像这样,写一个 PersonController 类,加上类注解 @Controller 就可以把这个 Bean 通过配置路径扫描后,放到 Spring 容器中;
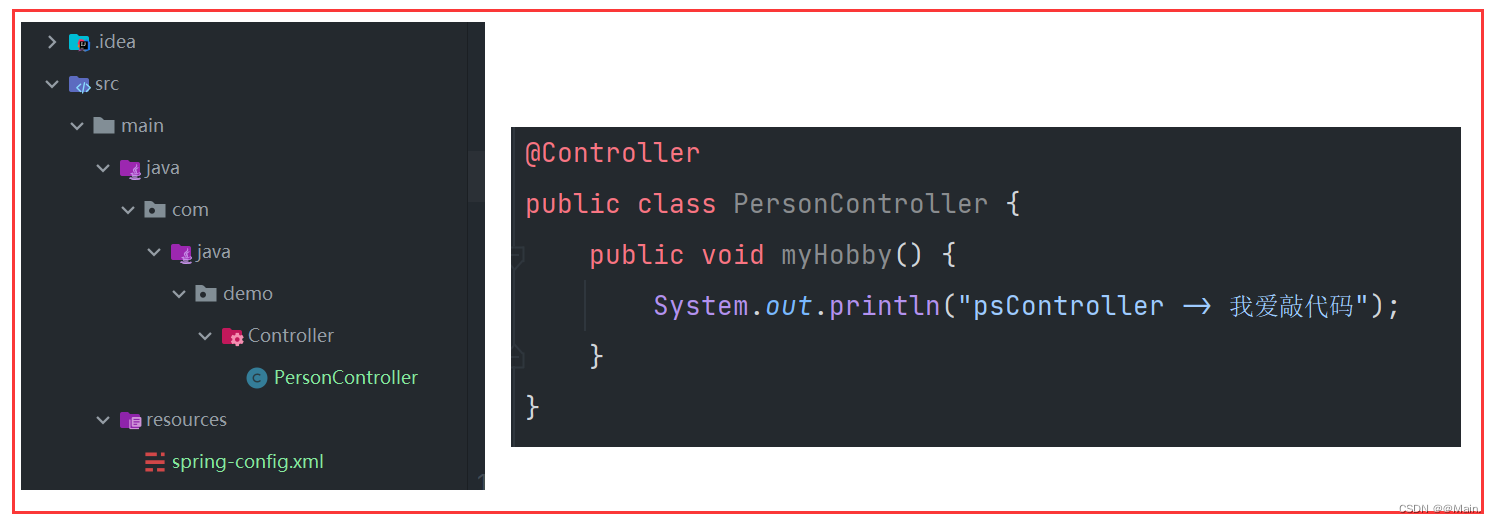
@Controller
public class PersonController {
    public void myHobby() {
        System.out.println("psController -> 我爱敲代码");
    }
}
1.1.2 读取 Bean:
在最初的java包下创建一个启动类:App类,获取 Spring 对象、Bean 对象;
运行结果得出,我们没有像原始那样在配置文件中添加一行 <bean id="" class=""></bean> 这样的手动注入,也成功的可以读取到 Bean 对象 - personController,这就是 @Controller 注解自动注入的好处;
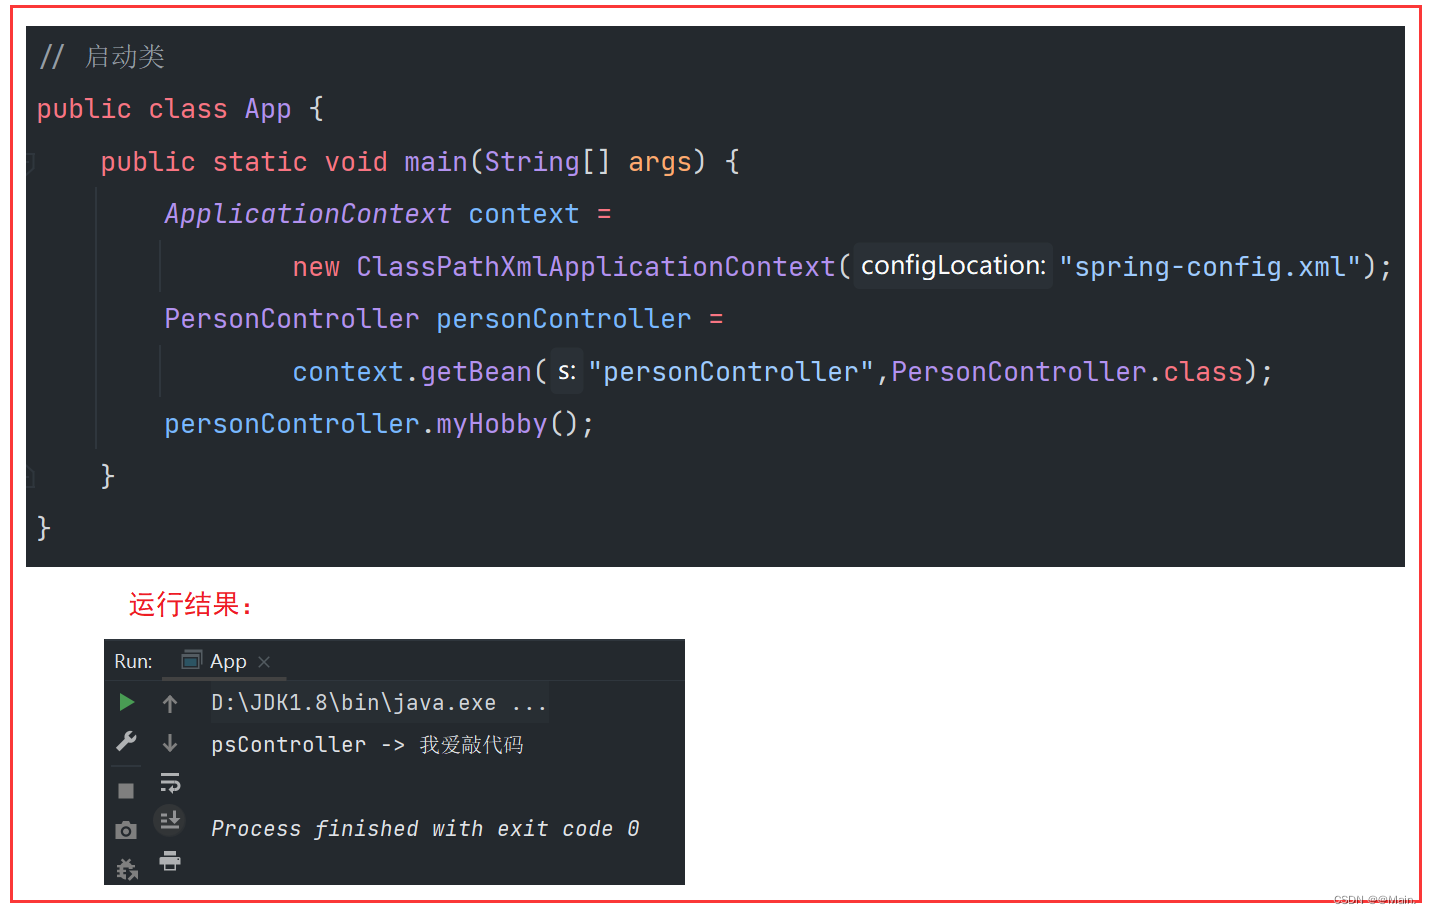
// 启动类
public class App {
    public static void main(String[] args) {
        ApplicationContext context =
                new ClassPathXmlApplicationContext("spring-config.xml");
        PersonController personController =
                context.getBean("personController",PersonController.class);
        personController.myHobby();
    }
}
------------------------------------------------------------------------------------------------------
1.2 @Service:
1.2.1 存储 Bean:
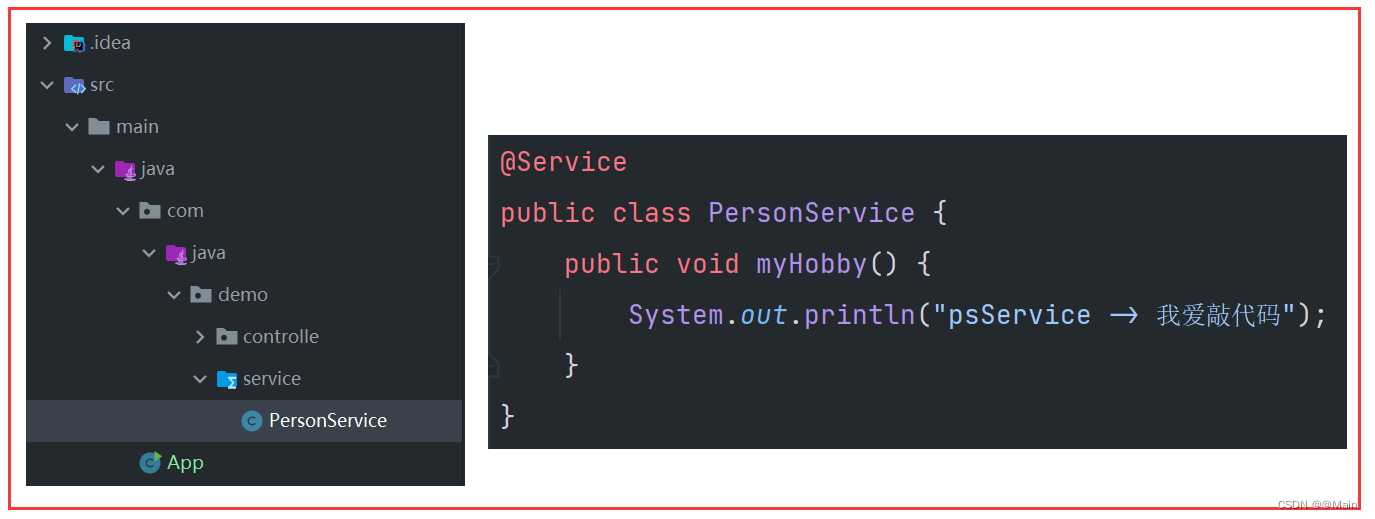
@Service
public class PersonService {
    public void myHobby() {
        System.out.println("psService -> 我爱敲代码");
    }
}
1.2.2 读取 Bean:

public class App {
    public static void main(String[] args) {
        ApplicationContext context =
                new ClassPathXmlApplicationContext("spring-config.xml");
        PersonService personService = context.getBean("personService",PersonService.class);
        personService.myHobby();
    }
}
------------------------------------------------------------------------------------------------------
1.3 @Repository:
1.3.1 存储 Bean:
创建一个名为 repository 的包,在包下创建类 PersonRepository:

@Repository
public class PersonRepository {
    public void myHobby() {
        System.out.println("psRepository -> 我爱敲代码");
    }
}
1.3.2 读取 Bean:

public class App {
    public static void main(String[] args) {
        ApplicationContext context =
                new ClassPathXmlApplicationContext("spring-config.xml");
        PersonRepository personRepository =
                context.getBean("personRepository",PersonRepository.class);
        personRepository.myHobby();
    }
}
1.4 @Component:
1.4.1 存储 Bean:
创建一个名为 Component 的包,在包下创建一个类 PersonComponent:

@Component
public class PersonComponent {
    public void myHobby() {
        System.out.println("psComponent -> 我爱敲代码");
    }
}
1.4.2 读取 Bean:

public class App {
    public static void main(String[] args) {
        ApplicationContext context =
                new ClassPathXmlApplicationContext("spring-config.xml");
        PersonComponent personComponent =
                (PersonComponent) context.getBean("personComponent", PersonComponent.class);
        personComponent.myHobby();
    }
}
1.5 @Configuration:
1.5.1 存储 Bean:
创建一个名为 configuration 的包,在包下创建类 PersonConfiguration:

@Configuration
public class PersonConfiguration {
    public void myHobby() {
        System.out.println("psConfiguration -> 我爱敲代码");
    }
}
1.5.2 读取 Bean:

public class App {
    public static void main(String[] args) {
        ApplicationContext context =
                new ClassPathXmlApplicationContext("spring-config.xml");
        PersonConfiguration personConfiguration =
                context.getBean("personConfiguration",PersonConfiguration.class);
        personConfiguration.myHobby();
    }
}
五大类注解匹配 Bean 时默认 id 命名规则:
上面通过注解方式直接将 Bean 存储到 Spring 容器中,我们并没有手动设置其 id,那么读取时的 id 该怎么写?
id 是有默认规则的:双击 shift,找到 AnnotationBeanNameGenerator 方法,alt + 7 直接查看 buildDefaultBeanName 方法:

再进入其内部的 decapitalize() 方法:
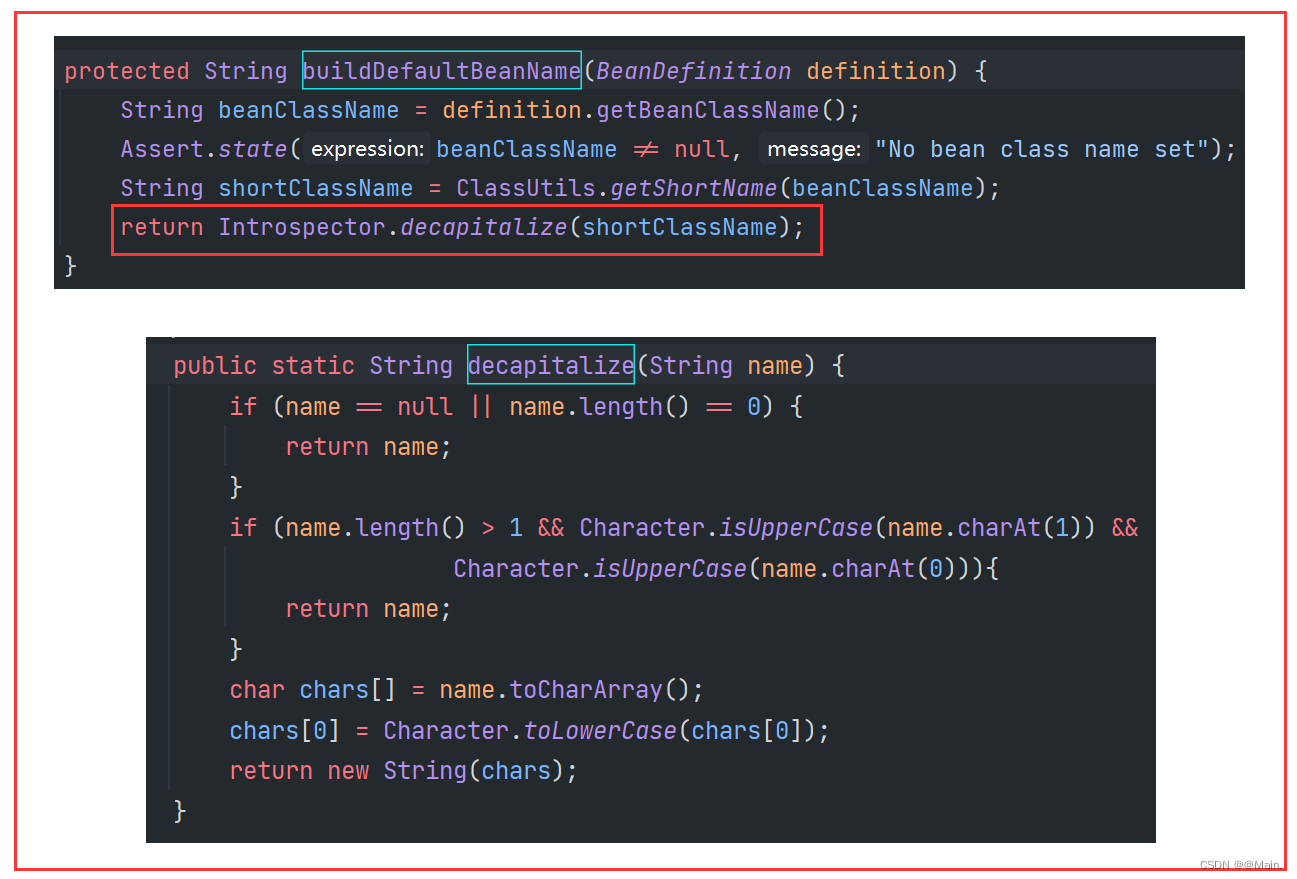
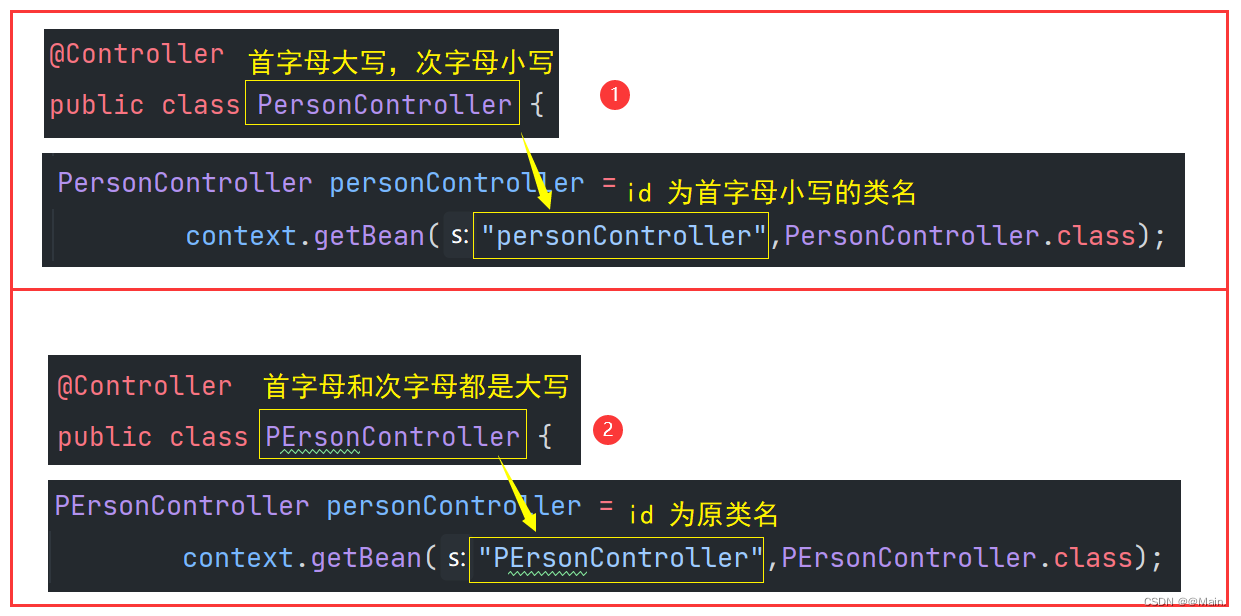
通过源码可以得到结论:在 @Controller 注解下默认规定:
图解:
为什么要有这么多的注解?
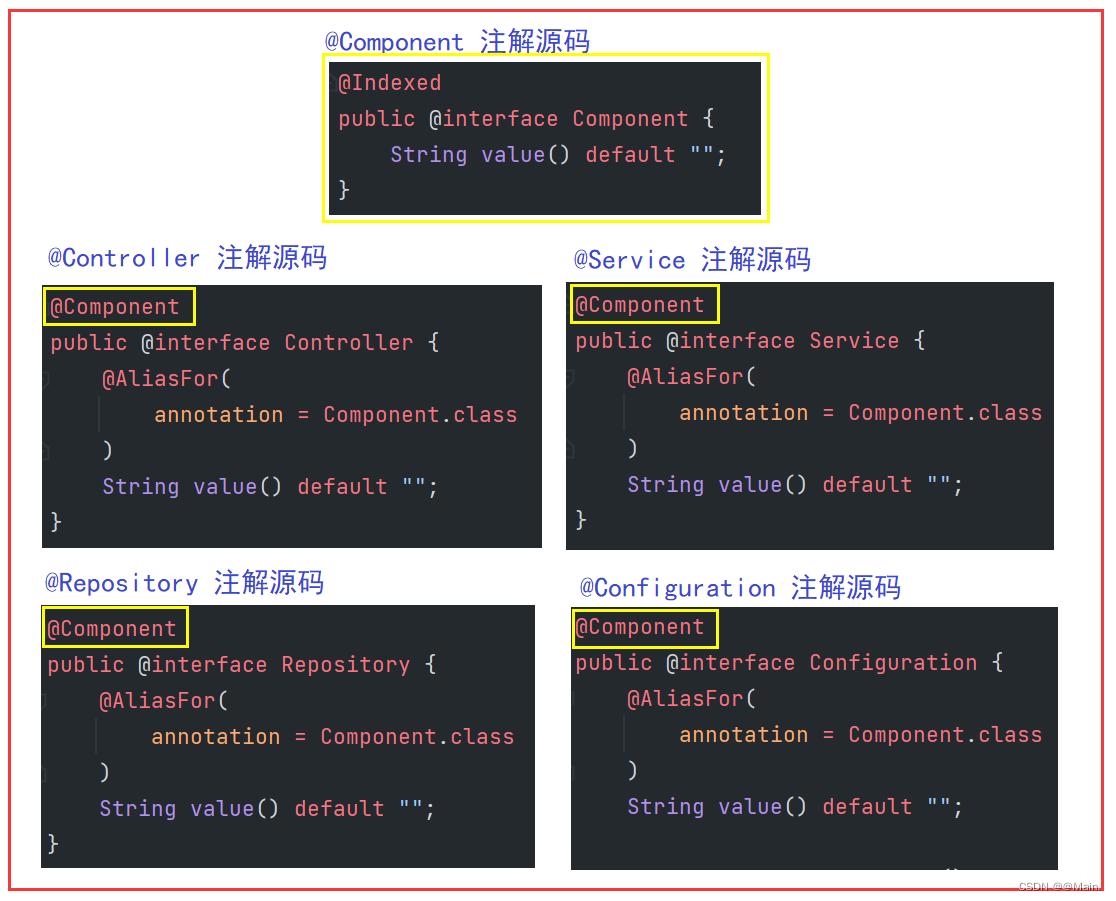
1.五大类注解之间的关系:
同样通过五种注解的源码可以看到:@Controller、@Service、@Repository、@Configuration 这四个注解的实现都依赖于 @Component注解,因此可以理解为 前面四个注解是 @Component 注解的“子类”,是对其的扩展。
2.为什么使用这么多注解?
这就不得不提 javaEE 标准分层了,既然 Spring 框架是针对企业开发使用的,因此这些注解一定程度上也是为了适应开发规则、符合业务逻辑而设计的。
javaEE标准分层就是各大企业为了高效开发设计出来的一种逻辑分层结构模型,主要分为:表现层 —> 控制层 —> 服务层 —> 数据持久层;
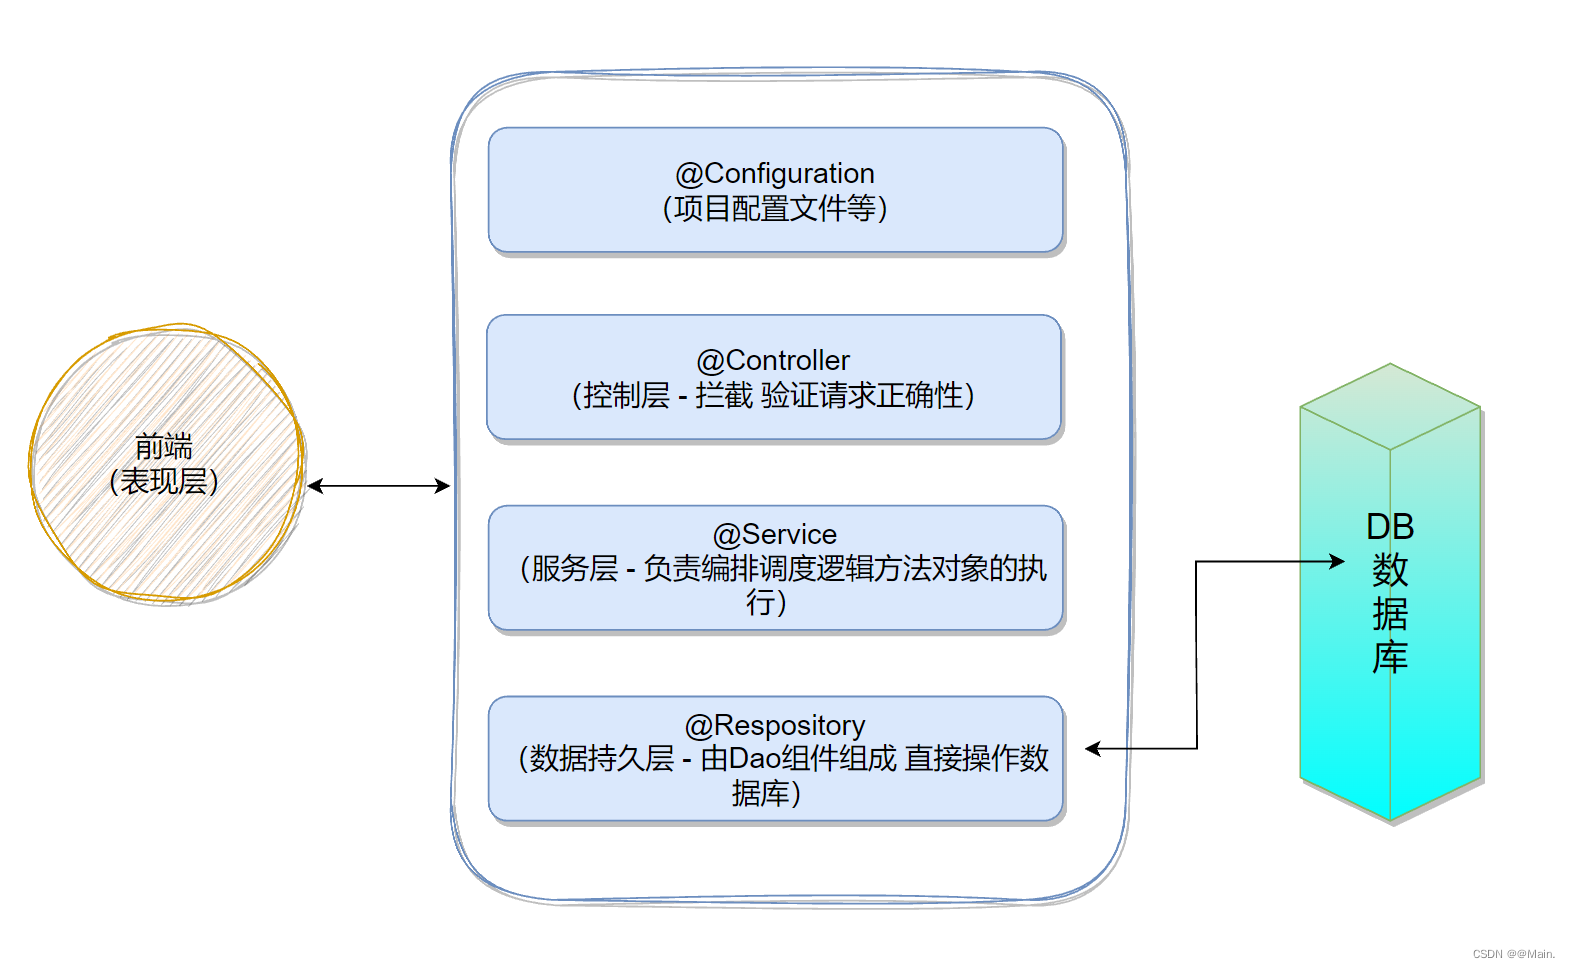
写代码不仅是为了设计程序,另一方面也是为了给程序员看的,虽然五大注解的功能都是一样的,但它们各自代表着一种设计层,在开发过程中,哪些类是用在哪一层的,借助对应的注解就可以很直观的起到标识功能,便于流程调度。
2. 方法注解 @Bean:
除了上面介绍的五大类注解之外,还有一种专门使用在方法上的“方法注解”:@Bean;
@Bean 注解的作用:告诉方法产生一个 Bean 对象,将这个对象交给 Spring IoC容器管理,所以这个方法要返回创建的对象;
2.1 存储 Bean:
先在 demo 包下创建一个 bean 包,在该包下创建一个类 PersonBean:
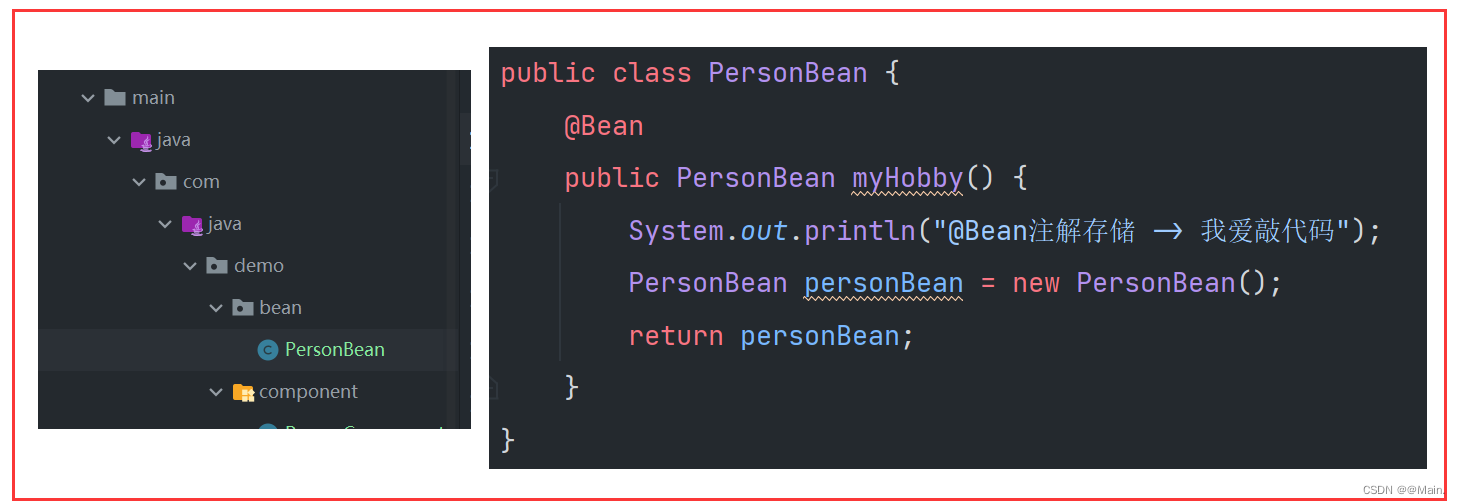
2.2 获取 Bean 对象:
通过 @Bean 注解存储的对象,获取时就不能像之前那样了,因为这个注解的 id 命名规则和五大注解的是不同的;
如图:
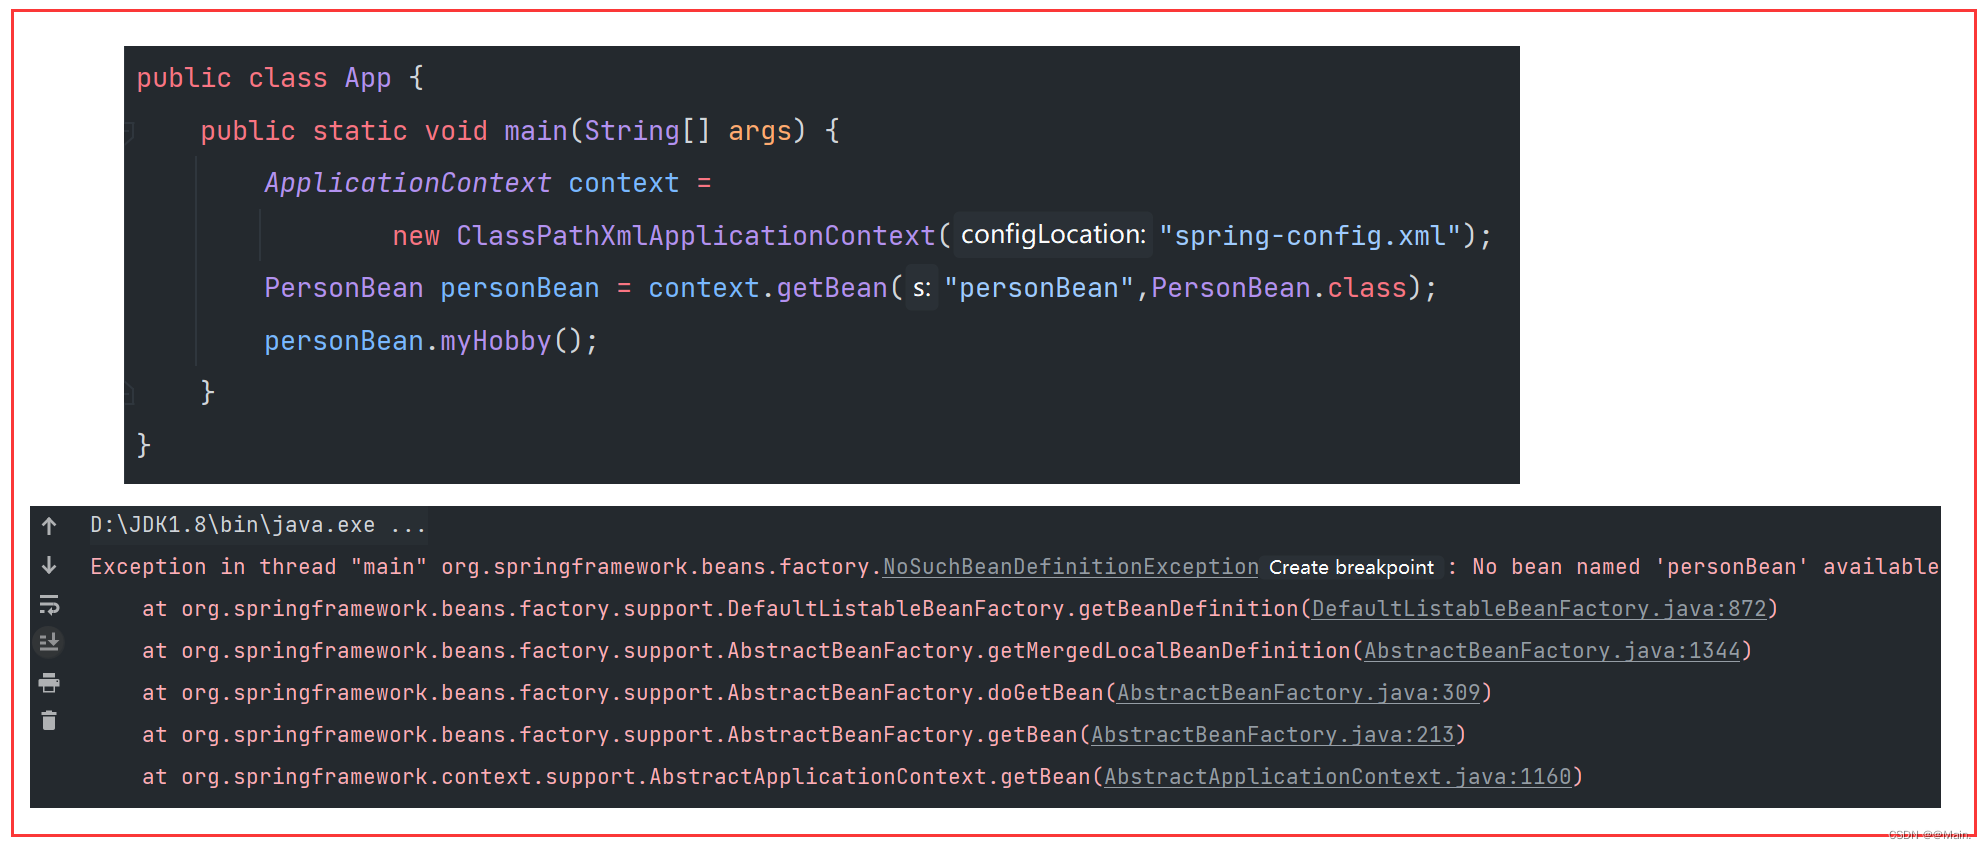
注意! 以上报错有两个原因:
修改以上代码:
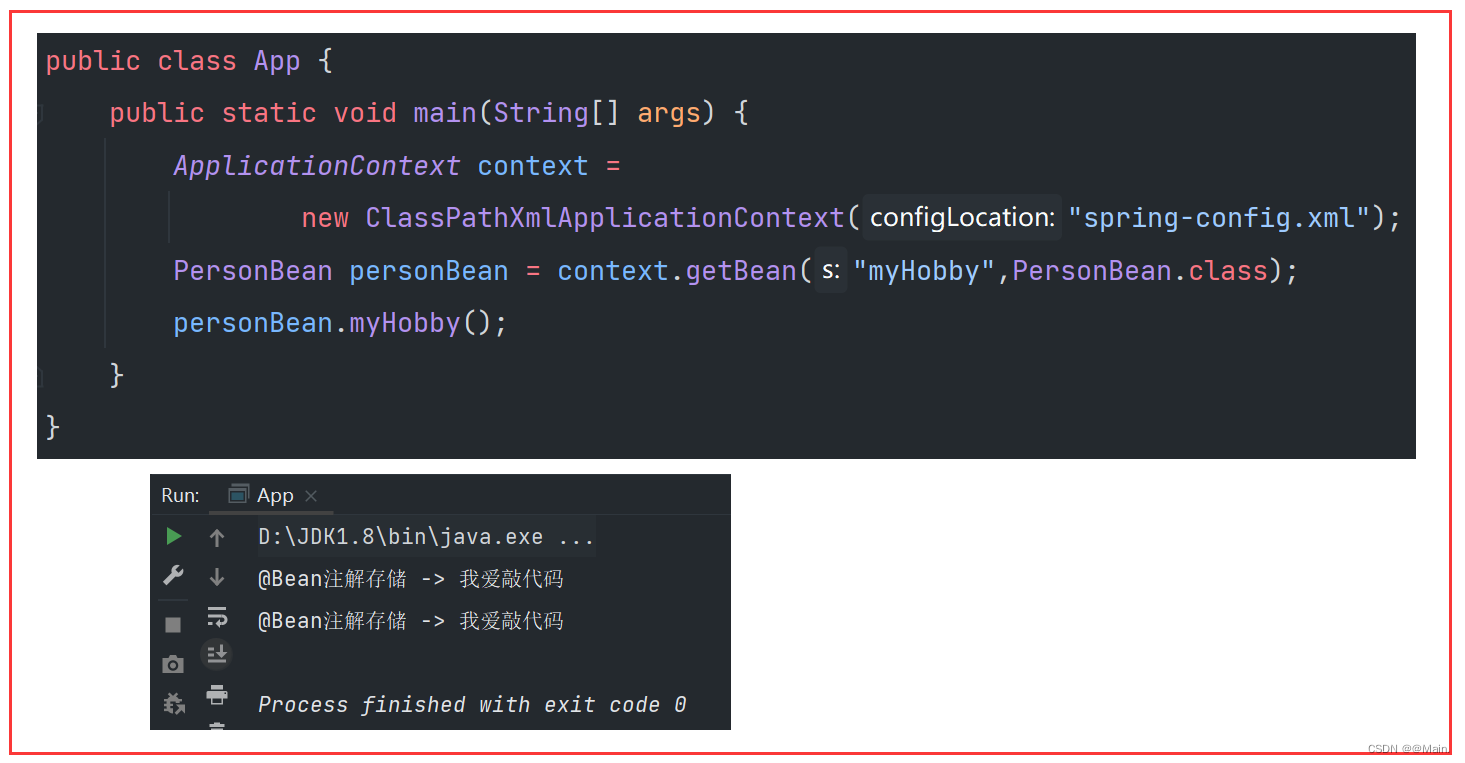
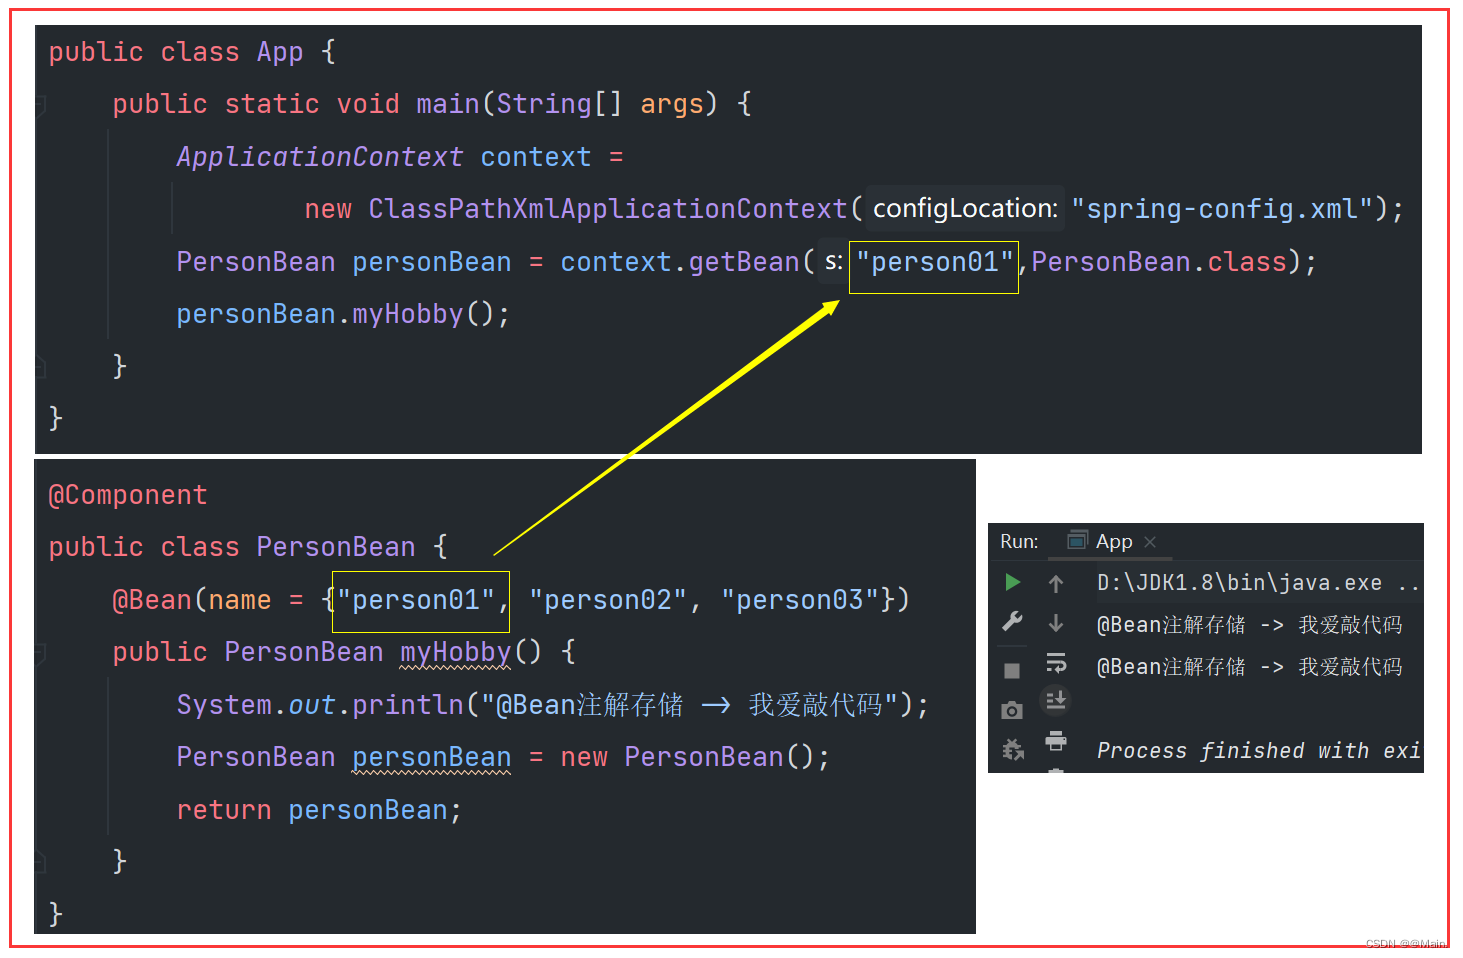
2.3 @Bean 重命名策略:
默认情况下 @Bean 注解存储的对象的 id 和方法名一致,除此之外,还可以根据程序员需要,自行重命名;
写法:
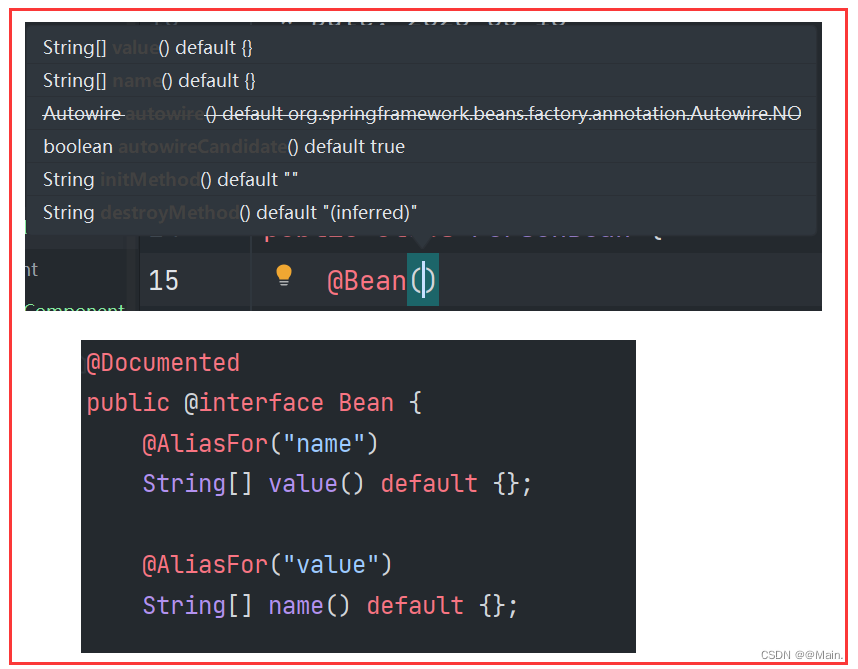
修改后:
也可以省略着写:

3. 对象装配(更简单地获取 Bean 对象):
从容器中读取到 Bean 对象也叫“对象装配”,是把对象取出来放到某个类中,有时也叫“对象注入”;
下面介绍的三种新的注入方式:
- 属性注入;
- Setter 注入;
- 构造方法注入;
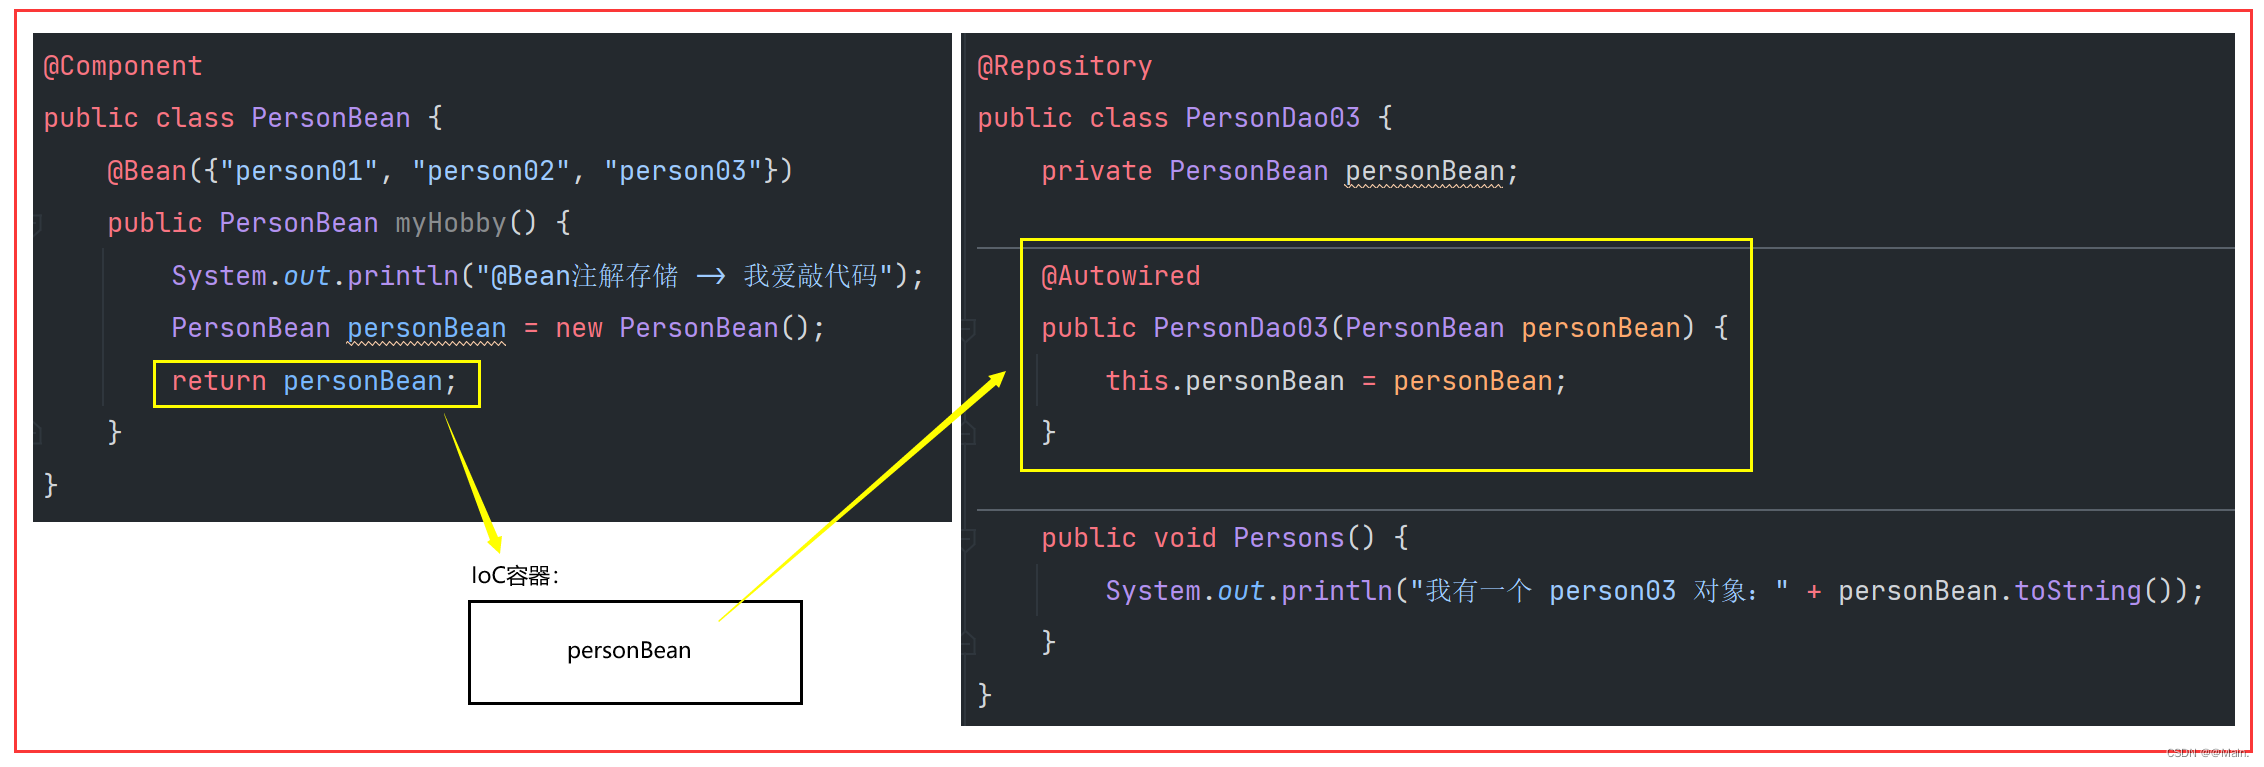
3.1 属性注入:
属性注入要借助 @Autowired 注解;
示例:现在有一个数据表 personDao,其中要存储上面创建出来的 PersonBean 的实例,因此思路为:创建一个 PersonDao 实体类,在这个类内部,借助属性注入直接将 PersonBean 类的 Bean 对象注入到 PersonDao 类中;


3.1.1 优缺点分析:
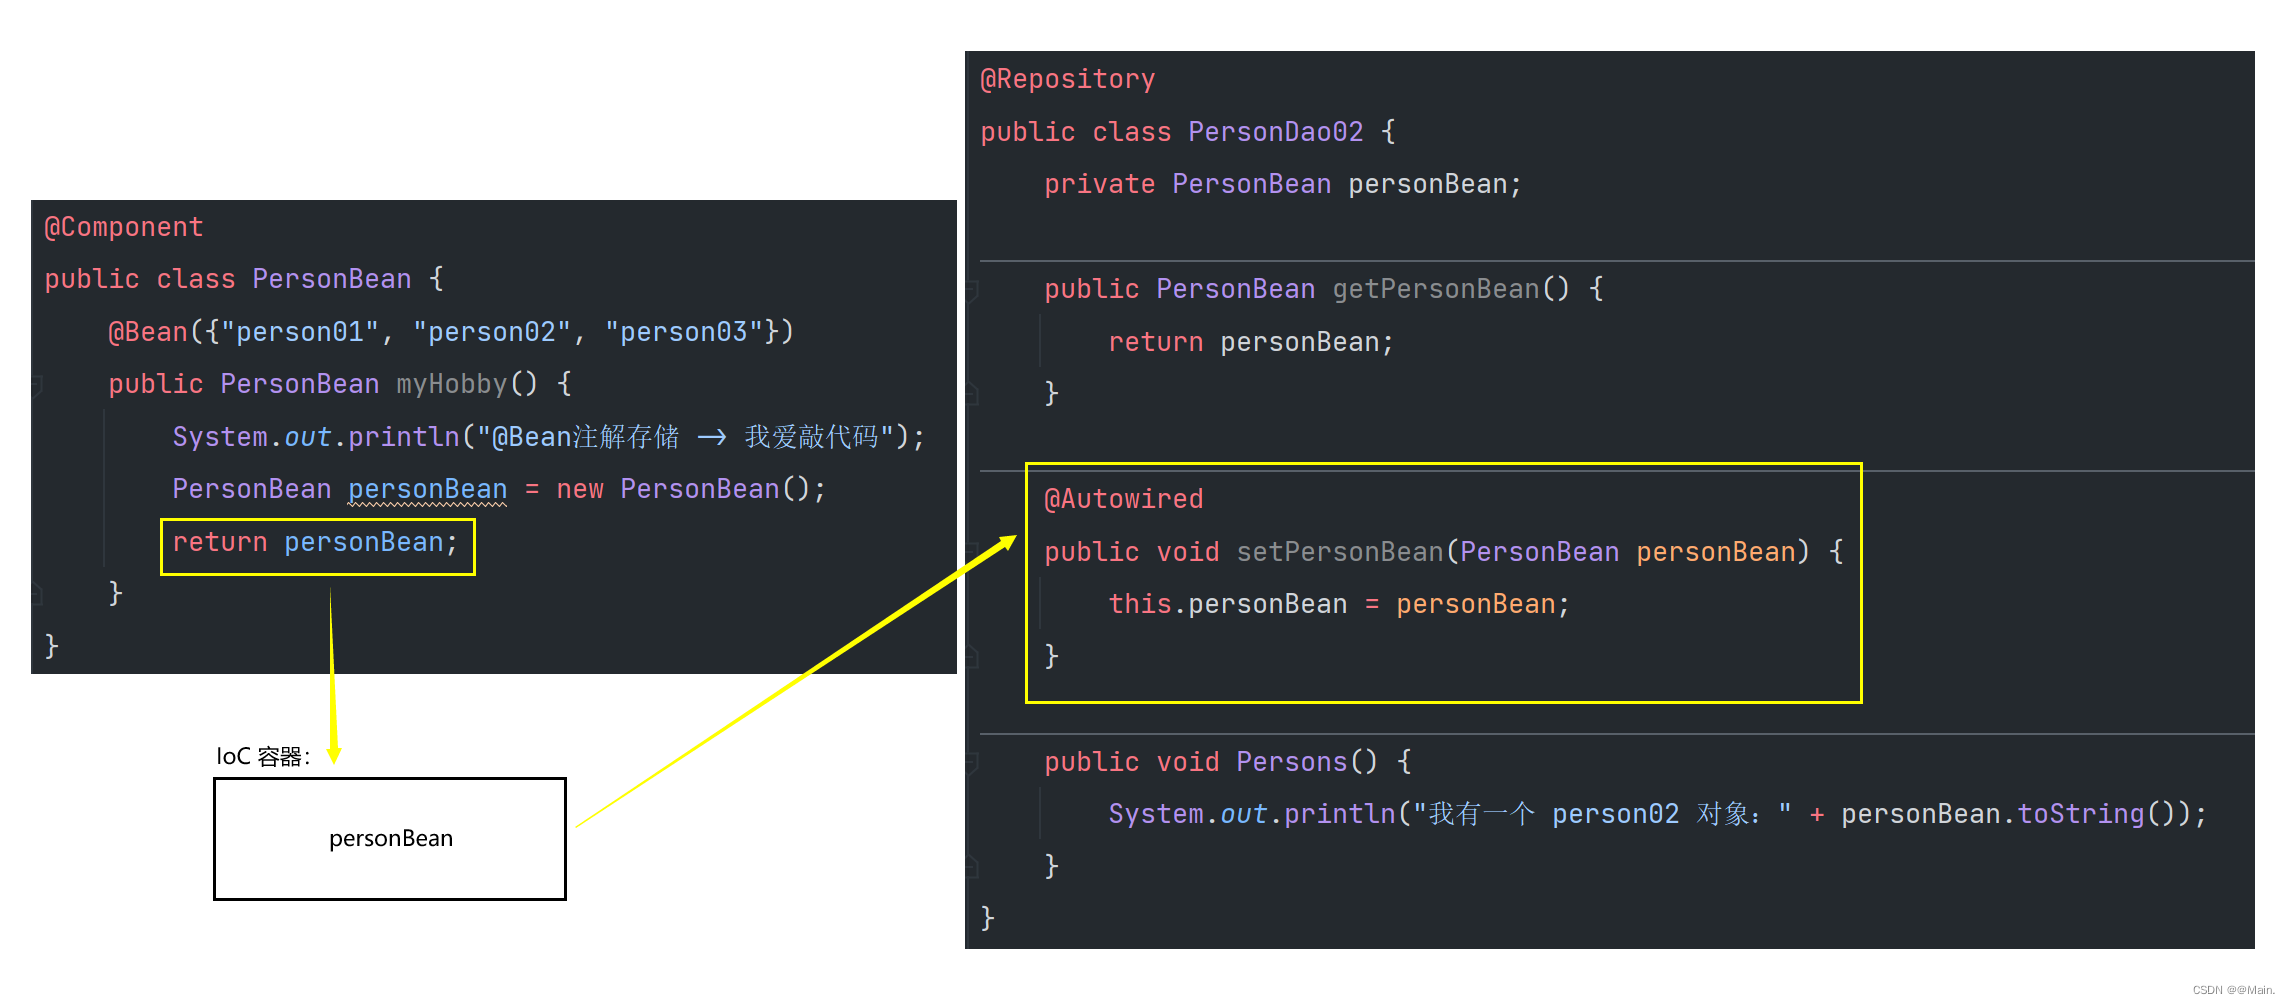
3.2 Setter 注入:
Setter 注入也要借助 @Autowired 注解,但它确实使用在 setter() 方法上的;
示例:还是把 PersonBean 对象注入到 PersonDao 类中,稍微修改代码,注解这次要加到 Setter() 方法上;
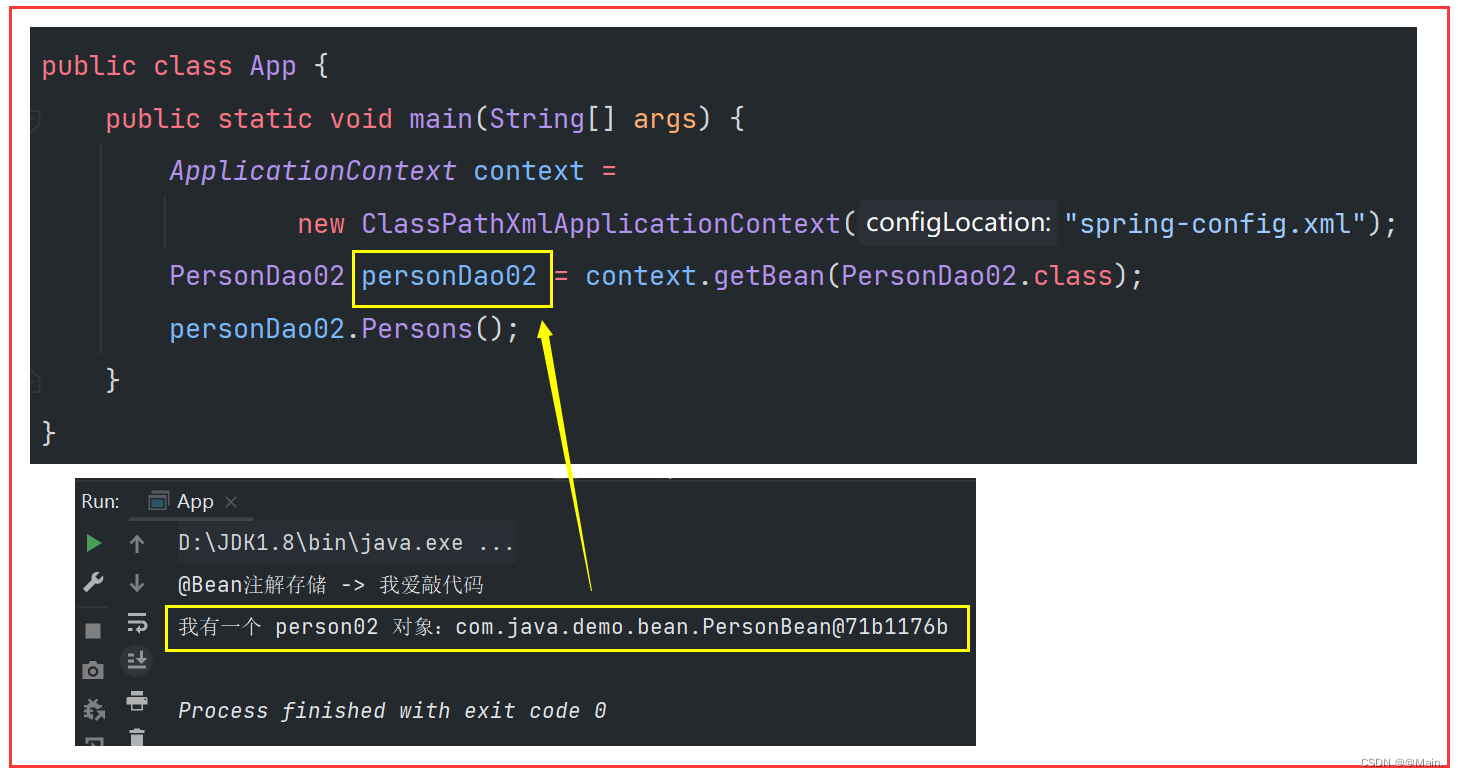
3.2.1 优缺点分析:
3.3 构造方法注入:
构造方法注入还是要借助 @Autowired 注解,但这里是使用在构造方法上;
注意事项:
- 如果只有一个构造方法,那么 @Autowired 注解可以省略;
- 如果有多个构造方法,就必须使用 @Autowired 注解标明使用的哪个构造方法;
示例:依然是把 PersonBean 对象注入到 PersonDao 类中,稍微修改代码,注解这次要加到构造方法上;

3.3.1 优缺点分析:
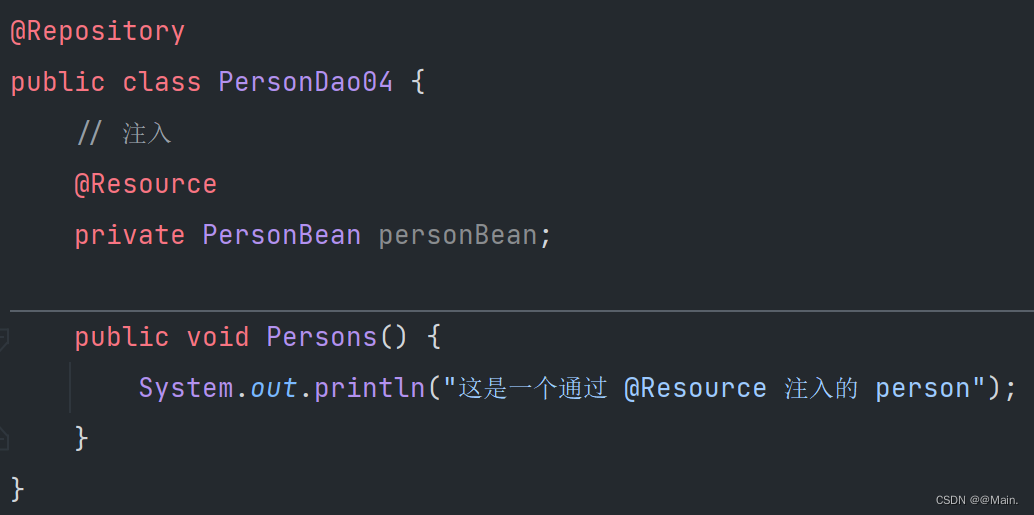
4. @Resource 注解:
这个注解也是用来进行对象注入的,先看演示:
4.1 @Resource 和 @AutoWired 的区别:
4.1.1 解决同一类型 @Bean 报错问题:
当同一类型的 Bean 存储了多份时,如果仅仅使用 Spring 的 @Autowired 注解来注入到类中,可能会出现查找不到唯一匹配目标的错误。
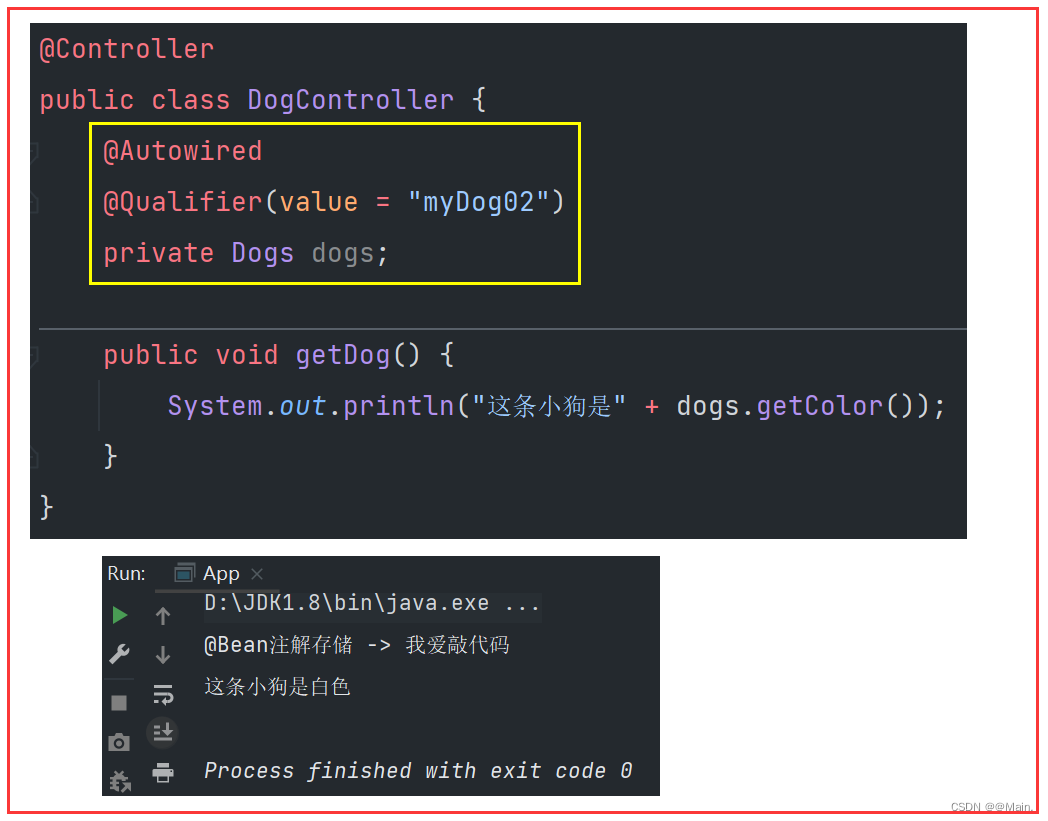
示例:DogsBean 类中使用 @Bean 注解存储了两只颜色不同的小狗,现在想在 DogController 类中把某个指定的小狗注入;
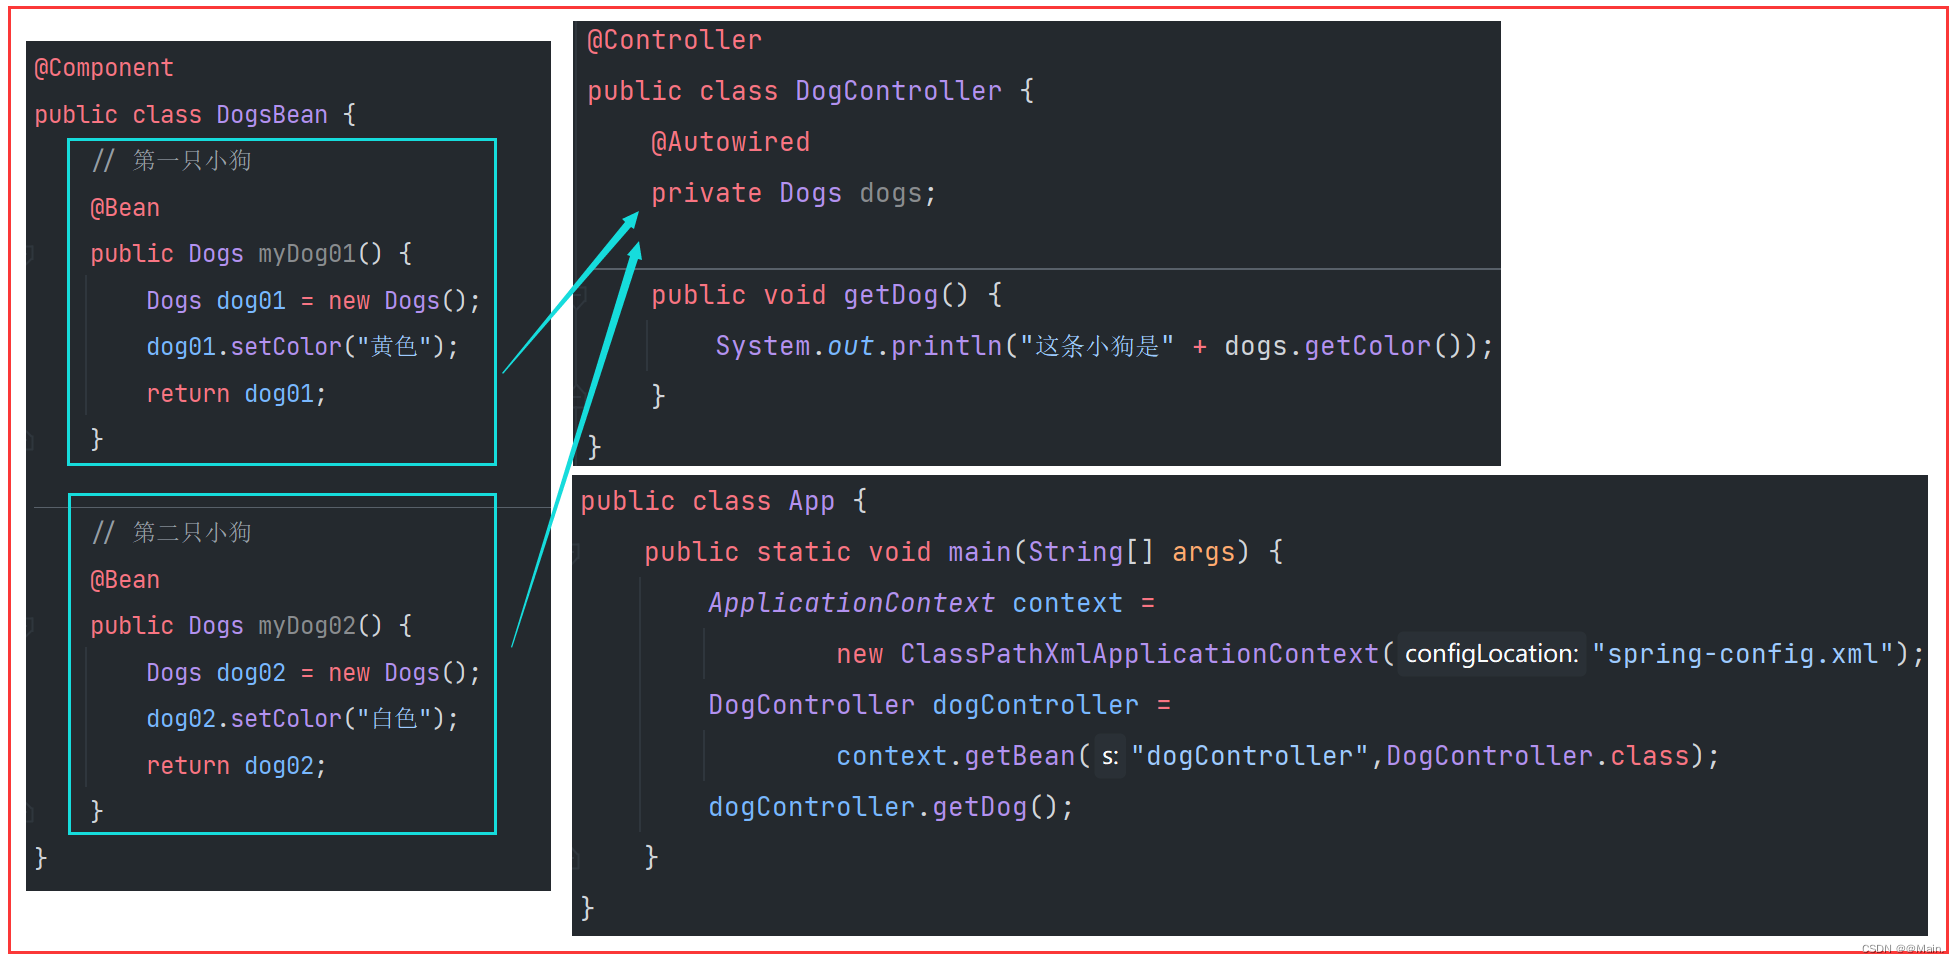

运行就会出现错误:不能匹配到唯一值。
解决办法:
方法一:使用 @Resource(name= ""):因为 @Autowired 注解的参数只能是 Boolean 类型的值,所以不能指定名称,而 @Resource却可以;


方法二: 使用 @Qualifier(value="") 注解:有的人可能就是只想用@Autowired注解,那也行,那么就要结合 @Qualifieer 注解一起使用;