安装apisix
先下载apisix的镜像文件
在docker的镜像库搜一下
docker search apisix
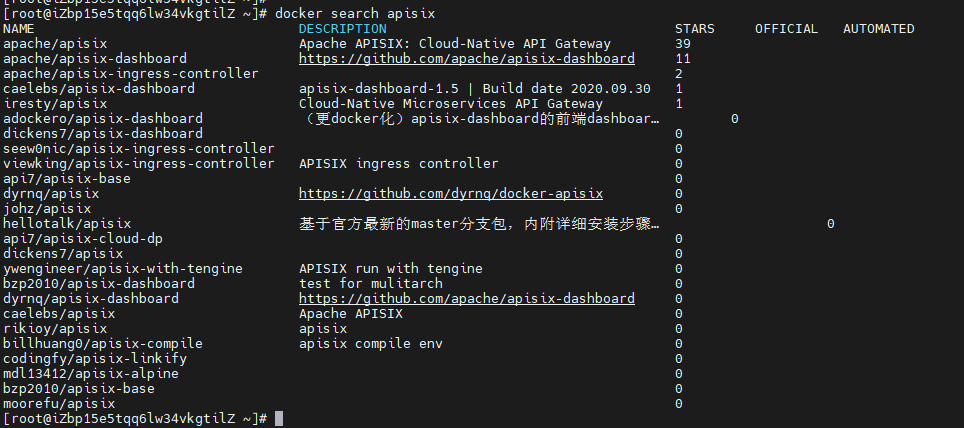
第一个就是,如果要下载最新版的,直接执行docker pull apache/apisix即可。选择其他版本的话需要访问https://hub.docker.com/r/apache/apisix/tags,我是用的2.10.0-alpine版本。

启动etcd
下载完之后不着急启动,因为apisix依赖etcd,所以要先保证etcd启动。

创建配置文件
然后,在宿主机本地创建apisix的配置文件config.yaml。下面的key修改为自己的,这个key是调用apisix的admin相关API需要传的,如果不改会有一个默认的在源码里写死的,如果你部署在公网上会导致被别人攻击,因为知道这个key就可以随意调用你的API操作apisix,我的就被攻击过,莫名被配置了好多路由,路由的结果是执行一些脚本,我发现后下线并删除了这些路由。
apisix:
  admin_key:
    -
      name: admin
      key: zZ2Trn0WFjk3k34hjsdaReplrVUekVz  # using fixed API token has security risk, please update it when you deploy to production environment
      role: admin
etcd:
  host:                           # it's possible to define multiple etcd hosts addresses of the same etcd cluster.
    - "http://yourip:2379"     # multiple etcd address, if your etcd cluster enables TLS, please use https scheme,
                                  # e.g. https://127.0.0.1:2379.
  prefix: /apisix                 # apisix configurations prefix
  timeout: 300
启动apisix
创建完后执行如下命令,启动容器:
docker -d -p 9080:9080 -v /usr/local/apisix/conf/config.yaml:/usr/local/apisix/conf/config.yaml apache/apisix:2.10.0-alpine
-v后面的路径是你宿主机内的配置文件路径,冒号后面的路径是固定的
查看是否启动成功,执行docker ps -a
可以看到状态为Up,表示启动成功了

浏览器访问http://yourip:9080/显示404,表示启动成功。

安装dashboard
下载镜像
同样,先下载镜像,我下的2.9.0版本的

创建配置文件
然后创建配置文件conf.yaml
conf:
  listen:
    host: 0.0.0.0         # the address on which the `Manager API` should listen.
                          # The default value is 0.0.0.0, if want to specify, please enable it.
                          # This value accepts IPv4, IPv6, and hostname.
    port: 9000            # The port on which the `Manager API` should listen.

  allow_list:             # If we don't set any IP list, then any IP access is allowed by default.
  etcd:
    endpoints:            # supports defining multiple etcd host addresses for an etcd cluster
      - 172.19.60.179:2379
authentication:
  secret:
    zQ5w5jkLDh3jZpywJ3sskrw6Yv633ruq
  expire_time: 3600     # jwt token expire time, in second
  users:                # yamllint enable rule:comments-indentation
    - username: admin
      password: password
    - username: user
      password: password
注意,上面的password要自定义,不要设置的太简单,尤其时你部署后是在公网上,太简单容易被破解,遭到攻击。
启动dashboard
docker run -d -p 9000:9000 -v /usr/local/apisix-dashboard/conf/conf.yaml:/usr/local/apisix-dashboard/conf/conf.yaml apache/apisix-dashboard:2.9.0
docker ps -a查看

然后浏览器访问http://yourip:9000/
如下启动成功。