由于项目中最近需要用到dwr实现一些功能,因此在网上和dwr官网上找了一些资料进行学习。在此记录一下。(此处实现简单的dwr应用和dwr消息反向推送)
一、引入dwr的包
<dependency>
       <groupId>org.directwebremoting</groupId>
       <artifactId>dwr</artifactId>
       <version>3.0.1-RELEASE</version>
</dependency>
二、引入spring的包,因为示例代码中和spring进行了整合,spring的包略。
三、spring的配置文件(启用注解扫描即可)
<context:component-scan base-package="com.huan.dwr" />四、修改web.xml
<context-param>
    <param-name>contextConfigLocation</param-name>
    <param-value>classpath:spring/applicationContext.xml</param-value>
  </context-param>
  <listener>
    <listener-class>org.springframework.web.context.ContextLoaderListener</listener-class>
  </listener>
  <listener>
    <listener-class>org.directwebremoting.servlet.DwrListener</listener-class>
  </listener>
  <servlet>
    <servlet-name>dwr-invoker</servlet-name>
    <display-name>DWR Servlet</display-name>
    <description>Direct Web Remoter Servlet</description>
    <servlet-class>org.directwebremoting.servlet.DwrServlet</servlet-class>
    <init-param>
      <param-name>fileUploadMaxBytes</param-name>
      <param-value>1024000</param-value>
    </init-param>
    <init-param>
      <param-name>debug</param-name>
      <param-value>false</param-value>
    </init-param>
    <init-param>
      <param-name>accessLogLevel</param-name>
      <param-value>runtimeexception</param-value>
    </init-param>
    <init-param>
      <param-name>activeReverseAjaxEnabled</param-name>
      <param-value>true</param-value>
    </init-param>
    <init-param>
      <param-name>initApplicationScopeCreatorsAtStartup</param-name>
      <param-value>true</param-value>
    </init-param>
    <init-param>
      <param-name>jsonRpcEnabled</param-name>
      <param-value>true</param-value>
    </init-param>
    <init-param>
      <param-name>jsonpEnabled</param-name>
      <param-value>true</param-value>
    </init-param>
    <init-param>
      <param-name>preferDataUrlSchema</param-name>
      <param-value>false</param-value>
    </init-param>
    <init-param>
      <param-name>org.directwebremoting.extend.ScriptSessionManager</param-name>
      <param-value>com.huan.dwr.simple.reverseajax.DwrScriptSessionManager</param-value>
    </init-param>
    <load-on-startup>1</load-on-startup>
  </servlet>
  <servlet-mapping>
    <servlet-name>dwr-invoker</servlet-name>
    <url-pattern>/dwr/*</url-pattern>
  </servlet-mapping>
注:1.测试环境中可以将debug的参数改为true,开发环境改为false
2.fileUploadMaxBytes 文件上传时限制上传文件的大小
3.org.directwebremoting.extendScriptSessionManager 为修改dwr默认的scriptSession的管理,默认情况下,页面上每刷新一次,都将会产生一次scriptsession,这样会产生没有的 scriptsession,浪费服务器的资源。而HttpSession只在用户第一次访问服务器时产生,所以可以考虑使用httpSession和 ScriptSession结合管理scriptsession.即需要重写dwr ScriptSessionManager接口中的方法
五、dwr的配置(默认会找web-inf 下的dwr.xml文件)
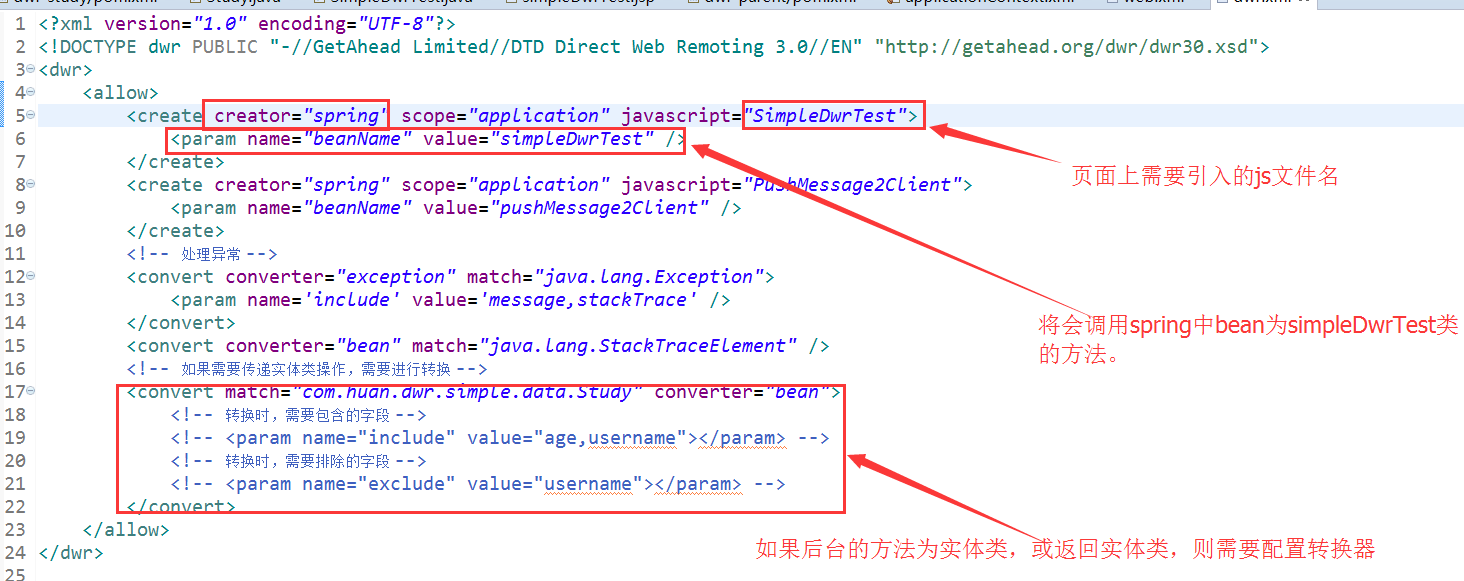
六、简单的dwr实例应用
1.jsp页面引入dwr需要的js文件
<script type="text/javascript" src="${pageContext.request.contextPath }/dwr/engine.js"></script> <!-- dwr自动生成 -->
<script type="text/javascript" src="${pageContext.request.contextPath }/dwr/util.js"></script><!-- dwr自动生成 ,dwr的一些工具类-->
<!-- SimpleDwrTest.js 这个为dwr.xml文件中create 标签中javascript元素的值 -->
<script type="text/javascript" src="${pageContext.request.contextPath }/dwr/interface/SimpleDwrTest.js"></script>
2.jsp页面的代码
<strong><% page language="java" contentType="text/html; charset=UTF-8" pageEncoding="UTF-8"%>
<!DOCTYPE html PUBLIC "-//W3C//DTD HTML 4.01 Transitional//EN" "http://www.w3.org/TR/html4/loose.dtd">
<html>
<head>
<meta http-equiv="Content-Type" content="text/html; charset=UTF-8">
<title>测试dwr简单的功能</title>
<script type="text/javascript" src="${pageContext.request.contextPath }/dwr/engine.js"></script>
<script type="text/javascript" src="${pageContext.request.contextPath }/dwr/util.js"></script>
<script type="text/javascript" src="${pageContext.request.contextPath }/dwr/interface/SimpleDwrTest.js"></script>
<script type="text/javascript">
function method1(){
SimpleDwrTest.noArgumentMethod();
}
function method2(){
SimpleDwrTest.hellowArgument("一个参数.");
}
function method3(){
SimpleDwrTest.invokedMoreArgument("参数一","参数二");
}
/** 获取到后台返回的值,只需要在回调函数中处理即可 */
function method4(){
SimpleDwrTest.returnValue("传递值到后台",function(r){
alert(r);
});
SimpleDwrTest.returnValue("传递值到后台",{
callback : function(r){
alert(r+"...");
}
});
}
/** 需要在dwr.xml文件中配置一下,才可以得到详细的异常信息 */
function method5(){
SimpleDwrTest.handleError({
errorHandler : function(msg,e){
alert(msg);
}
});
}
/** 处理实体类 */
function method6(){
var student = {
username : 'huan',
age : 23,
address : '湖北黄冈.'
};
SimpleDwrTest.addStudy(student,function(r){ alert(r); });
}
function method7(){
var file = document.getElementById('file');
SimpleDwrTest.fileUpload("ok",file,function(r){
alert(r);
});
}
</script>
</head>
<body>
<div>
<ul>
<li>调用无参方法:<input type="button" value="click" onclick="method1()"> </li>
<li>调用一个参数的方法:<input type="button" value="click" onclick="method2()"/> </li>
<li>调用多个参数的方法:<input type="button" value="click" onclick="method3()"/> </li>
<li>后台返回值到前台:<input type="button" value="click" onclick="method4()"/> </li>
<li>处理实体类的信息:<input type="button" value="click" onclick="method6()"/></li>
<li>处理异常信息:<input type="button" value="click" onclick="method5()"/></li>
<li>实现简单的文件上传:<input id="file" type="file" /><input type="button" value="click" onclick="method7()"/> </li>
</ul>
</div>
</body>
</html></strong>2.后台对应的java代码
<strong>package com.huan.dwr.simple;
import java.io.File;
import java.io.IOException;
import org.apache.commons.io.FileUtils;
import org.apache.commons.io.IOUtils;
import org.directwebremoting.io.FileTransfer;
import org.springframework.stereotype.Component;
import com.huan.dwr.simple.data.Study;
/**
* 测试一下dwr调用简单的java方法
*
* @描述
* @作者 huan
* @时间 2016年4月11日 - 下午7:11:02
*/
("simpleDwrTest")
public class SimpleDwrTest {
/**
* 调用无参数的构造方法
*/
public void noArgumentMethod() {
System.out.println("invoked...");
}
/**
* 调用一个参数的方法
*
* @param hello
*/
public void hellowArgument(String hello) {
System.out.println(hello + " world.");
}
/** 调用多个参数的方法 */
public void invokedMoreArgument(String param1, String param2) {
System.out.println(String.format("这是接收到的参数:[%s]-[%s]", param1, param2));
}
/**
* 后台返回值到前台
*
* @param value
* @return
*/
public String returnValue(String value) {
return "后台返回的值:" + value;
}
/**
* 处理错误信息
*/
public void handleError() {
System.out.println("该方法将会抛出异常");
throw new RuntimeException("后台出异常了.");
}
/**
* 以实体类作为参数
* @param study
* @return
*/
public String addStudy(Study study) {
System.out.println(study);
return "添加学生成功!!!";
}
/**
* 文件上传
*
* @param fileName
* @param flie
* @return
* @throws IOException
*/
public String fileUpload(String msg,FileTransfer fileTransfer) throws IOException {
try {
System.out.println(fileTransfer.getFilename());
System.out.println(fileTransfer.getMimeType());
System.out.println(fileTransfer.getSize());
System.out.println(fileTransfer.getOutputStreamLoader());
FileUtils.copyInputStreamToFile(fileTransfer.getInputStream(), new File("D:" + File.separator + fileTransfer.getFilename()));
} catch (IOException e) {
e.printStackTrace();
} finally {
IOUtils.closeQuietly(fileTransfer.getInputStream());
}
return "文件上传成功.";
}
}
</strong>可以看到,使用了dwr后,可以使访问后台,变得简单了。 比如文件的上传也变得简单了。
注意:文件的上传需要依赖 commons-fileupload-version.jar这个jar包。
在项目中有时需要用到后台发生了变化,需要及时通知到前台,这个可以使用dwr的来实现。
注意: 由 于scriptSession比较特殊,页面每次刷新都会创建一个scriptsession,这个不符合我们的需求,应当只需要一个 scriptSession即可。然后我们知道httpsession是第一次访问服务器时创建的,并且在整个应用中只有一个,所以可以使用 httpsession的结合scriptsession做一些事情。
在dwr3中提供了ScriptSessionListener用于 监听scriptsession的创建和销毁。因此,我们创建一个类实现ScriptSessionListener接口,在这个类中维护一个 map,map的key为httpsession的id,值为Scriptsession.
步骤:
一、写一个类实现ScriptSessionListener接口,在此接口中实现自己维护scriptsession
public class HandleScriptSessionLinstener implements ScriptSessionListener {
private static final ConcurrentHashMap<String, ScriptSession> SCRIPT_SESSIONS = new ConcurrentHashMap<String, ScriptSession>();
/**
* ScriptSession 创建时触发
*/
public void sessionCreated(ScriptSessionEvent ev) {
String sessionId = WebContextFactory.get().getSession().getId();
SCRIPT_SESSIONS.put(sessionId, ev.getSession());
}
/**
* ScriptSession销毁时触发
*/
public void sessionDestroyed(ScriptSessionEvent ev) {
SCRIPT_SESSIONS.remove(WebContextFactory.get().getSession().getId());
}
/** 获取所有的scriptsession */
public static Collection<ScriptSession> getAllSctiptSessions() {
return SCRIPT_SESSIONS.values();
}
}二、写一个类继承默认的scriptsession管理器DefaultScriptSessionManager,在构造方法中注入上一步自己写的scriptsessionlistener,然后重写获取scriptsession的方法
public class DwrScriptSessionManager extends DefaultScriptSessionManager {
/**
* 注入自己的scriptsession管理
*/
public DwrScriptSessionManager() {
this.addScriptSessionListener(new HandleScriptSessionLinstener());
}
public Collection<ScriptSession> getAllScriptSessions() {
return HandleScriptSessionLinstener.getAllSctiptSessions();
}
}三、在web.xml配置文件中进行配置(DwrServlet参数中进行配置)
<init-param>
    <param-name>org.directwebremoting.extend.ScriptSessionManager</param-name>
    <param-value>com.huan.dwr.simple.reverseajax.DwrScriptSessionManager</param-value>
</init-param>
四、写后台推送的业务逻辑,此处简单的实现为,每隔5秒中向前台推送一个数据
package com.huan.dwr.simple.reverseajax;
import java.util.Random;
import java.util.concurrent.ScheduledThreadPoolExecutor;
import java.util.concurrent.TimeUnit;
import org.directwebremoting.Browser;
import org.directwebremoting.ScriptSession;
import org.directwebremoting.ScriptSessionFilter;
import org.directwebremoting.ScriptSessions;
import org.directwebremoting.WebContext;
import org.directwebremoting.WebContextFactory;
import org.directwebremoting.extend.UninitializingBean;
import org.springframework.stereotype.Component;
/**
* 推送消息到客户端
*
* @描述
* @作者 huan
* @时间 2016年4月11日 - 下午9:05:49
*/
("pushMessage2Client")
public class PushMessage2Client implements Runnable, UninitializingBean {
private ScheduledThreadPoolExecutor threadPool = null;
/** 保存在scriptsession中的属性 */
private static final String LOGIN_NAME = "LOGIN_NAME";
private Random random = new Random();
public PushMessage2Client() {
threadPool = new ScheduledThreadPoolExecutor(1);
/**
* 每隔5秒推送数据到前台客户端
*/
threadPool.scheduleAtFixedRate(this, 1, 5, TimeUnit.SECONDS);
}
public void run() {
final int randomNumber = random.nextInt(5000);
Browser.withAllSessionsFiltered(new ScriptSessionFilter() {
public boolean match(ScriptSession session) {
System.out.println("登录名为:" + session.getAttribute(LOGIN_NAME));
return true;
}
}, new Runnable() {
public void run() {
/**
* 调用客户端的show方法,并将randomNumber作为参数
* 如果上方那个过滤器返回true:则此方法调用
* 返回false:则此方法不调用
*/
ScriptSessions.addFunctionCall("show", randomNumber);
}
});
}
/** 添加属性到scriptSession中 */
public void addScriptSessionAttribute(String loginName) {
WebContext webContext = WebContextFactory.get();
ScriptSession scriptSession = webContext.getScriptSession();
scriptSession.setAttribute(LOGIN_NAME, loginName);
}
public void destroy() {
if (null != threadPool) {
threadPool.shutdown();
}
}
}五、前台jsp的写法:
<% page language="java" contentType="text/html; charset=UTF-8" pageEncoding="UTF-8"%>
<!DOCTYPE html PUBLIC "-//W3C//DTD HTML 4.01 Transitional//EN" "http://www.w3.org/TR/html4/loose.dtd">
<html>
<head>
<meta http-equiv="Content-Type" content="text/html; charset=UTF-8">
<title>测试dwr简单的功能</title>
<script type="text/javascript" src="${pageContext.request.contextPath }/dwr/engine.js"></script>
<script type="text/javascript" src="${pageContext.request.contextPath }/dwr/util.js"></script>
<script type="text/javascript" src="${pageContext.request.contextPath }/dwr/interface/PushMessage2Client.js" ></script>
<script type="text/javascript">
function start(){
var loginName = document.getElementById('loginName');
if(!loginName){
alert("请输入登录名.");
return ;
}
document.getElementById('loginName').style.disabled=true;
dwr.engine.setActiveReverseAjax(true);
dwr.engine.setNotifyServerOnPageUnload(true);
PushMessage2Client.addScriptSessionAttribute(loginName.value);
}
/** 接收后台的数据,加入到前台页面 */
function show(num){
document.getElementById('show').innerHTML += num+",";
}
</script>
</head>
<body>
<div>
<input type="text" id="loginName" /><input type="button" onclick="start()" value="链接"/>
<textarea rows="10" cols="100" id="show"></textarea>
</div>
</body>
</html>
到此,一个简单的dwr运用和dwr反向ajax消息推送就实现了,如有那些地方写错了,欢迎指出。


