安卓中实现异步任务(2)——使用AsyncTask实现
问题背景
上次的文章大致介绍了几种安卓汇总实现异步任务的方法,讲得比较简要,有朋友问到具体的实现方式,现在开始分列几篇文章详细介绍这几种异步的具体实现。这篇讲得是基于asyncTask实现,持续更新。
实现demo
(1)实现我们的AsyncTask子类
import android.content.Context;
import android.os.AsyncTask;
import android.util.Log;
import android.widget.ProgressBar;
import android.widget.TextView;
import android.widget.Toast;

public class MyAsyncTask extends AsyncTask<Integer,Integer,Integer> {
    private final String TAG = "AsyncTask";
    private TextView textView;
    private ProgressBar progressBar;
    private Context context;
    public MyAsyncTask(TextView textView, ProgressBar progressBar, Context context) {
        this.textView = textView;
        this.progressBar = progressBar;
        this.context = context;
    }
    @Override
    protected void onPreExecute() {
        super.onPreExecute();
        Log.d(TAG,"onPreExecute(): " + Thread.currentThread().getName());
    }
    @Override
    protected Integer doInBackground(Integer... ints) {
        Integer count = ints[0];
        while (count < 10 && !isCancelled()){
            // isCancelled()表示判断当前任务是否被取消,防止在取消异步任务的时候循环不能及时停下
            try {
                Thread.sleep(100);
            } catch (InterruptedException e) {
                e.printStackTrace();
            }
            count++;
            Log.d(TAG,"doInBackground(): "+ Thread.currentThread().getName() +" "+count);
            publishProgress(count);
        }
        return count;
    }
    @Override
    protected void onPostExecute(Integer i) {
        Log.d(TAG,"onPostExecute(): "+ Thread.currentThread().getName());
        textView.setText(i + "");
    }
    @Override
    protected void onProgressUpdate(Integer... values) {
        Log.d(TAG,"onProgressUpdate(): " + Thread.currentThread().getName());
        textView.setText(values[0]+"");
        progressBar.setProgress(values[0]);
    }
    @Override
    protected void onCancelled() {
        Log.d(TAG,"nCancelled(): "+Thread.currentThread().getName());
        super.onCancelled();
        Toast.makeText(context,"任务取消成功", Toast.LENGTH_LONG).show();
    }
}
(2)新建我们的activity,对应layout布局如下:
<?xml version="1.0" encoding="utf-8"?>
<LinearLayout xmlns:android="http://schemas.android.com/apk/res/android"
    xmlns:tools="http://schemas.android.com/tools"
    android:layout_width="match_parent"
    android:layout_height="match_parent"
    android:orientation="vertical"
    tools:context=".thread.AsyncTaskActivity">
    <TextView
        android:id="@+id/textView"
        android:hint="0"
        android:layout_gravity="center_horizontal"
        android:layout_width="wrap_content"
        android:layout_height="wrap_content"/>

    <ProgressBar
        style="@android:style/Widget.ProgressBar.Horizontal"
        android:id="@+id/progressBar"
        android:progress="0"
        android:layout_width="match_parent"
        android:layout_height="wrap_content"/>

    <RelativeLayout
        android:layout_width="match_parent"
        android:layout_height="wrap_content">
        <Button
            android:text="启动任务"
            android:layout_width="wrap_content"
            android:layout_height="wrap_content"
            android:layout_alignParentStart="true"
            android:onClick="doTaskClick" />
        <Button
            android:text="取消任务"
            android:layout_width="wrap_content"
            android:layout_height="wrap_content"
            android:layout_alignParentEnd="true"
            android:onClick="cancelTaskClick" />
    </RelativeLayout>

</LinearLayout>
(3)对应我们activity的代码如下:
import androidx.appcompat.app.AppCompatActivity;

import android.os.Bundle;
import android.view.View;
import android.widget.ProgressBar;
import android.widget.TextView;

public class AsyncTaskActivity extends AppCompatActivity {
    private TextView textView;
    private ProgressBar progressBar;
    private MyAsyncTask myAsyncTask;
    @Override
    protected void onCreate(Bundle savedInstanceState) {
        super.onCreate(savedInstanceState);
        setContentView(R.layout.activity_async_task);
        textView= findViewById(R.id.textView);
        progressBar= findViewById(R.id.progressBar);
    }

    public void doTaskClick(View view){
        myAsyncTask = new MyAsyncTask(textView, progressBar,this);
        // 执行异步任务,传入初始参数
        myAsyncTask.execute(1);
    }

    public void cancelTaskClick(View view){
        // 取消异步任务
        myAsyncTask.cancel(true);
    }
}
执行结果如下:
安卓中实现异步任务(2)——使用AsyncTask实现
问题背景
上篇文章大致介绍了几种安卓汇总实现异步任务的方法,讲得比较简要,有朋友问到具体的实现方式,现在开始分列几篇文章详细介绍这几种异步的具体实现。这篇讲得是基于asyncTask实现,持续更新。
实现demo
(1)实现我们的AsyncTask子类
import android.content.Context;
import android.os.AsyncTask;
import android.util.Log;
import android.widget.ProgressBar;
import android.widget.TextView;
import android.widget.Toast;

public class MyAsyncTask extends AsyncTask<Integer,Integer,Integer> {
    private final String TAG = "AsyncTask";
    private TextView textView;
    private ProgressBar progressBar;
    private Context context;
    public MyAsyncTask(TextView textView, ProgressBar progressBar, Context context) {
        this.textView = textView;
        this.progressBar = progressBar;
        this.context = context;
    }
    @Override
    protected void onPreExecute() {
        super.onPreExecute();
        Log.d(TAG,"onPreExecute(): " + Thread.currentThread().getName());
    }
    @Override
    protected Integer doInBackground(Integer... ints) {
        Integer count = ints[0];
        while (count < 10 && !isCancelled()){
            // isCancelled()表示判断当前任务是否被取消,防止在取消异步任务的时候循环不能及时停下
            try {
                Thread.sleep(100);
            } catch (InterruptedException e) {
                e.printStackTrace();
            }
            count++;
            Log.d(TAG,"doInBackground(): "+ Thread.currentThread().getName() +" "+count);
            publishProgress(count);
        }
        return count;
    }
    @Override
    protected void onPostExecute(Integer i) {
        Log.d(TAG,"onPostExecute(): "+ Thread.currentThread().getName());
        textView.setText(i + "");
    }
    @Override
    protected void onProgressUpdate(Integer... values) {
        Log.d(TAG,"onProgressUpdate(): " + Thread.currentThread().getName());
        textView.setText(values[0]+"");
        progressBar.setProgress(values[0]);
    }
    @Override
    protected void onCancelled() {
        Log.d(TAG,"nCancelled(): "+Thread.currentThread().getName());
        super.onCancelled();
        Toast.makeText(context,"任务取消成功", Toast.LENGTH_LONG).show();
    }
}
(2)新建我们的activity,对应layout布局如下:
<?xml version="1.0" encoding="utf-8"?>
<LinearLayout xmlns:android="http://schemas.android.com/apk/res/android"
    xmlns:tools="http://schemas.android.com/tools"
    android:layout_width="match_parent"
    android:layout_height="match_parent"
    android:orientation="vertical"
    tools:context=".thread.AsyncTaskActivity">
    <TextView
        android:id="@+id/textView"
        android:hint="0"
        android:layout_gravity="center_horizontal"
        android:layout_width="wrap_content"
        android:layout_height="wrap_content"/>

    <ProgressBar
        style="@android:style/Widget.ProgressBar.Horizontal"
        android:id="@+id/progressBar"
        android:progress="0"
        android:layout_width="match_parent"
        android:layout_height="wrap_content"/>

    <RelativeLayout
        android:layout_width="match_parent"
        android:layout_height="wrap_content">
        <Button
            android:text="启动任务"
            android:layout_width="wrap_content"
            android:layout_height="wrap_content"
            android:layout_alignParentStart="true"
            android:onClick="doTaskClick" />
        <Button
            android:text="取消任务"
            android:layout_width="wrap_content"
            android:layout_height="wrap_content"
            android:layout_alignParentEnd="true"
            android:onClick="cancelTaskClick" />
    </RelativeLayout>

</LinearLayout>
(3)对应我们activity的代码如下:
import androidx.appcompat.app.AppCompatActivity;

import android.os.Bundle;
import android.view.View;
import android.widget.ProgressBar;
import android.widget.TextView;

public class AsyncTaskActivity extends AppCompatActivity {
    private TextView textView;
    private ProgressBar progressBar;
    private MyAsyncTask myAsyncTask;
    @Override
    protected void onCreate(Bundle savedInstanceState) {
        super.onCreate(savedInstanceState);
        setContentView(R.layout.activity_async_task);
        textView= findViewById(R.id.textView);
        progressBar= findViewById(R.id.progressBar);
    }

    public void doTaskClick(View view){
        myAsyncTask = new MyAsyncTask(textView, progressBar,this);
        // 执行异步任务,传入初始参数
        myAsyncTask.execute(1);
    }

    public void cancelTaskClick(View view){
        // 取消异步任务
        myAsyncTask.cancel(true);
    }
}
执行结果如下:
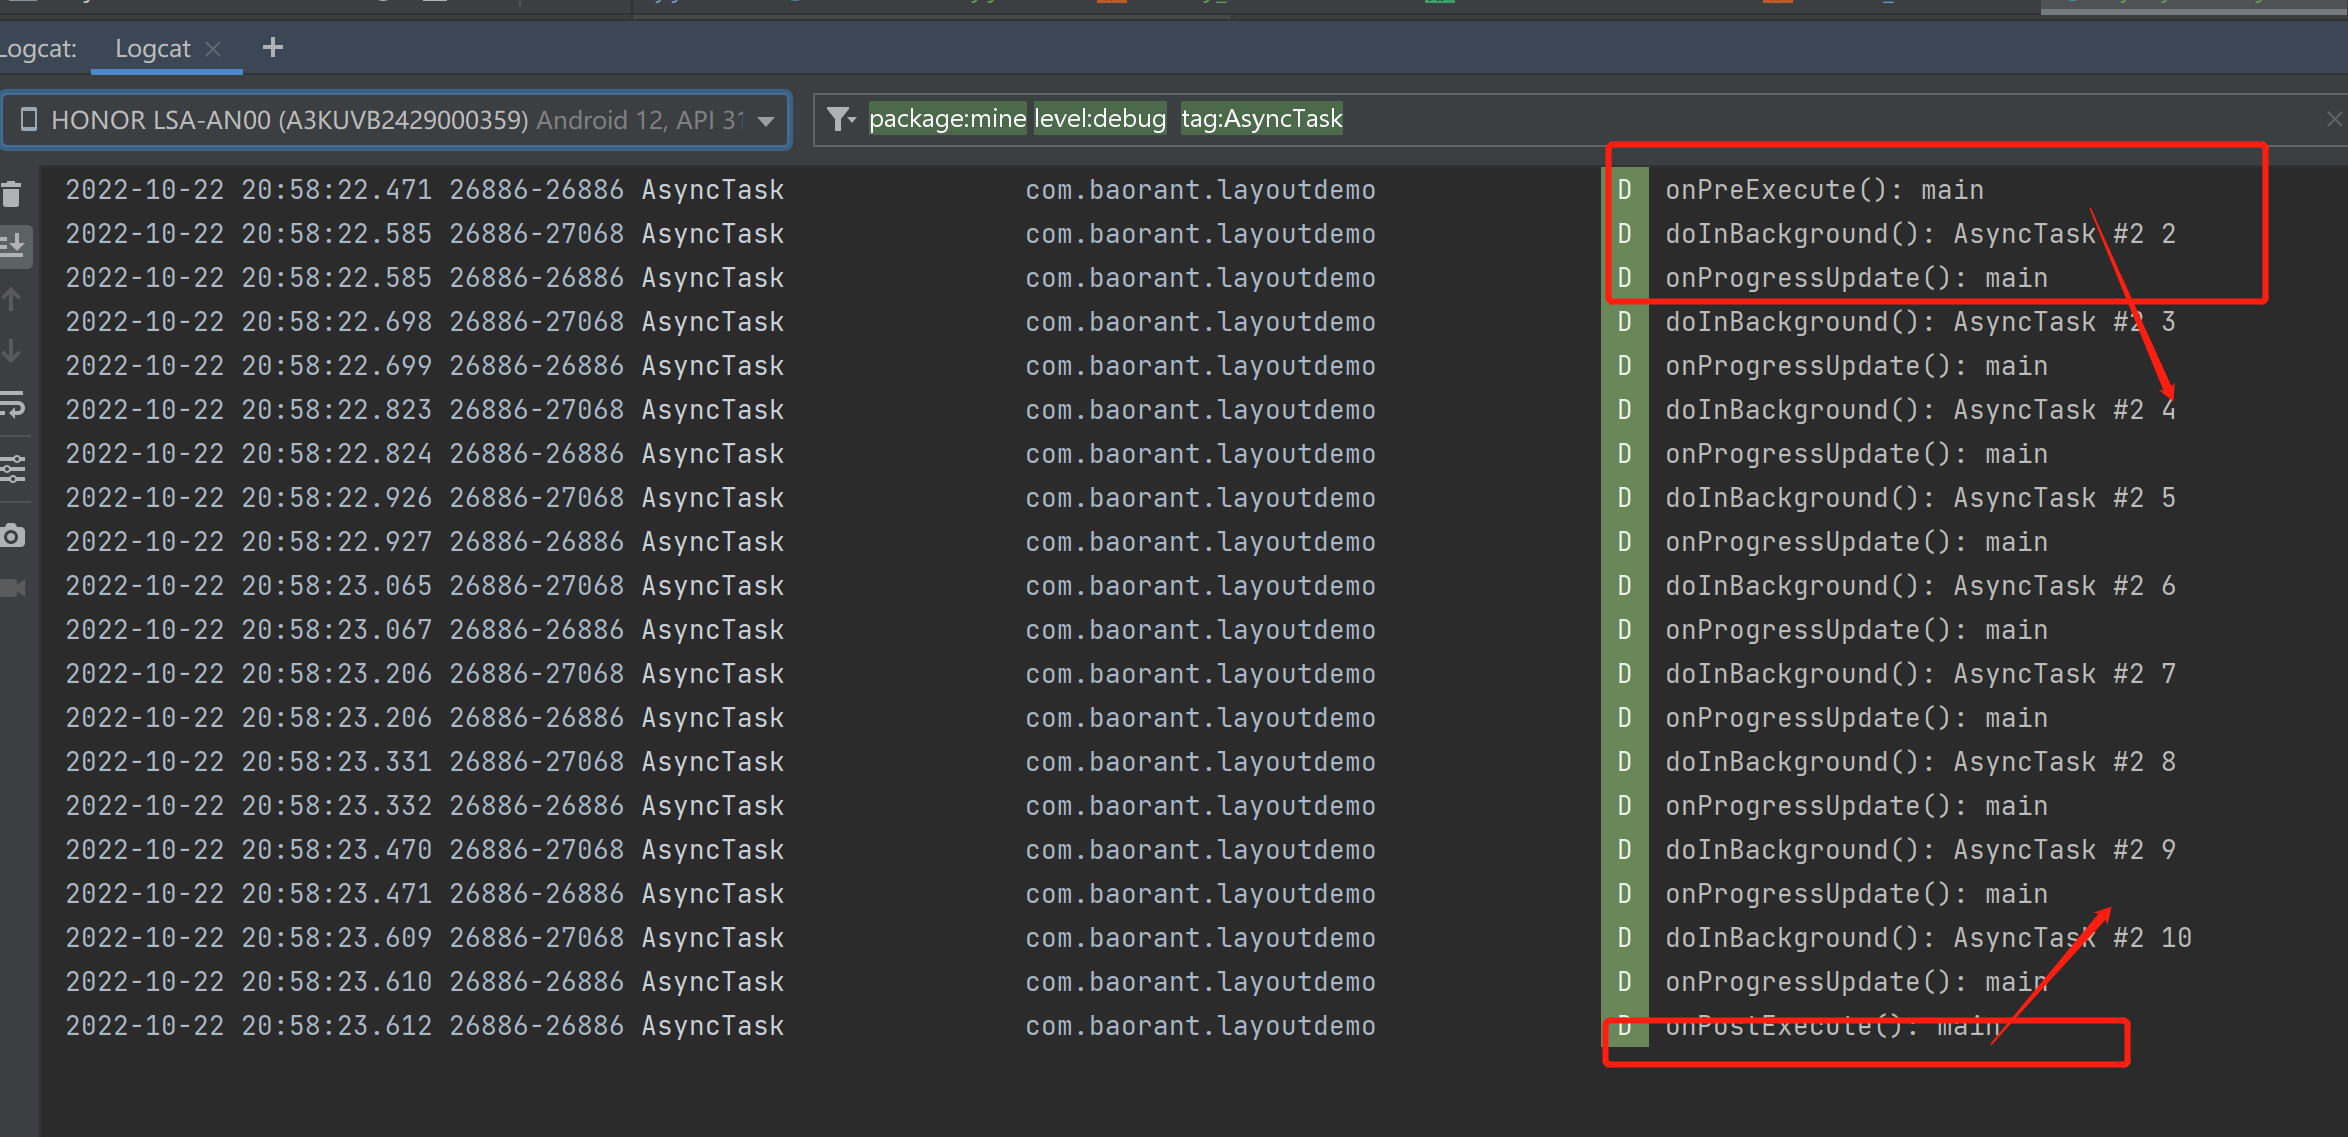 根据log,我们可以很清楚的看到asyncTask对应各方法所在的线程以及执行时机;
关键代码分析
持续更新。。。


