1、SaltStack简介
1.1 自动化运维工具
自动化运维就是周期性、重复性、规律性的工作都交给工具去做,把过去的手工执行转为自动化操作。自动化是IT运维工作的升华,IT运维自动化不单纯是一个维护过程,更是一个管理的提升过程,是IT运维的最高层次,也是未来的发展趋势
常见的自动化运维工具
| 名称 | 优点 | 缺点 |
|---|---|---|
| SaltStack | 状态文件可用简单YAML配置模块或复杂的Python/PyDSL脚本 与客户端可以基于SSH或在被管节点安装代理 Web界面可看到运行的工作、minion状态、事件日志、可在客户端执行命令 扩展能力极强 | Web界面像毒药竞争产品不稳定与相对不完善 缺乏生成深度报告的能力 |
| Puppet | 模块由Ruby或Ruby子集编写 push命令可以即可触发变更 Web界面生成处理报表、资源清单、实时节点管理 代理运行端进行详细、深入的报告和对节点进行配置 | 相对其他工具较复杂,需学习Puppet的DSL或Ruby 安装过程缺少错误校验和产生错误报表 |
| Ansible | 模块可以用任何语言开发 备管节点不需要安装代理软件 有Web管理界面、可配置用户、组、资源清单和执行Playbook 安装、运行极其简单 | 对备管理节点为Windows有待加强 Web管理界面是内置的Ansible的一-部分 需导入资源清单 执行效率较低 |
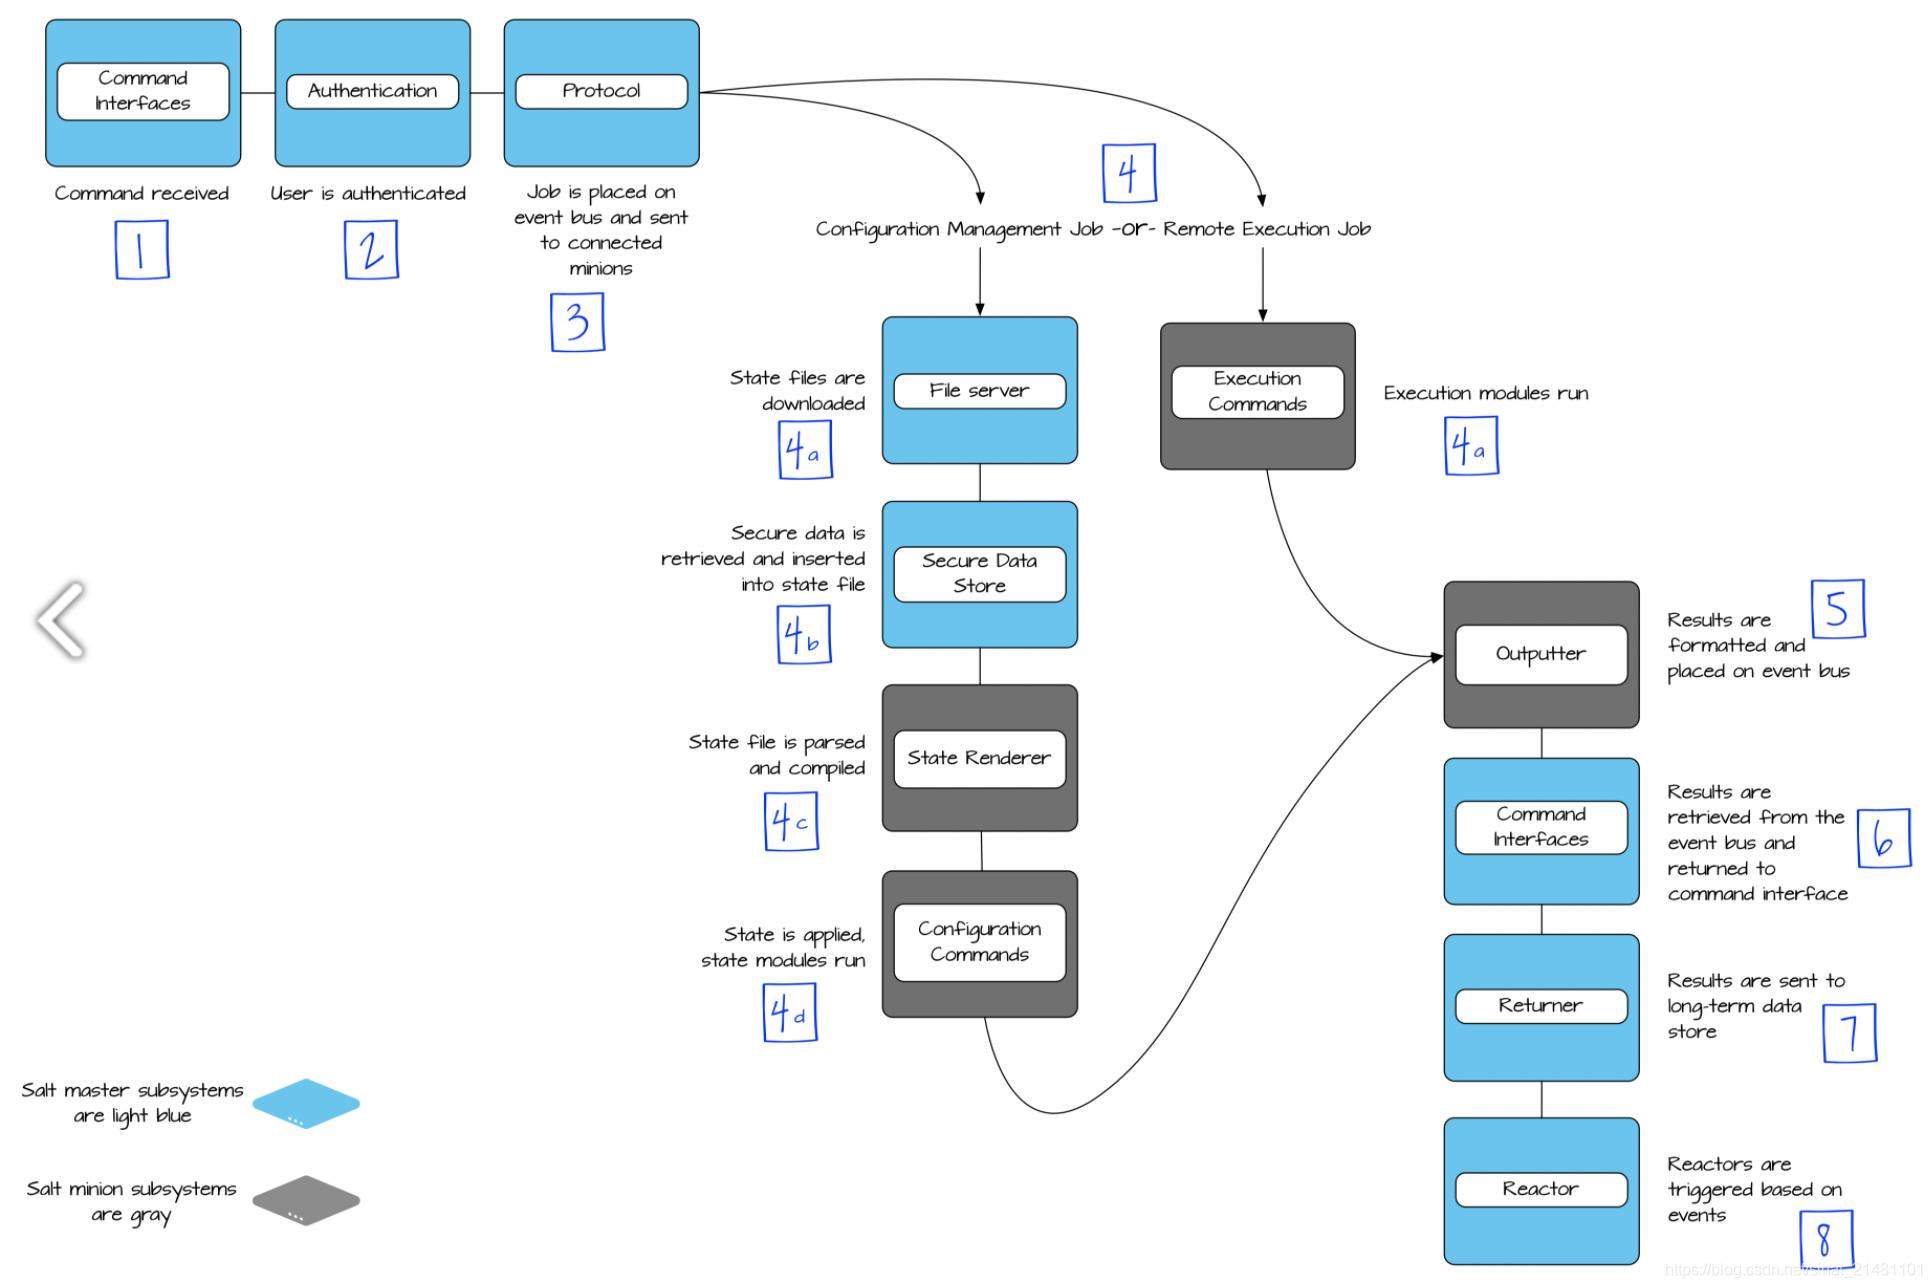
1.2 SaltStack服务架构
在saltstack架构中服务器端叫Master,客户端叫Minion。
在Master和Minion端都是以守护进程的模式运行,一直监听配置文件里面定义的ret_port(接受minion请求)和publish_port(发布消息)的端口。
当Minion运行时会自动连接到配置文件里面定义的Master地址ret_port端口进行连接认证。
saltstack除了传统的C/S架构外,其实还有一种叫做masterless的架构,其不需要单独安装一台 master 服务器,只需要在每台机器上安装 Minion端,然后采用本机只负责对本机的配置管理机制服务的模式。
2、saltstack四大功能与四大运行方式
saltstack有四大功能,分别是:
- 远程执行
- 配置管理/状态管理
- 云管理(cloud)
- 事件驱动
saltstack可以通过远程执行实现批量管理,并且通过描述状态来达到实现某些功能的目的。
saltstack四大运行方式:
- local本地运行
- Master/Minion传统方式
- Syndic分布式
- Salt ssh
3、saltstack组件介绍
| 组件 | 功能 |
|---|---|
| Salt Master | 用于将命令和配置发送到在受管系统上运行的Salt minion |
| Salt Minions | 从Salt master接收命令和配置 |
| Execution Modules | 从命令行针对一个或多个受管系统执行的临时命令 |
| Formulas (States) | 系统配置的声明性或命令式表示 |
| Grains | Grains是有关底层受管系统的静态信息,包括操作系统,内存和许多其他系统属性。 |
| Pillar | 用户定义的变量。这些安全变量被定义并存储在Salt Master中,然后使用目标“分配”给一个或多个Minion。Pillar数据存储诸如端口,文件路径,配置参数和密码之类的值。 |
| Top File | 将Formulas (States)和Salt Pillar数据与Salt minions匹配。 |
| Runners | 在Salt master上执行的模块,用于执行支持任务。Salt runners报告作业状态,连接状态,从外部API读取数据,查询连接的Salt minions等。 |
| Returners | 将Salt minions返回的数据发送到另一个系统,例如数据库。Salt Returners可以在Salt minion或Salt master上运行。 |
| Reactor | 在SaltStack环境中发生事件时触发反应。 |
| Salt Cloud / Salt Virt | 在云提供商/虚拟机管理程序上提供系统,并立即将其置于管理之下。 |
| Salt SSH | 在没有Salt minion的系统上通过SSH运行Salt命令。 |
4、部署SaltStack
环境说明
| 主机名 | IP | 服务 | 系统版本 |
|---|---|---|---|
| JLin | 192.168.23.116 | salt-master salt-minion | CentOS 8 Stream |
| JiaL | 192.168.23.117 | salt-minion | CentOS 8 Stream |
官方yum源地址
4.1 在控制节点上安装Saltstack
配置yum源
[root@JLin ~]# rpm --import https:// repo.saltproject.io/py3/redhat/8/x86_64/latest/SALTSTACK-GPG-KEY.pub
[root@JLin ~]# curl -fsSL https:// repo.saltproject.io/py3/redhat/8/x86_64/latest.repo | sudo tee /etc/yum.repos.d/salt.repo
[salt-latest-repo]
name=Salt repo for RHEL/CentOS 8 PY3
baseurl=https:// repo.saltproject.io/py3/redhat/8/x86_64/latest
skip_if_unavailable=True
failovermethod=priority
enabled=1
enabled_metadata=1
gpgcheck=1
gpgkey=https:// repo.saltproject.io/py3/redhat/8/x86_64/latest/SALTSTACK-GPG-KEY.pub
[root@JLin ~]# yum clean all
安装SaltStack主控
[root@JLin ~]# yum -y install salt-master salt-minion
[root@JLin ~]# rpm -qa | grep salt
salt-minion-3004-1.el8.noarch
salt-3004-1.el8.noarch
salt-master-3004-1.el8.noarch
修改配置文件
[root@JLin ~]# vim /etc/salt/minion
# Set the location of the salt master server. If the master server cannot be
# resolved, then the minion will fail to start.
#master: salt
master: 192.168.23.180
启动服务
[root@JLin ~]# systemctl enable --now salt-master.service
[root@JLin ~]# systemctl enable --now salt-minion.service
[root@JLin ~]# ss -anltup | grep salt
tcp   LISTEN 0      128           0.0.0.0:4505       0.0.0.0:*    users:(("salt-master",pid=48716,fd=22))
tcp   LISTEN 0      128           0.0.0.0:4506       0.0.0.0:*    users:(("salt-master",pid=48722,fd=35))
4.2 被控机上安装salt-minion客户端
配置yum源
[root@JiaL ~]# rpm --import https:// repo.saltproject.io/py3/redhat/8/x86_64/latest/SALTSTACK-GPG-KEY.pub
[root@JiaL ~]# curl -fsSL https:// repo.saltproject.io/py3/redhat/8/x86_64/latest.repo | sudo tee /etc/yum.repos.d/salt.repo
[salt-latest-repo]
name=Salt repo for RHEL/CentOS 8 PY3
baseurl=https:// repo.saltproject.io/py3/redhat/8/x86_64/latest
skip_if_unavailable=True
failovermethod=priority
enabled=1
enabled_metadata=1
gpgcheck=1
gpgkey=https:// repo.saltproject.io/py3/redhat/8/x86_64/latest/SALTSTACK-GPG-KEY.pub
[root@JiaL ~]# yum clean all
安装 salt-minion
[root@JiaL ~]# yum -y install salt-minion
[root@JiaL ~]# rpm -qa | grep salt
salt-3004-1.el8.noarch
salt-minion-3004-1.el8.noarch
修改被控端的配置文件,将master设为控制节点的IP
[root@JiaL ~]# vim /etc/salt/minion
# Set the location of the salt master server. If the master server cannot be
# resolved, then the minion will fail to start.
#master: salt
master: 192.168.23.180
启动服务
[root@JiaL ~]# systemctl enable --now salt-minion.service
4.3 saltstack配置文件
saltstack的配置文件在/etc/salt目录
saltstack配置文件说明:
| 配置文件 | 说明 |
|---|---|
| /etc/salt/master | 主控端(控制端)配置文件 |
| /etc/salt/minion | 受控端配置文件 |
配置文件/etc/salt/master默认的配置就可以很好的工作,故无需修改此配置文件。
配置文件/etc/salt/minion常用配置参数
- master:设置主控端的IP
- id:设置受控端本机的唯一标识符,可以是ip也可以是主机名或自取某有意义的单词
在日常使用过程中,经常需要调整或修改Master配置文件,saltstack大部分配置都已经指定了默认值,只需根据自己的实际需求进行修改即可。下面的几个参数是比较重要的
- max_open_files:可根据Master将Minion数量进行适当的调整
- timeout:可根据Master和Minion的网络状况适当调整
- auto_accept和autosign_file:在大规模部署Minion时可设置自动签证
- master_tops和所有以external开头的参数:这些参数是SaltStack与外部系统进行整合的相关配置参数
5、saltstack认证机制
saltstack主控端是依靠openssl证书来与受控端主机认证通讯的,受控端启动后会发送给主控端一个公钥证书文件,在主控端用salt-key命令来管理证书。
salt-minion与salt-master的认证过程:
- minion在第一次启动时,会在/etc/salt/pki/minion/下自动生成一对密钥,然后将公钥发给master
- master收到minion的公钥后,通过salt-key命令接受该公钥。此时master的/etc/salt/pki/master/minions目录将会存放以minion id命名的公钥,然后master就能对minion发送控制指令了
salt-key常用选项
-L      // 列出所有公钥信息
-a minion    // 接受指定minion等待认证的key
-A      // 接受所有minion等待认证的key
-r minion    // 拒绝指定minion等待认证的key
-R      // 拒绝所有minion等待认证的key
-f minion   // 显示指定key的指纹信息
-F      // 显示所有key的指纹信息
-d minion   // 删除指定minion的key
-D      // 删除所有minion的key
-y      // 自动回答yes
查看当前证书情况
[root@JLin ~]# salt-key -L
Accepted Keys:
JLin
Denied Keys:
Unaccepted Keys:
JiaL
Rejected Keys:
接受指定minion的新证书
[root@JLin ~]# salt-key -ya JiaL
The following keys are going to be accepted:
Unaccepted Keys:
JiaL
Key for minion JiaL accepted.
[root@JLin ~]# salt-key -L
Accepted Keys:
JLin
JiaL
Denied Keys:
Unaccepted Keys:
Rejected Keys:
6、saltstack远程执行
测试指定受管主机是否存活
[root@JLin ~]# salt "JiaL" test.ping
JiaL:
    True
[root@JLin ~]# salt "JiaL" cmd.run hostname
JiaL:
    JiaL
[root@JLin ~]# salt "*" test.ping
JLin:
    True
JiaL:
    True
7、salt命令使用
// 语法:salt [options] '<target>' <function> [arguments]

// 常用的options
    --version       // 查看saltstack的版本号
    --versions-report   // 查看saltstack以及依赖包的版本号
    -h      // 查看帮助信息
    -c CONFIG_DIR   // 指定配置文件目录(默认为/etc/salt/)
    -t TIMEOUT      // 指定超时时间(默认是5s)
    --async     // 异步执行
    -v      // verbose模式,详细显示执行过程
    --username=USERNAME     // 指定外部认证用户名
    --password=PASSWORD     // 指定外部认证密码
    --log-file=LOG_FILE     // 指定日志记录文件

// 常用target参数
    -E      // 正则匹配
    -L      // 列表匹配
    -S      // CIDR匹配网段
    -G      // grains匹配
    --grain-pcre    // grains加正则匹配
    -N      // 组匹配
    -R      // 范围匹配
    -C      // 综合匹配(指定多个匹配)
    -I      // pillar值匹配
示例
// 正则匹配
[root@JLin ~]# salt -E 'J*' test.ping
JLin:
    True
JiaL:
    True
// 列表匹配
修改id
// 控制节点
[root@JLin ~]# salt-key -yd JiaL
The following keys are going to be deleted:
Accepted Keys:
JiaL
Key for minion JiaL deleted.
[root@JLin ~]# salt-key -L
Accepted Keys:
JLin
Denied Keys:
Unaccepted Keys:
Rejected Keys:

// 受管主机
[root@JiaL ~]# cd /etc/salt/pki/minion/
[root@JiaL minion]# ls
minion.pem  minion.pub  minion_master.pub
[root@JiaL minion]# rm -rf *
[root@JiaL minion]# vim /etc/salt/minion
# Explicitly declare the id for this minion to use, if left commented the id
# will be the hostname as returned by the python call: socket.getfqdn()
# Since salt uses detached ids it is possible to run multiple minions on the
# same machine but with different ids, this can be useful for salt compute
# clusters.
#id:
id: 192.168.23.181
[root@JiaL minion]# systemctl restart salt-minion.service
[root@JiaL minion]# ls
minion.pem  minion.pub

// 控制节点
[root@JLin ~]# salt-key -L
Accepted Keys:
JLin
Denied Keys:
Unaccepted Keys:
192.168.23.181
Rejected Keys:
[root@JLin ~]# salt-key -ya 192.168.23.181
The following keys are going to be accepted:
Unaccepted Keys:
192.168.23.181
Key for minion 192.168.23.181 accepted.
[root@JLin ~]# salt-key -L
Accepted Keys:
192.168.23.181
JLin
Denied Keys:
Unaccepted Keys:
Rejected Keys:
[root@JLin ~]# salt '*' test.ping
JLin:
    True
192.168.23.181:
    True
[root@JLin ~]# salt -G 'os:centos stream' test.ping
192.168.23.181:
    True
JLin:
    True


