
前言
ViewModel 作为 Jetpack 中的明星组件,相信大家都对其有一定的了解。在 Google 的官方介绍中也详细的罗列了 ViewModel 的优点,如:
- 可以提供和管理UI界面数据。(将加载数据与数据恢复从 Activity or Fragment中解耦)
- 可感知生命周期的组件。
- 不会因配置改变而销毁。
- 可以配合 LiveData 使用。
- 多个 Fragment 可以共享同一 ViewModel。
- 等等等....
你也可以通过下列两个视频,更为详细的了解 ViewModel:
在本篇文章中,不会讲解 ViewModel 的使用方式及使用 ViewModel 的原因,而是着重于讲解 ViewModel 的原理。通过阅读本篇文章你能了解到:
- ViewModel 在 Activity 中的绑定过程。
- ViewModel 在 Activity 中不会因配置改变而销毁的原理。
- ViewModel 在 Fragment 中的绑定过程。
- ViewModel 在 Fragment 中不会因配置改变而销毁的原理。
- ViewMode 能在 Fragment 中共享的原理。
希望通过该篇文章,大家能对 ViewModel 有更深入的了解。
ViewModel 与 Activity 的绑定过程
一般情况下使用 ViewModel,我们一般会先声明自己的 ViewModel,并在 Activity 中的 onCreate 方法中使用 ViewModelProviders 来创建 ViewModel。 如下代码所示:
MyViewModel model = ViewModelProviders.of(this).get(MyViewModel.class);
通过使用 ViewModelProviders 类的 of() 方法,我们会得到一个 ViewModelProvider 对象。如下代码所示:
   public static ViewModelProvider of(@NonNull FragmentActivity activity) {
        return new ViewModelProvider(activity);
    }
ViewModelProvider 类需要我们传递 ViewModelStore 与 Factory 对象。其构造函数声明如下:
    //使用ViewModelStoreOwner对象构造函数
    public ViewModelProvider(@NonNull ViewModelStoreOwner owner) {
        this(owner.getViewModelStore(), owner instanceof HasDefaultViewModelProviderFactory
                ? ((HasDefaultViewModelProviderFactory) owner).getDefaultViewModelProviderFactory()
                : NewInstanceFactory.getInstance());
    }

    //使用ViewModelStoreOwner与Factory对象的构造函数
    public ViewModelProvider(@NonNull ViewModelStoreOwner owner, @NonNull Factory factory) {
        this(owner.getViewModelStore(), factory);
    }

    //使用ViewModelStore与Factory对象的构造函数
    public ViewModelProvider(@NonNull ViewModelStore store, @NonNull Factory factory) {
        mFactory = factory;
        mViewModelStore = store;
    }
在 ViewModelProvider 内部,拥有三种类型构造函数:
-
(ViewModelStoreOwner owner):- 该构造函数使用 owner 对象的
getViewModelStore()方法来获取ViewModelStore对象,如果传入的 owner 对象也实现了HasDefaultViewModelProviderFactory接口时,那么会调用getDefaultViewModelProviderFactory()方法获取 Factory。反之,使用内部静态的NewInstanceFactory对象来创建 Factory 对象。
- 该构造函数使用 owner 对象的
-
(ViewModelStoreOwner owner, Factory factory):- 该构造函数使用 owner 对象的
getViewModelStore()方法来获取ViewModelStore对象,使用传递的 Factory 对象
- 该构造函数使用 owner 对象的
-
(ViewModelStore store, Factory factory):- 使用
ViewModelStore与Factory对象的构造函数
- 使用
Factory 接口介绍
在 ViewModelProvider 中,Factory 主要用于创建 ViewModel,Factory 的声明如下:
    public interface Factory {
        /**
         * 通过给定的Class对象创建ViewModel对象
         * <p>
         *
         * @param modelClass 所需ViewModel的Class对象
         * @param <T>        ViewModel的泛型参数
         * @return 新创建的ViewModel对象
         */
        @NonNull
        <T extends ViewModel> T create(@NonNull Class<T> modelClass);
    }
通过实现 Factory 接口,我们可以实现自己想要的工厂以创建所需的 ViewModel。在 Android 中有多个类都实现了该接口(如 KeyedFactory, AndroidViewModelFactory),这里以默认的 NewInstanceFactory 为例:
    public static class NewInstanceFactory implements Factory {

        private static NewInstanceFactory sInstance;

        @NonNull
        static NewInstanceFactory getInstance() {
            if (sInstance == null) {
                sInstance = new NewInstanceFactory();
            }
            return sInstance;
        }

        @SuppressWarnings("ClassNewInstance")
        @NonNull
        @Override
        public <T extends ViewModel> T create(@NonNull Class<T> modelClass) {
            try {
                //默认使用对应ViewModel类无参的构造函数创建实例对象
                return modelClass.newInstance();
            } catch (InstantiationException e) {
                throw new RuntimeException("Cannot create an instance of " + modelClass, e);
            } catch (IllegalAccessException e) {
                throw new RuntimeException("Cannot create an instance of " + modelClass, e);
            }
        }
    }
默认情况下, NewInstanceFactory 会调用 ViewModel 的无参构造函数创建实例对象,当然如果你需要在 ViewModel 中使用其他参数,你也可以传递自定义的 Factory。
ViewModelStore 介绍
ViewModelStore 内部维护了一个 HashMap,其 key 为 DEFAULT_KEY + ViewModel的Class对象底层类规范名称,其 value 为对应 ViewModel 对象。每个 Activity 与 Fragment 都对应着一个 ViewModelStore ,用于存储所需的 ViewModel。ViewModelStore 类声明如下所示:
public class ViewModelStore {

    private final HashMap<String, ViewModel> mMap = new HashMap<>();

    final void put(String key, ViewModel viewModel) {
        ViewModel oldViewModel = mMap.put(key, viewModel);
        if (oldViewModel != null) {
            oldViewModel.onCleared();
        }
    }

    final ViewModel get(String key) {
        return mMap.get(key);
    }

    Set<String> keys() {
        return new HashSet<>(mMap.keySet());
    }

    /**
     * 当内部的 ViewModel 不再使用时,清除所占的内存
     */
    public final void clear() {
        for (ViewModel vm : mMap.values()) {
            //下面调用ViewModel的clear方法
            vm.clear();
        }
        mMap.clear();
    }
}
Activity 中创建与获取 ViewModel 流程
ViewModel 最终的创建与获取,需要 ViewProvider 类调用 get(Class<T> modelClass)方法(该方法内部通过 ViewModelStore 与 Factory 的配合,创建并保存了所需的 ViewModel 对象),具体代码如下所示:
 public <T extends ViewModel> T get(@NonNull Class<T> modelClass) {
        String canonicalName = modelClass.getCanonicalName();
        if (canonicalName == null) {
            throw new IllegalArgumentException("Local and anonymous classes can not be ViewModels");
        }
        return get(DEFAULT_KEY + ":" + canonicalName, modelClass);
    }
该方法内部会调用 get(String key, Class<T> modelClass) 方法:
 public <T extends ViewModel> T get(@NonNull String key, @NonNull Class<T> modelClass) {
        //?根据key值从ViewModelStore中取对应的ViewModel
        ViewModel viewModel = mViewModelStore.get(key);
        //?判断所传入的Class对象是否是ViewModel的Class类或其子类的对象,如果是,直接返回
        if (modelClass.isInstance(viewModel)) {
            if (mFactory instanceof OnRequeryFactory) {
                ((OnRequeryFactory) mFactory).onRequery(viewModel);
            }
            return (T) viewModel;
        } else {
            //noinspection StatementWithEmptyBody
            if (viewModel != null) {
                // TODO: log a warning.
            }
        }
        //?如果为null,根据传入的Factory创建新的VideModel
        if (mFactory instanceof KeyedFactory) {
            viewModel = ((KeyedFactory) (mFactory)).create(key, modelClass);
        } else {
            viewModel = (mFactory).create(modelClass);
        }
        //?将新的 ViewModel 存入ViewModelStore,并返回
        mViewModelStore.put(key, viewModel);
        return (T) viewModel;
    }
在该方法中,会在 ViewModelStore 中根据传入的 key 获取并保存 ViewModel。其具体逻辑如下:
- 根据 key 值从 ViewModelStore 中取对应的 ViewModel。
- 判断所传入的 Class 对象是否是 ViewModel 的 Class 类或其子类的对象,如果是,直接返回。(当
Object.isInstance(class)接受的参数为null时,该方法会返回false) - 如果获取的 ViewModel 为 null,会根据传入的 Factory 对象创建新的 VideModel,并将创建好的 ViewModel 放入 ViewModelStore中。
Activity 中创建与获取 ViewModel 的整体流程如下所示:

ViewModel 在 Activity 中不会因配置改变而销毁的原理
我们都知道 ViewModel 不会因为 Activity 的配置发生改变而销毁,ViewModel 作用域如下所示:
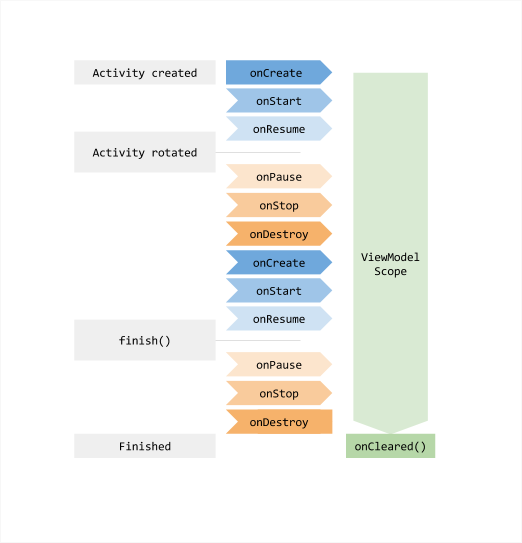
观察上图,我相信小伙伴们肯定有如下疑惑:
- 当 Activity 因配置发生改变时,系统会重新创建一个新的 Activity 。那老的 Activity 中的 ViewModel 是如何传递给新的 Activity 的呢?
- ViewModel 又是如何感知配置是否改变,进而判断是否销毁的呢?
要解决如上问题,我们需要了解 Android 中数据恢复的方式以及 Activity 生命周期中 ViewModel 实际处理流程。
数据恢复的常见方式
在 Android 系统中,需要数据恢复有如下两种场景:
- 场景1:资源相关的配置发生改变导致 Activity 被杀死并重新创建。
- 场景2:资源内存不足导致低优先级的 Activity 被杀死。
针对上述场景,分别对应三种不同的数据恢复方式。
使用 onSaveInstanceState 与 onRestoreInstanceState
使用 onSaveInstanceState 与 onRestoreInstanceState 方法,能处理场景1与场景2的情况。当你的界面数据简单且轻量时,例如原始数据类型或简单对象(比如 String),则我们可以采用该方式。如果你需要恢复的数据较为复杂,那你应该考虑使用 ViewModle + onSaveInstanceState() (为什么要配合使用,会在下文进行讲解),因为使用 onSaveInstanceState() 会导致序列化或反序列化,而这,有一定的时间消耗。
onSaveInstanceState() 更为详细的介绍以及使用,可参考官方文档:
使用 Fragment 的 setRetainInstance
当配置发生改变时,Fragment 会随着宿主 Activity 销毁与重建,当我们调用 Fragment 中的 setRetainInstance(true) 方法时,系统允许 Fragment 绕开销毁-重建的过程。使用该方法,将会发送信号给系统,让 Activity 重建时,保留 Fragment 的实例。需要注意的是:
- 使用该方法后,不会调用 Fragment 的
onDestory()方法,但仍然会调用onDetach()方法 - 使用该方法后,不会调用 Fragment 的
onCreate(Bundle)方法。因为 Fragment 没有被重建。 - 使用该方法后,Fragment 的
onAttach(Activity)与onActivityCreated(Bundle)方法仍然会被调用。
以下示例代码展示了如何在配置发生改变时,保留 Fragment 实例,并进行数据的恢复。
public class MainActivity extends AppCompatActivity {

    private SaveFragment mSaveFragment;

    public static final String TAG_SAVE_FRAGMENT = "save_fragment";

    @Override
    protected void onCreate(@Nullable Bundle savedInstanceState) {
        super.onCreate(savedInstanceState);
        setContentView(R.layout.activity_main);

        FragmentManager fm = getSupportFragmentManager();
        mSaveFragment = (SaveFragment) fm.findFragmentByTag(TAG_SAVE_FRAGMENT);

        // fragment 不为空,是因为配置发生改变,Fragment 被重建
        if (mSaveFragment == null) {
            mSaveFragment = SaveFragment.newInstance();
            fm.beginTransaction().add(mSaveFragment, TAG_SAVE_FRAGMENT).commit();
        }

        //获取保存的数据
        int saveData = mSaveFragment.getSaveData();
    }
}
Fragment :
public class SaveFragment extends Fragment {

    private int saveData;

    public static SaveFragment newInstance() {
        Bundle args = new Bundle();
        SaveFragment fragment = new SaveFragment();
        fragment.setArguments(args);
        return fragment;
    }

    @Override
    public void onAttach(@NonNull Context context) {
        super.onAttach(context);
    }

    @Override
    public void onCreate(@Nullable Bundle savedInstanceState) {
        super.onCreate(savedInstanceState);
        //保存当前Fragment实例
        setRetainInstance(true);
        saveData = 1010;//通过网络请求或查询数据库,赋值需要保存的数据
    }

    @Override
    public void onDetach() {
        super.onDetach();
    }

    public int getSaveData() {
        return saveData;
    }
}
使用 onRetainNonConfigurationInstance 与 getLastNonConfigurationInstance
在 Activity 中提供了 onRetainNonConfigurationInstance 方法,用于处理配置发生改变时数据的保存。随后在重新创建的 Activity 中调用 getLastNonConfigurationInstance 获取上次保存的数据。我们不能直接重写上述方法,如果想在 Activity 中自定义想要恢复的数据,需要我们调用上述两个方法的内部方法:
onRetainCustomNonConfigurationInstance()getLastCustomNonConfigurationInstance()
以下代码展示了,在 Actiity 中恢复自定义的数据:
public class MainActivity extends AppCompatActivity {

    @Override
    protected void onCreate(@Nullable Bundle savedInstanceState) {
        super.onCreate(savedInstanceState);
        setContentView(R.layout.activity_main);
        String name = (String) getLastCustomNonConfigurationInstance();
        if (!TextUtils.isEmpty(name)) {
            //获取恢复后的数据,执行相应操作
        }
    }

//你可以可以在onStart中,获取恢复的数据
//    @Override
//    protected void onStart() {
//        super.onStart();
//        String name = (String) getLastCustomNonConfigurationInstance();
//        if (!TextUtils.isEmpty(name)) {
//        }
//    }

    @Nullable
    @Override
    public Object onRetainCustomNonConfigurationInstance() {
        return "AndyJennifer";
    }
}
在 Android 3.0 后,官方推荐使用 Fragment#setRetainInstance(true) 的方式进行数据的恢复。之所以推荐这种方式,个人猜测是为了降低 Activity 的冗余,将数据恢复的任务从 Activity 抽离出来,这更符合单一职责的设计模式。
几种数据恢复方式的总结
通过了解数据恢复的几种方式,我们能得到如下对比图:

ViewModel 的恢复
ViewModel 在官方设计之初就倾向于在配置改变时进行数据的恢复。考虑到数据恢复时的效率,官方最终采用了 onRetainNonConfigurationInstance 的方式来恢复 ViewModel 。
知道了 ViewModel 的恢复方式,那现在一起来解决我们之前的疑惑。当 Activity 因配置发生改变时,系统会重新创建一个新的 Activity 。那老的 Activity 中的 ViewModel 是如何传递给新的 Activity ?
在 Androidx 中的 Activity 的最新代码中,官方重写了 onRetainNonConfigurationInstance 方法,在该方法中保存了 ViewModelStore (ViweModelStore 中存储了 ViewModel ),进而也保存了 ViewModel,具体代码如下所示:
    public final Object onRetainNonConfigurationInstance() {
        Object custom = onRetainCustomNonConfigurationInstance();

        ViewModelStore viewModelStore = mViewModelStore;
        if (viewModelStore == null) {
            NonConfigurationInstances nc =
                    (NonConfigurationInstances) getLastNonConfigurationInstance();
            if (nc != null) {
                viewModelStore = nc.viewModelStore;
            }
        }

        if (viewModelStore == null && custom == null) {
            return null;
        }

        //将ViewModel存储在 NonConfigurationInstances 对象中
        NonConfigurationInstances nci = new NonConfigurationInstances();
        nci.custom = custom;
        nci.viewModelStore = viewModelStore;
        return nci;
    }
当新的 Activity 重新创建,并调用 ViewModelProviders.of(this).get(xxxModel.class) 时,又会在 getViewModelStore() 方法中获取老 Activity 保存的 ViewModelStore。那么也就拿到了 ViewModel。具体代码如下所示:
    public ViewModelStore getViewModelStore() {
        if (getApplication() == null) {
            throw new IllegalStateException("Your activity is not yet attached to the "
                    + "Application instance. You can't request ViewModel before onCreate call.");
        }
        if (mViewModelStore == null) {
            //?获取保存的NonConfigurationInstances,
            NonConfigurationInstances nc =
                    (NonConfigurationInstances) getLastNonConfigurationInstance();
            if (nc != null) {
                //?从该对象中获取ViewModelStore
                mViewModelStore = nc.viewModelStore;
            }
            if (mViewModelStore == null) {
                mViewModelStore = new ViewModelStore();
            }
        }
        return mViewModelStore;
    }
ViewModel 何时判断是否被移除
ViewModel 最重要的特性就是不会在配置发生改变的时候被移除。其内部实现也非常简单,监听 Activity 声明周期,在 onDestory 方法被调用时,判断配置是否改变。如果没有发送改变,则调用 Activity 中的 ViewModelStore 的 clear() 方法,清除所有的 ViewModel。具体代码如下所示:
    public ComponentActivity() {
        Lifecycle lifecycle = getLifecycle();
        //省略更多....
        getLifecycle().addObserver(new LifecycleEventObserver() {
            @Override
            public void onStateChanged(@NonNull LifecycleOwner source,
                    @NonNull Lifecycle.Event event) {
                if (event == Lifecycle.Event.ON_DESTROY) {
                    if (!isChangingConfigurations()) {
                       //?在配置没发生改变且走到onDestory方法时,清除所有的ViewModel
                        getViewModelStore().clear();
                    }
                }
            }
        });
    }
ViewModel 在 Fragment 的绑定过程
在官方的最新代码实现中,Fragment 中的 ViewModel 与其宿主 Activity 有着密切的联系。要了解 ViewModel 与 Fragment 的绑定过程,我们需要先了解 FragmentManager 与 FragmentManagerViewModel 相关知识。
FragmentManager 介绍
每个 Fragment 及宿主 Activity (继承自 FragmentActivity)都会在创建时,初始化一个 FragmentManager 对象,了解 Fragment 中的 ViewModel 与 Activity 的联系的关键,就是理清这些不同阶级的栈视图。
下面给出一个简要的关系图:

- 对于宿主 Activity ,
getSupportFragmentManager()获取的是 FragmentActivity 的 FragmentManager 对象; - 对于 Fragment ,
getFragmentManager()是获取的父 Fragment (如果没有,则是 FragmentActivity )的 FragmentManager 对象,而getChildFragmentManager()是获取自身的 FragmentManager 对象。
FragmentManagerViewModel 介绍
每个 Fragment 创建时,都会创建一个 FragmentManagerViewModel 对象,在该对象中主要存储其 子Fragment 的 ViewModelStore 与 FragmentManagerViewMoel。具体结构如下所示:

在 FragmentManagerViewModel 中:
- mViewModelStore 是类型为
<String, FragmentManagerViewModel>的 HashMap - mChildNonConfigs 是类型为
<String, ViewModelStore>的 HashMap
上述两个 Map 对应的 Key 值都为 Fragment 的唯一 UUID。该 UUID 会在 Fragment 对象创建时自动生成。也就是每个 Fragment 对应唯一 UUID。
ViewModel 在 Fragment 绑定具体流程
ViewModel 与 Fragment 的绑定流程比较复杂,主要分为三个流程:
- 第一步:在宿主 Activity 创建时,默认会在其
FramgentManager中创建一个 FragmentManagerViewModel。同时将生成的 FragmentManagerViewModel 存储在其本身的 ViewModelStore 中。同时使用自身的FragmentManager - 第二步:在 Fragment 创建时,从
宿主Activity或父Fragment中的FramgentManager中获取对应的 FragmentManagerViewModel,并使用自身的ChildFragmentManager中mNonConfig变量进行保存。 - 第三步:将 Fragment 中所创建的 ViewModel 与其自身的 ViewModelStore 关联 ,并自身的 ViewModelStore 存储在
mNonConfig所指向的 FragmentManaerViewModel 中的mViewModelStores中。
下面我将结合源码对这三个流程进行详细的介绍。
第一步流程
FragmentActivity 中的 onCreate 方法:
    protected void onCreate(@Nullable Bundle savedInstanceState){
        mFragments.attachHost(null /*parent*/);//?传入null
        //省略更多...
    }
该方法最终会执行 FragmentActivity 中 FragmentManager 的 attachController 方法:
 void attachController(@NonNull FragmentHostCallback<?> host,
            @NonNull FragmentContainer container, @Nullable final Fragment parent) {
        //省略更多...
        if (parent != null) {
            mNonConfig = parent.mFragmentManager.getChildNonConfig(parent);
        } else if (host instanceof ViewModelStoreOwner) {
            //?走这里
            ViewModelStore viewModelStore = ((ViewModelStoreOwner) host).getViewModelStore();
            mNonConfig = FragmentManagerViewModel.getInstance(viewModelStore);
        } else {
            mNonConfig = new FragmentManagerViewModel(false);
        }
    }
因为传入的 parent = null,且 Activity 默认实现了 ViewModelStoreOwner 接口,所以会获取 Activity 中的 ViewModelStore,接着调用 FragmentManagerViewModel 的 getInstance() 方法:
    static FragmentManagerViewModel getInstance(ViewModelStore viewModelStore) {
        ViewModelProvider viewModelProvider = new ViewModelProvider(viewModelStore,
                FACTORY);
        return viewModelProvider.get(FragmentManagerViewModel.class);
    }
在该方法中,会创建 FragmentManagerViewModel,并将其添加到 Activity 中的 ViewModelStore 中。
整体流程如下所示:

第二步流程
当 Fragment 与 Activity 关联时,在其 performAttach() 方法中
    void performAttach() {
        //?又会调用attachController
        mChildFragmentManager.attachController(mHost, new FragmentContainer() {
            @Override
            @Nullable
            public View onFindViewById(int id) {
                if (mView == null) {
                    throw new IllegalStateException("Fragment " + this + " does not have a view");
                }
                return mView.findViewById(id);
            }

            @Override
            public boolean onHasView() {
                return (mView != null);
            }
        }, this);//?注意这里的this传入的parent是当前Fragment
      //省略更多...
    }
该方法会调用 Fragment 中 ChildFragmentManager 中的 attachController 方法如下所:
 void attachController(@NonNull FragmentHostCallback<?> host,
            @NonNull FragmentContainer container, @Nullable final Fragment parent) {
        //省略更多...
        if (parent != null) {
            //?因为parent为this,故我们会获取Activity的FragmentManager
            mNonConfig = parent.mFragmentManager.getChildNonConfig(parent);
        } else if (host instanceof ViewModelStoreOwner) {
            ViewModelStore viewModelStore = ((ViewModelStoreOwner) host).getViewModelStore();
            mNonConfig = FragmentManagerViewModel.getInstance(a);
        } else {
            mNonConfig = new FragmentManagerViewModel(false);
        }
    }
继续追踪 FragmentManager 下的 getChildNonConfig 方法:
  private FragmentManagerViewModel getChildNonConfig(Fragment f){
        return mNonConfig.getChildNonConfig(f);
    }
mNonConfig 本身为 FragmentManagerViewModel,我们继续跟踪:
  FragmentManagerViewModel getChildNonConfig(Fragment f){
        FragmentManagerViewModel childNonConfig = mChildNonConfigs.get(f.mWho);
        if (childNonConfig == null) {
            //?创建Fragment的FragmentManagerViewModel
            childNonConfig = new FragmentManagerViewModel(mStateAutomaticallySaved);
            mChildNonConfigs.put(f.mWho, childNonConfig);
        }
        return childNonConfig;
    }
在该方法中,会从 Activity 中的 FragmentManagerViewModel 中的 mChildNonConfigs 中获取 Fragment 的 FragmentManagerViewModel,如果有,直接返回。反之,存入mChildNonConfigs 中。
整体流程如下所示:

第三步流程
在 Fragment 中,ViewModelStore 是通过其 FragmentManager 创建与获取的。具体代码如所示:
    public ViewModelStore getViewModelStore() {
        if (mFragmentManager == null) {
            throw new IllegalStateException("Can't access ViewModels from detached fragment");
        }
        return mFragmentManager.getViewModelStore(this);
    }
继续追踪 FragmentManager 下的 getChildNonConfig 方法:
  ViewModelStore getViewModelStore(@NonNull Fragment f) {
        return mNonConfig.getViewModelStore(f);
    }
mNonConfig 本身为 FragmentManagerViewModel,最终会走 getViewModelStore 方法。
  ViewModelStore getViewModelStore(@NonNull Fragment f) {
        ViewModelStore viewModelStore = mViewModelStores.get(f.mWho);
        if (viewModelStore == null) {
            viewModelStore = new ViewModelStore();
            //将创建好的ViewStore,放入FragmentManagerViewModel中
            mViewModelStores.put(f.mWho, viewModelStore);
        }
        return viewModelStore;
    }
在该方法中最终会将 Fragment 的 ViewModelStore 存入 FragmentManagerViewModel 中的 mViewModelStores 集合中。
那么 Fragment 的创建并获取 ViewModel 的流程如下所示:

ViewModel 在 Fragment 中不会因配置改变而销毁的原理
ViewModel 在 Fragment 中不会因配置改变而销毁的原因其实是因为其声明的 ViewModel 是存储在 FragmentManagerViewModel 中的,而 FragmentManagerViewModel 是存储在宿主 Activity 中的 ViewModelStore 中,又因 Activity 中 ViewModelStore不会因配置改变而销毁,故 Fragment 中 ViewModel 也不会因配置改变而销毁。
当然在 Google 的代码实现中,也能很好的处理 Fragment 嵌套的情况。在下述例子中展示了 Fragment 嵌套下 ViewModel 存储的情况。

在上图中,我们在 Activity 中 分别添加了 Fragment A、B、C。并在 Fragment C 中有嵌套了 Fragment D、E、F。
结合本篇文章所讲解的知识,我们能得到如下结构:

从上图中,我们可以看出,当存在嵌套 Fragment 的情况下,ViewModel 总是以线性的结构进行存储。在这种结构下,就能让宿主 Activity 良好的统一管理与所有的 ViewModel。
ViewModel 能在 Fragment 中共享的原理
ViewModel 的另一大特性就是能在 Fragment 中共享数据。还是以上图例:
假如我们想 Fragment D 获取 Fragment A 中的数据,那么我们只有在 Activity 中的 ViewModelStore 下添加 ViewModel。只有这样,我们才能在不同 Fragment 中获取相同的数据。这也是为什么在 Fragment 中使用共享的 ViewModel 时,我们要在调用ViewModelProvider.of() 创建 ViewModel 时需要传入 getActivity() 的原因。
具体例子如下所示:
    public class SharedViewModel extends ViewModel {
        private final MutableLiveData<Item> selected = new MutableLiveData<Item>();

        public void select(Item item) {
            selected.setValue(item);
        }

        public LiveData<Item> getSelected() {
            return selected;
        }
    }

    public class FragmentA extends Fragment {
        private SharedViewModel model;
        public void onCreate(Bundle savedInstanceState) {
            super.onCreate(savedInstanceState);
            //?传入的是宿主Activity
            model = ViewModelProviders.of(getActivity()).get(SharedViewModel.class);
            itemSelector.setOnClickListener(item -> {
                model.select(item);
            });
        }
    }

    public class FragmentD extends Fragment {
        public void onCreate(Bundle savedInstanceState) {
            super.onCreate(savedInstanceState);
             //?传入的是宿主Activity
            SharedViewModel model = ViewModelProviders.of(getActivity()).get(SharedViewModel.class);
            model.getSelected().observe(this, { item ->
               // Update the UI.
            });
        }
    }
最后
站在巨人的肩膀上,才能看的更远~
