Google双向认证与CRT配置
Google Authenticator介绍
通常我们直接通过ssh输入密码连接服务器,但这样很容易出现暴力破解情况,所以我们可以结合google的动态认证
+ssh密码,这样能够大大的提升登陆的安全。简单来说,就是当用户通过ssh登陆系统时,先输入google的随机验证
码,然后在输入服务器的ssh密码Google Authenticator介绍
GoogleAuthenticator安装部署
# 1.安装依赖
[root@m01 <sub>]# yum -y install pam-devel libpng-devel autoconf automake libtool
# 2.下载Google apm插件
## 官方下载地址
[root@m01 </sub>]# wget https://github.com/google/google-authenticatorlibpam/archive/1.04.tar.gz
## 个人下载地址
[root@m01 <sub>]# wget http://test.driverzeng.com/other/1.04.tar.gz
# 3.解压插件
[root@m01 </sub>]# tar xf 1.04.tar.gz
# 4.构建代码
## 进入解压开的目录
[root@m01 <sub>]# cd google-authenticator-libpam-1.04/
[root@m01 google-authenticator-libpam-1.04]# ll
total 52
-rwxrwxr-x 1 root root 605 Aug 16 2017 bootstrap.sh
drwxrwxr-x 2 root root 24 Aug 16 2017 build
-rw-rw-r-- 1 root root 1932 Aug 16 2017 configure.ac
drwxrwxr-x 2 root root 46 Aug 16 2017 contrib
-rw-rw-r-- 1 root root 1452 Aug 16 2017 CONTRIBUTING.md
drwxrwxr-x 2 root root 20 Aug 16 2017 examples
-rw-rw-r-- 1 root root 2622 Aug 16 2017 FILEFORMAT
-rw-rw-r-- 1 root root 11358 Aug 16 2017 LICENSE
-rw-rw-r-- 1 root root 2231 Aug 16 2017 Makefile.am
drwxrwxr-x 2 root root 140 Aug 16 2017 man
-rw-rw-r-- 1 root root 7155 Aug 16 2017 README.md
drwxrwxr-x 2 root root 158 Aug 16 2017 src
drwxrwxr-x 2 root root 49 Aug 16 2017 tests
-rw-rw-r-- 1 root root 9423 Aug 16 2017 totp.html
drwxrwxr-x 2 root root 41 Aug 16 2017 utc-time
## 执行bootstrap构建
[root@m01 google-authenticator-libpam-1.04]# ./bootstrap.sh
# 5.生成
[root@m01 google-authenticator-libpam-1.04]# ./configure
# 6.编译 && 安装
[root@m01 google-authenticator-libpam-1.04]# make && make install
# 7.检查插件是否安装
[root@m01 google-authenticator-libpam-1.04]# ll /usr/local/lib/security/
-rwxr-xr-x 1 root root 1021 May 25 09:15 pam_google_authenticator.la
-rwxr-xr-x 1 root root 133552 May 25 09:15 pam_google_authenticator.so
# 8.将安装好的插件,拷贝到系统库文件目录中
[root@m01 </sub>]# cp /usr/local/lib/security/pam_google_authenticator.so /usr/lib64/security/
# 9.生成初始google认证识别码
[root@m01 ~]# google-authenticator
## 认证令牌是否随时间变化
Do you want authentication tokens to be time-based (y/n) y
Your new secret key is: 7WHLC4Z6LT3W4BTK6OR2AVCR7E
Your verification code is 020267
Your emergency scratch codes are:
81061642
20695747
19608008
26971435
40551289
Do you want me to update your "/root/.google_authenticator" file? (y/n) y
Do you want to disallow multiple uses of the same authentication
token? This restricts you to one login about every 30s, but it increases
your chances to notice or even prevent man-in-the-middle attacks (y/n) y
By default, a new token is generated every 30 seconds by the mobile app.
In order to compensate for possible time-skew between the client and the server,
we allow an extra token before and after the current time. This allows for a
time skew of up to 30 seconds between authentication server and client. If you
experience problems with poor time synchronization, you can increase the window
from its default size of 3 permitted codes (one previous code, the current
code, the next code) to 17 permitted codes (the 8 previous codes, the current
code, and the 8 next codes). This will permit for a time skew of up to 4 minutes
between client and server.
Do you want to do so? (y/n) y
If the computer that you are logging into isn't hardened against brute-force
login attempts, you can enable rate-limiting for the authentication module.
By default, this limits attackers to no more than 3 login attempts every 30s.
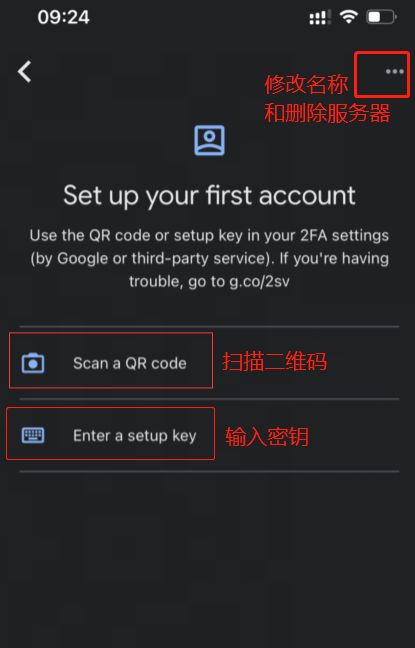
Do you want to enable rate-limiting? (y/n) y打开手机谷歌双向认证app 扫描生成的二维码 或者 输入生成的密钥
将Google 2FA接入SSH
# 1.修改ssh认证配置
[root@m01 <sub>]# vim /etc/pam.d/sshd
#%PAM-1.0     # 第一个区域内添加以下内容
auth       required     pam_google_authenticator.so


# 2.修改SSH配置文件,关联Google认证
[root@m01 </sub>]# vim /etc/ssh/sshd_config
69 ChallengeResponseAuthentication yes

# 3.重启sshd服务
[root@m01 ~]# systemctl restart sshd
CRT配置
CRT优化
使用Python脚本登录CRT
## 先在windows创建一个 .py结尾的文件 把脚本放入文件 文件内容如下

# $language = "python"
# $interface = "1.0"
import hmac, base64, struct, hashlib, time,re
#获取当前脚本所在的tab对象
objTab = crt.GetScriptTab()
#objTab = crt.GetActiveTab()
objTab.Screen.Synchronous = True
objTab.Screen.IgnoreEscape = True
#获取终端名字
tabName=objTab.Caption
reIp=r'\d{1,3}\.\d{1,3}\.\d{1,3}\.\d{1,3}'
hostIp=re.findall(reIp,tabName)[0]
secretKey="Your new secret key is:"   # 这里写入双向认证生成的密钥

def calGoogleCode(secretKey):
    #secreKey 需要是8的倍数
    t = int(time.time())//30
    lens = len(secretKey)
    lenx = 8 - (lens % 4 if lens % 4 else 4)
    secretKey += lenx * '='
    key = base64.b32decode(secretKey)
    msg = struct.pack(">Q", t)
    googleCode = hmac.new(key, msg, hashlib.sha1).digest()
    o = ord(str(googleCode[19])) & 15
    googleCode = str((struct.unpack(">I", googleCode[o:o+4])[0] & 0x7fffffff) % 1000000)
    return googleCode.zfill(6)

def get_string(objTab,szStart,szPrompt):
    objTab.Screen.WaitForStrings(szStart)
    return objTab.Screen.ReadString(szPrompt)
def send_string(objTab,waitString,strings,selfSleepTime=20):
    objTab.Screen.WaitForStrings(waitString)
    time.sleep(0.0001)
    for i in strings:
        crt.Sleep(5)
        objTab.Screen.Send(i)
    # time.sleep(0.0001)
    objTab.Screen.WaitForStrings(strings)
    if strings[-1] != '\r':
        objTab.Screen.Send('\r')
    #msg(objTab.Screen.ReadString('[ q ]'))
    # time.sleep(0.0001)

def send_pass(objTab,waitString,strings):
    objTab.Screen.WaitForStrings(waitString)
    for i in strings:
        crt.Sleep(5)
        objTab.Screen.Send(i)
    if strings[-1] != '\r':
        objTab.Screen.Send('\r')
    time.sleep(0.01)

#发送2fa
send_pass(objTab,'Verification code:',calGoogleCode(secretKey))
## 发送密码
send_pass(objTab,'Password: ','1') # '1' 是服务器的密码
#发送登录ip
send_string(objTab,'Opt> ',hostIp)

#objTab.Screen.WaitForStrings("[MFA auth]: ","")
#if objTab.Screen.WaitForStrings("Opt> ",1):
#    #发送登录ip 克隆会话,不需要二次验证码
# send_string(objTab,'Opt> ',hostIp)
#else:
#    #发送2fa
#    send_pass(objTab,'[MFA auth]: ',calGoogleCode(secretKey))
#    #发送登录ip
#    send_string(objTab,'Opt> ',hostIp)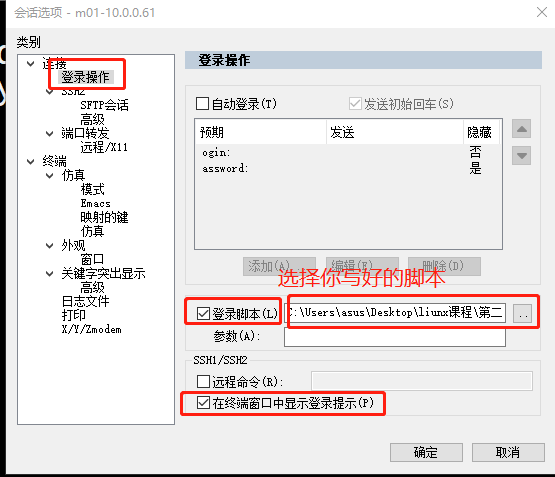
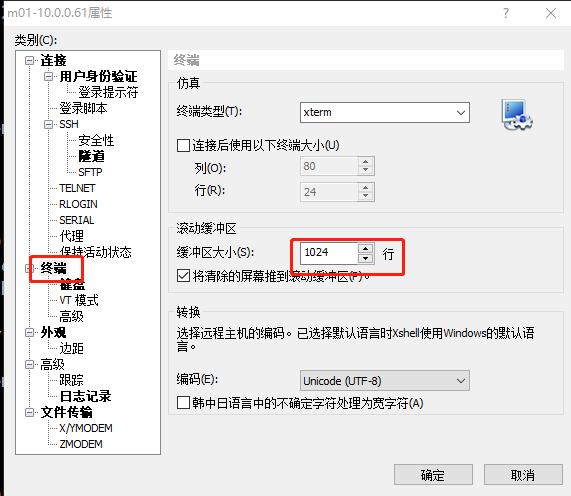
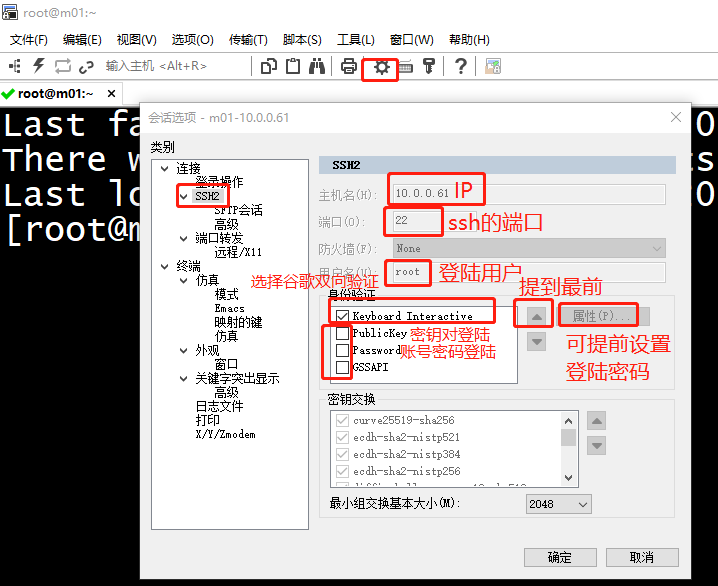
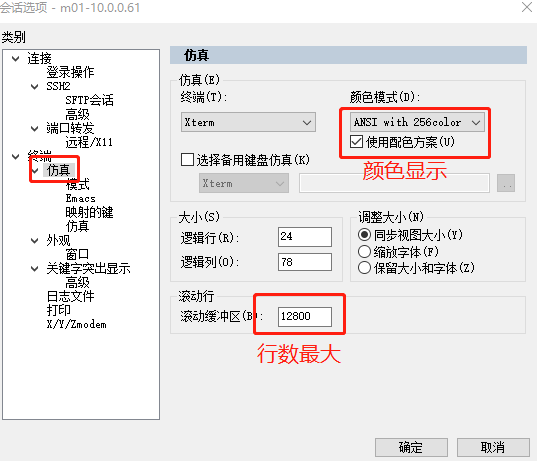
Xshell的配置
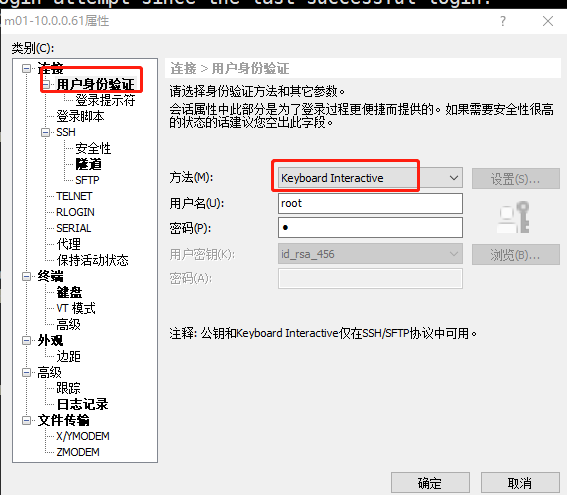
Xshell的优化