一、
在linux内核中,字符设备是由cdev结构体来描述的,它位于/include/linux/cdev.h中
/* SPDX-License-Identifier: GPL-2.0 */
#ifndef _LINUX_CDEV_H
#define _LINUX_CDEV_H

#include <linux/kobject.h>
#include <linux/kdev_t.h>
#include <linux/list.h>
#include <linux/device.h>

struct file_operations;
struct inode;
struct module;

struct cdev {
	struct kobject kobj;
	struct module *owner;
	const struct file_operations *ops;
	struct list_head list;   //list字段来将所有的字符设备组织成一个链表。每个设备由主设备号与次设备号确定,
	dev_t dev;      //dev就是字符设备的设备号,包括主设备号和次设备号
	unsigned int count;   //count字段是同一个主设备号中次设备号的个数
} __randomize_layout;

void cdev_init(struct cdev *, const struct file_operations *);

struct cdev *cdev_alloc(void);

void cdev_put(struct cdev *p);

int cdev_add(struct cdev *, dev_t, unsigned);

void cdev_set_parent(struct cdev *p, struct kobject *kobj);
int cdev_device_add(struct cdev *cdev, struct device *dev);
void cdev_device_del(struct cdev *cdev, struct device *dev);

void cdev_del(struct cdev *);

void cd_forget(struct inode *);

#endif
linux的设备驱动程序可以由两种形式来定义,一种是全局静态变量,另一种是使用内核提供的API,这里采用第二种方法来实现一个简单的虚拟设备的驱动,并且实现它的读写功能。
首先看内核态代码
device_drive.c
# include <linux/module.h>
# include <linux/fs.h>
# include <linux/uaccess.h>
# include <linux/init.h>
# include <linux/cdev.h>

# define DEMO_NAME "my_demo_dev"

static dev_t dev;   //设备号
static struct cdev *demo_cdev;
static signed count = 1;


static int demodrv_open(struct inode *inode, struct file *file)
{
    //Linux内核提供的读取主设备号和次设备号的方法
	int major = MAJOR(inode->i_rdev);
	int minor = MINOR(inode->i_rdev);

	printk("%s: major=%d, minor=%d\n",__func__,major,minor);  //__func__宏获取当前的函数名

	return 0;
}


static ssize_t demodrv_read(struct file *file, char __user *buf,size_t lbuf,loff_t *ppos)
{
	printk("%s enter\n",__func__);   //打印函数名

	return 0;
}


static ssize_t demodrv_write(struct file *file, const char __user *buf,size_t count,loff_t *f_pos)
{
	printk("%s enter\n",__func__);

	return 0;
}

 //给设备的操作,和在文件系统中使用的是相同的结构体
static const struct file_operations demodrv_fops = {
	.owner = THIS_MODULE,
	.open = demodrv_open,
	.read = demodrv_read,
	.write = demodrv_write
};


static int __init simple_char_init(void)
{
	int ret;

	ret = alloc_chrdev_region(&dev,0,count,DEMO_NAME);
	if(ret)
	{
		printk("failed to allocate char device region\n");
		return ret;
	}
	demo_cdev = cdev_alloc();   //分配空间
	if(!demo_cdev)
	{
		printk("cdev_alloc failed\n");
		goto unregister_chrdev;
	}

	cdev_init(demo_cdev,&demodrv_fops);

	ret = cdev_add(demo_cdev,dev,count);
	if(ret)
	{
		printk("cdev_add failed\n");
		goto cdev_fail;
	}

	printk("successed register char device: %s\n",DEMO_NAME);
	printk("Major number = %d,minor number = %d\n",MAJOR(dev),MINOR(dev));

	return 0;

cdev_fail:
	cdev_del(demo_cdev);

unregister_chrdev:
	unregister_chrdev_region(dev,count);

	return ret;
}


static void __exit simple_char_exit(void)
{
	printk("removing device\n");

	if(demo_cdev)
		cdev_del(demo_cdev);

	unregister_chrdev_region(dev,count);
}

module_init(simple_char_init);
module_exit(simple_char_exit);

MODULE_LICENSE("GPL");
内核模块初始化函数执行alloc_chrdev_region函数,进入源代码,位于fs/char_dev.c.
/**
 * alloc_chrdev_region() - register a range of char device numbers
 * @dev: output parameter for first assigned number
 * @baseminor: first of the requested range of minor numbers
 * @count: the number of minor numbers required
 * @name: the name of the associated device or driver
 *
 * Allocates a range of char device numbers.  The major number will be
 * chosen dynamically, and returned (along with the first minor number)
 * in @dev.  Returns zero or a negative error code.
 */
int alloc_chrdev_region(dev_t *dev, unsigned baseminor, unsigned count,
			const char *name)
{
	struct char_device_struct *cd;
	cd = __register_chrdev_region(0, baseminor, count, name);
	if (IS_ERR(cd))
		return PTR_ERR(cd);
	*dev = MKDEV(cd->major, cd->baseminor);
	return 0;
}
之后会执行__register_chrdev_region函数。第一个参数为0,自动分配主设备号。
之后使用cdev_alloc函数来分配空间,这里定义的是struct cdev* 类型
接下来会执行cdev_init,并执行fops的赋值操作
进入源代码来看一下:cedv_alloc会分配空间,并返回一个cdev结构体的指针。cdev_init初始化cdev,多了一步赋值fops
如果定义的是struct cdev结构体而不是指针类型,只需要执行cdev_init()就可以了
/**
 * cdev_alloc() - allocate a cdev structure
 *
 * Allocates and returns a cdev structure, or NULL on failure.
 */
struct cdev *cdev_alloc(void)
{
	struct cdev *p = kzalloc(sizeof(struct cdev), GFP_KERNEL);
	if (p) {
		INIT_LIST_HEAD(&p->list);
		kobject_init(&p->kobj, &ktype_cdev_dynamic);
	}
	return p;
}

/**
 * cdev_init() - initialize a cdev structure
 * @cdev: the structure to initialize
 * @fops: the file_operations for this device
 *
 * Initializes @cdev, remembering @fops, making it ready to add to the
 * system with cdev_add().
 */
void cdev_init(struct cdev *cdev, const struct file_operations *fops)
{
	memset(cdev, 0, sizeof *cdev);
	INIT_LIST_HEAD(&cdev->list);
	kobject_init(&cdev->kobj, &ktype_cdev_default);
	cdev->ops = fops;
}
接下来执行cdev_add,把这个设备添加到系统中。
在实现的方法中,我们在demodrv_open操作中打印主次设备号
在demodrv_read和demodrv_write中仅打印函数名
Makefile
#Makefile文件注意:假如前面的.c文件起名为first.c,那么这里的Makefile文件中的.o文
#件就要起名为first.o    只有root用户才能加载和卸载模块
obj-m:=device_drive.o                          #产生device_drive模块的目标文件
#目标文件  文件  要与模块名字相同
CURRENT_PATH:=$(shell pwd)             #模块所在的当前路径
LINUX_KERNEL:=$(shell uname -r)        #linux内核代码的当前版本
LINUX_KERNEL_PATH:=/usr/src/linux-headers-$(LINUX_KERNEL)

all:
	make -C $(LINUX_KERNEL_PATH) M=$(CURRENT_PATH) modules    #编译模块
#[Tab]              内核的路径       当前目录编译完放哪  表明编译的是内核模块

clean:
	make -C $(LINUX_KERNEL_PATH) M=$(CURRENT_PATH) clean      #清理模块
编译并插入内核模块
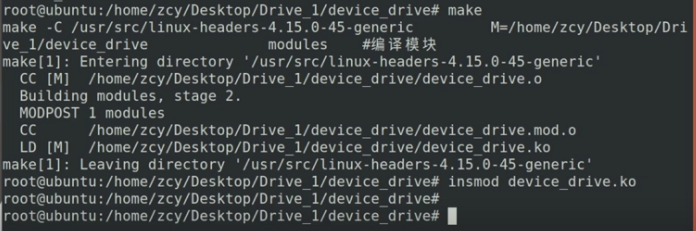
使用dmesg查看内核消息

在这里可以看到已经成功注册了字符设备,my_demo_dev是设备名,主设备号是243,次设备号是0
另外,生成的设备需要在/dev目录下生成对应的节点,这里需要手动生成
使用mknod命令
mknod /dev/demo_drv c 243 0

c代表字符设备,主设备号243,次设备号为0
之后查看/dev目录的情况

在这里

接下来使用用户空间的测试程序来测试这个字符设备驱动
用户空间种测试字符设备的程序test.c
# include <stdio.h>
# include <fcntl.h>
# include <unistd.h>

# define DEMO_DEV_NAME "/dev/demo_drv"

int main()
{
	char buffer[64];
	int fd;

	fd = open(DEMO_DEV_NAME,O_RDONLY);
	if(fd<0)
	{
		printf("open device %s failed\n",DEMO_DEV_NAME);
		return -1;
	}

	read(fd,buffer,64);
	close(fd);

	return 0;
}
在这个测试文件中定义设备的路径
进行一个open操作,read操作只打印函数名
编译用户测试程序并执行
使用dmesg打印内核消息

打印出了open和read的方法
二、
字符设备驱动也可以采用misc机制来进行注册,也就是Linux将一些不符合预先确定的字符设备划分为杂项设备,这类设备的主设备号是10,内核中使用miscdevice结构体来描述
如果使用misc机制来创建设备,就需要定义miscdevice结构体,来看一下第二个实验
内核模块
drive2.c
# include <linux/module.h>
# include <linux/fs.h>
# include <linux/uaccess.h>
# include <linux/init.h>
# include <linux/cdev.h>
//加入misc机制
# include <linux/miscdevice.h>
# include <linux/kfifo.h>

DEFINE_KFIFO(mydemo_fifo,char,64);

//设备名
# define DEMO_NAME "my_demo_dev"

static struct device *mydemodrv_device;

static int demodrv_open(struct inode *inode, struct file *file)
{
	int major = MAJOR(inode->i_rdev);
	int minor = MINOR(inode->i_rdev);

	printk("%s: major=%d, minor=%d\n",__func__,major,minor);

	return 0;
}


static ssize_t demodrv_read(struct file *file, char __user *buf,size_t count,loff_t *ppos)
{
	int actual_readed;
	int ret;

	ret = kfifo_to_user(&mydemo_fifo,buf, count, &actual_readed);
	if(ret)
		return -EIO;

	printk("%s,actual_readed=%d,pos=%lld\n",__func__,actual_readed,*ppos);

	return actual_readed;
}


static ssize_t demodrv_write(struct file *file, const char __user *buf,size_t count,loff_t *ppos)
{
	unsigned int actual_write;
	int ret;

	ret = kfifo_from_user(&mydemo_fifo,buf, count, &actual_write);
	if(ret)
		return -EIO;

	printk("%s: actual_write=%d,ppos=%lld\n",__func__,actual_write,*ppos);

	return actual_write;
}


static const struct file_operations demodrv_fops = {
	.owner = THIS_MODULE,
	.open = demodrv_open,
	.read = demodrv_read,
	.write = demodrv_write,
};

static struct miscdevice mydemodrv_misc_device = {
	.minor = MISC_DYNAMIC_MINOR,
	.name = DEMO_NAME,
	.fops = &demodrv_fops,  //设备相应的操作
};

static int __init simple_char_init(void)
{
	int ret;

	ret = misc_register(&mydemodrv_misc_device);
	if(ret)
	{
		printk("failed register misc device\n");
		return ret;
	}

	mydemodrv_device = mydemodrv_misc_device.this_device;

	printk("successed register char device: %s\n",DEMO_NAME);

	return 0;
}


static void __exit simple_char_exit(void)
{
	printk("removing device\n");

	misc_deregister(&mydemodrv_misc_device);
}

module_init(simple_char_init);
module_exit(simple_char_exit);

MODULE_LICENSE("GPL");
来看内核模块初始化函数,首先使用内核API:misc_register()函数来注册,可以自动创建设备结点,不需要mknod来手动创建设备节点,传入的参数是定义的miscdevice结构体的地址
Makefile
#Makefile文件注意:假如前面的.c文件起名为first.c,那么这里的Makefile文件中的.o文
#件就要起名为first.o    只有root用户才能加载和卸载模块
obj-m:=drive2.o                          #产生drive2模块的目标文件
#目标文件  文件  要与模块名字相同
CURRENT_PATH:=$(shell pwd)             #模块所在的当前路径
LINUX_KERNEL:=$(shell uname -r)        #linux内核代码的当前版本
LINUX_KERNEL_PATH:=/usr/src/linux-headers-$(LINUX_KERNEL)

all:
	make -C $(LINUX_KERNEL_PATH) M=$(CURRENT_PATH) modules    #编译模块
#[Tab]              内核的路径       当前目录编译完放哪  表明编译的是内核模块

clean:
	make -C $(LINUX_KERNEL_PATH) M=$(CURRENT_PATH) clean      #清理模块
编译并插入内核模块
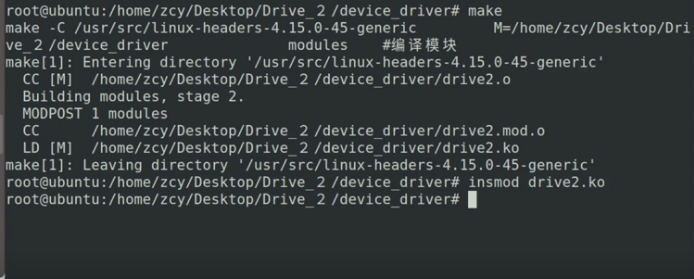
查看/dev下的内容 ll /dev

可以看到生成的设备文件主设备号为10misc,次设备号为53
用户态测试程序test.c
# include <stdio.h>
# include <fcntl.h>
# include <unistd.h>
# include <malloc.h>
# include <string.h>

# define DEMO_DEV_NAME "/dev/my_demo_dev"

int main()
{
	char buffer[64];
	int fd;
	int ret;
	size_t len;

	char message[] = "hello";
	char *read_buffer;

	len = sizeof(message);

	fd = open(DEMO_DEV_NAME,O_RDWR);
	if(fd<0)
	{
		printf("open device %s failed\n",DEMO_DEV_NAME);
		return -1;
	}

	//向设备写数据
	ret = write(fd,message,len);
	if(ret != len)
	{
		printf("cannot write on device %d,ret=%d\n",fd,ret);
		return -1;
	}

	read_buffer = malloc(2*len);
	memset(read_buffer,0,2*len);
	//关闭设备

	ret = read(fd,read_buffer,2*len);
	printf("read %d bytes\n",ret);
	printf("read buffer=%s\n",read_buffer);

	close(fd);

	return 0;
}
执行一次open、write和read操作
使用gcc来编译执行
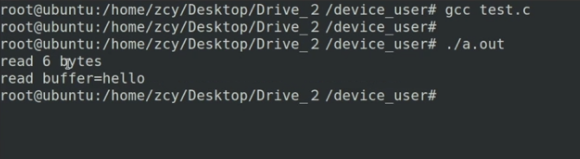
可以看到读取了hello,是6个字节
使用dmesg查看内核消息,也打印了相应的信息

这就是给大家分享的简单的字符设备驱动程序。


