一,基础概念
1.图的简介
图没有起始位置和终止位置,是由顶点和边组成的一种非线性数据结构。
2.图结构的常见概念
(先大概了解一下,后面可以结合图示对照看看):
顶点(Vertex/Node):顶点又称节点,是图的基础部分。
边(Edge):两个顶点之间的连线。
权重(Weight):边上可以附带的权重大小,用来表示从一个顶点到另一个顶点的成本。
相邻(Adjacency):同一条边两端的顶点被称为相邻或者邻接。
路径(Path):由边连接的顶点组成的序列。
度(Degree):连接到一个顶点的边的数量。
入度(Indegree):按传入方向连接到顶点的有向边的总数。
出度(Outdegree):按传出方向连接到顶点的有向边的总数。
3.图的等式表示
图结构可以用等式表示:G=(V, E)。
G是图结构的抽象表示。
V是图中的顶点集合,一般用数组存储,所以V常见于顶点数组。
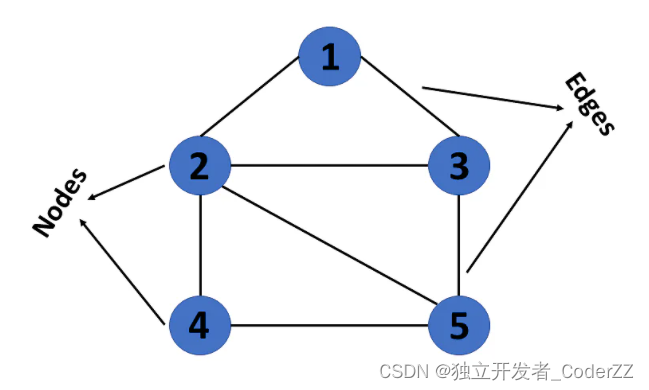
E是相邻顶点的集合,E中的元素也表示他们连接而成的边。例如E中的一个元素是(u, v),表示顶点u和顶点v连接成的边。如果是有方向的边,(u, v)和(v, u)表示的是不同方向的两条边,如果是无方向的边,则(u, v)和(v, u)表示的是同一条边。例如下图中的(1, 2)和(2, 1)表示的是相同的边。
该图有一组顶点V={1,2,3,4,5}和一组边E={(1,2),(1,3),(2,3),(2,4),(2,5),(3,5),(4,5)}。
二,常见的图结构分类
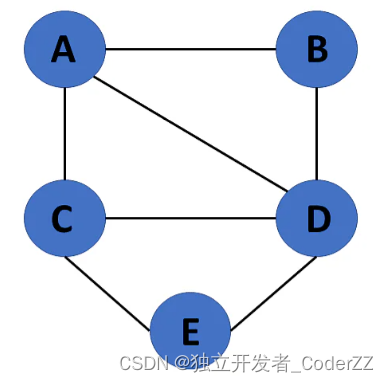
a.无向图
任意两个顶点之间的边不带方向。
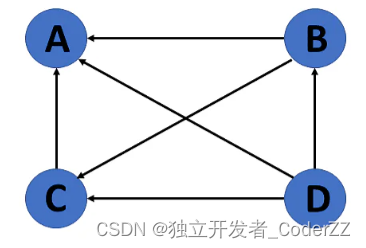
b.有向图
任意两个顶点之间的边区分方向。
c.连通图
图数据结构的一个顶点与任何其他顶点之间存在可以到达的路径、

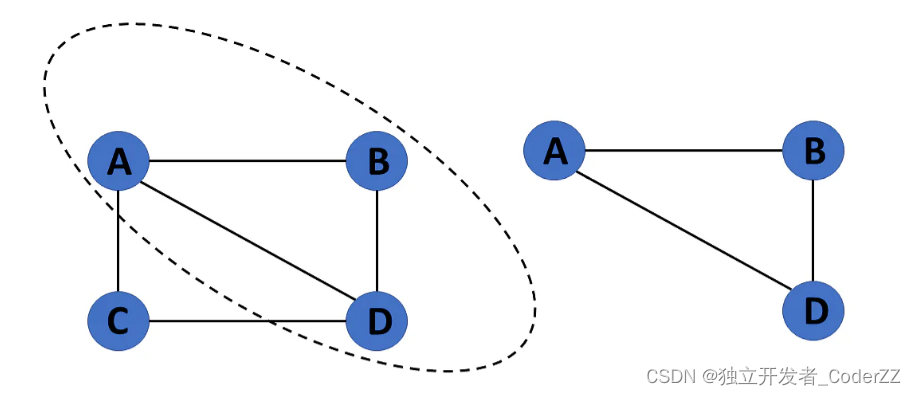
d.子图
顶点和边的组合是另一个图的子集
e.加权图
每条边都有一个权重,表示遍历该边的成本
三,图的常见表示方式
基于二维数组的表示方式——邻接矩阵(Adjacency Matrix)
基于链表的表示方式——邻接表(Adjacency List)
1.邻接矩阵
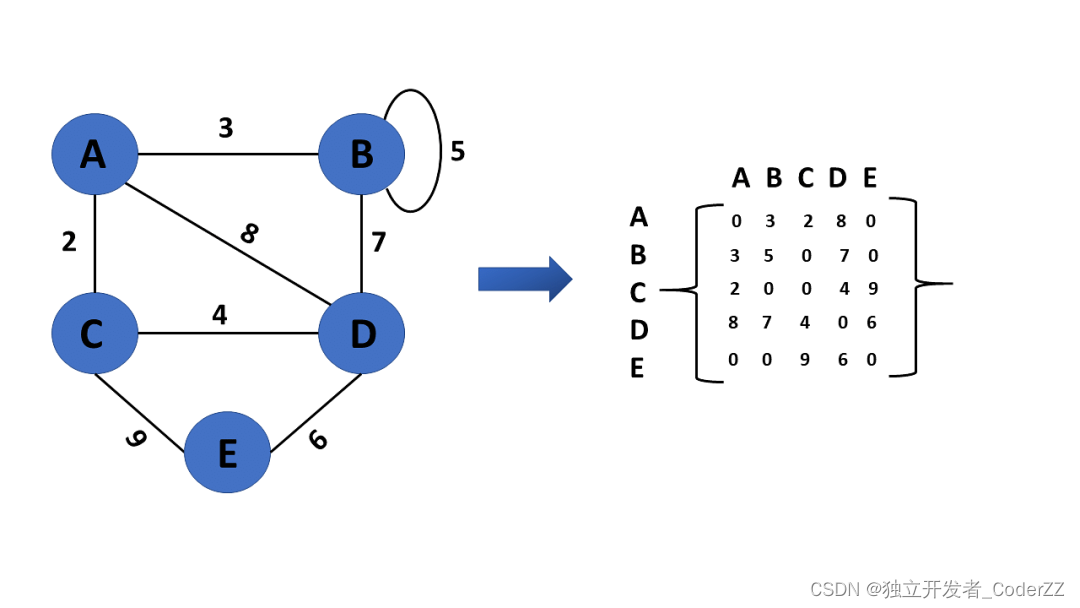
邻接矩阵用于显示哪些节点彼此相邻。
矩阵的行和列都是图的顶点列表,矩阵中不为0的地方表示顶点之间互相连接,即矩阵中不为0的地方表示边。
a.无向图的邻接矩阵
如果顶点a和顶点b之间存在边:AdjMatrix(A, B)=AdjMatrix(B, A)=1

b.有向图的邻接矩阵
如果存在顶点b到顶点a的边:AdjMatrix(B, A)=1
如果不存在顶点a到顶点b的边:AdjMatrix(A, B)=0

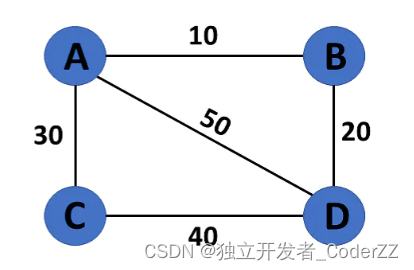
c.加权无向图的邻接矩阵
如果顶点a和顶点b之间存在边,且边的权重为3:AdjMatrix(A, B)=AdjMatrix(B, A)=3
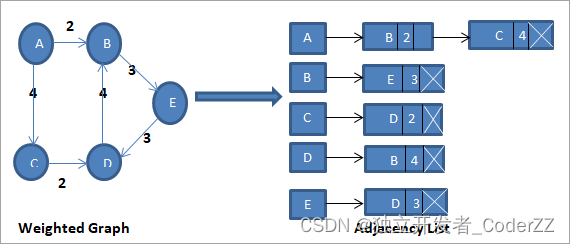
2.邻接表
通俗说就是每个顶点专门有一个列表来记录自己有哪些邻居,这个列表常用链表结构来实现。此结构维护了两张表:
1.包含所有顶点的数组(主表)。
2.每个顶点单独对应的链表,此链表包含了与此顶点相邻的所有顶点集合。

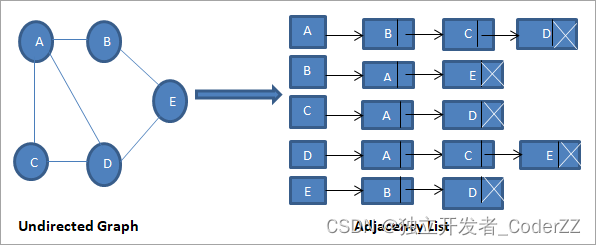
a.无向图的邻接表
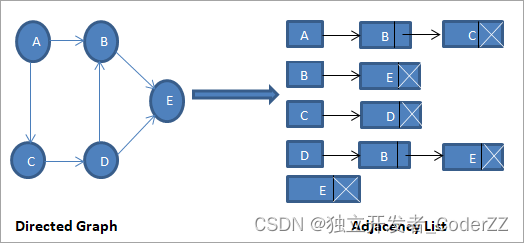
b.有向图的邻接表
c.加权有向图的邻接表
3.邻接表和邻接矩阵的对比
邻接矩阵的表示方式,简单直观且容易理解。其弱点在于,如果遇到了点很多而边很少的稀疏图,此时的矩阵包含大量的无效元素0,容易造成存储空间的浪费。
邻接表方便找任一顶点的所有邻接点,遇到稀疏图还能节省存储空间,其弱点在于,邻接表不方便检查任意两个顶点间是否存在边。
四,图的常见操作
由于邻接表的添加和删除操作比较容易,和链表结构的操作类似,此处主要展示邻接矩阵的添加和删除操作。
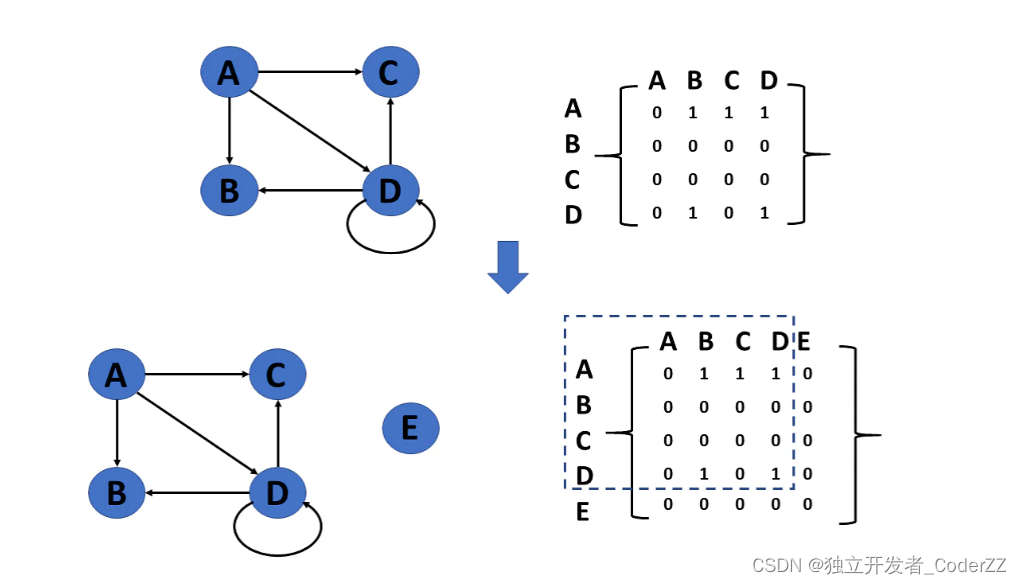
1.添加顶点
当添加一个顶点时,图形的大小会增加,从而使矩阵的行和列级别的大小加1。
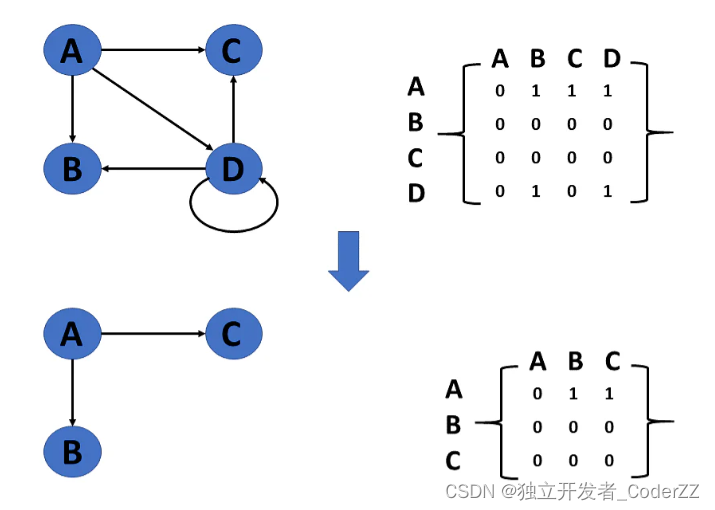
2.删除顶点
如果删除的顶点出现在图中,则矩阵返回该顶点。如果删除的顶点没有出现在图中,则不做任何操作,函数直接返回。删除完以后,矩阵的行和列级别的大小减1。
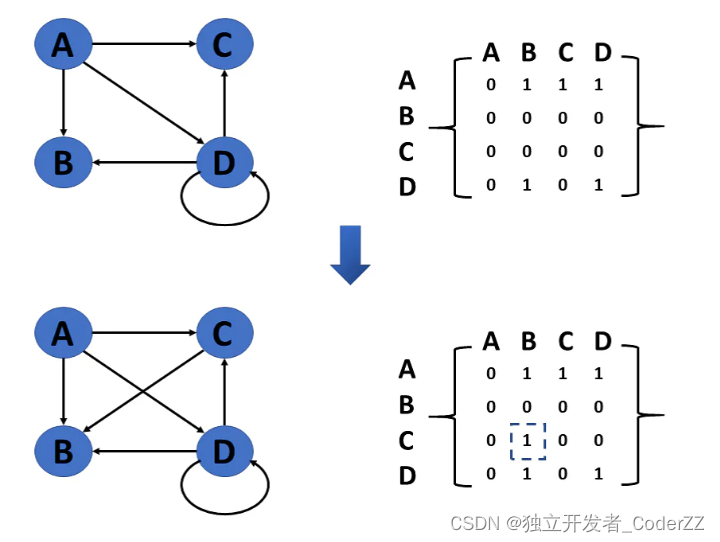
3.两个顶点之间添加边
在添加边之前,AdjMatrix(C, B)=0,在添加边以后,AdjMatrix(C, B)=1。
4.两个顶点之间删除边
在删除边之前,AdjMatrix(D, D)=1,在删除边以后,AdjMatrix(D, D)=0。

5.遍历
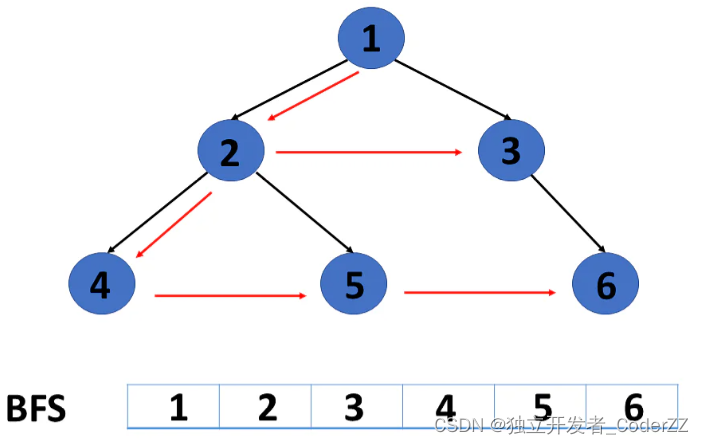
广度优先遍历(BFS)
广度优先遍历也可以说是层次遍历,它是逐层对元素进行访问的。
广度优先遍历从图的任意一个起始位置开始,将图按照深度进行切分(类似于树结构的分层),在移动到下一个深度级别之前,先遍历当前深度级别的所有节点。
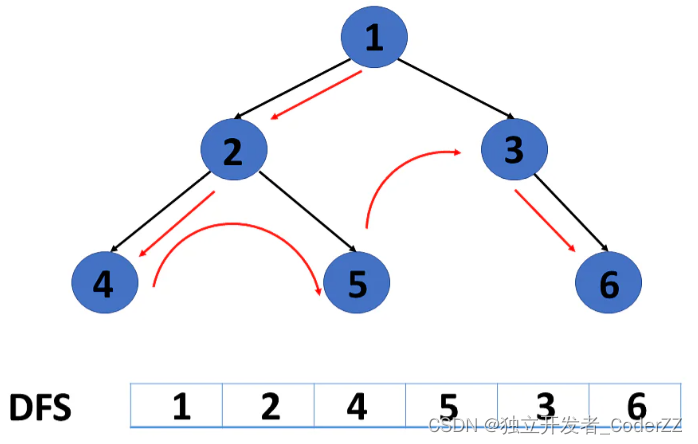
深度优先遍历(DFS)
深度优先是先任选一个出发点开始进行遍历,遍历的过程中,能继续往前移动就继续往前,如果不能就回退一步甚至再回退一步,然后从别的就近起点继续往前遍历。深度优先的遍历特点是,先选一条胡同走到底,走完了再跳到另外一条继续走到底。
两种遍历方式的对比
深度优先遍历,在遍历的过程中不存储所有的结点,占用空间小,但是遍历过程中有回溯操作(入栈/出栈),运行速度较慢。
广度优先遍历,在遍历的过程中存储所有的结点,占用空间大,但是无回溯操作,运行速度较快。
五,代码实例
1.邻接矩阵的代码样例
场景:

Python实现:
class Graph(object):
    def __init__(self, size):
        self.adjMatrix = []
        for i in range(size):
            self.adjMatrix.append([0 for i in range(size)])
        self.size = size

    def add_edge(self, v1, v2):
        if v1 == v2:
            print("Same vertex %d and %d" % (v1, v2))
        self.adjMatrix[v1][v2] = 1
        self.adjMatrix[v2][v1] = 1

    def remove_edge(self, v1, v2):
        if self.adjMatrix[v1][v2] == 0:
            print("No edge between %d and %d" % (v1, v2))
            return
        self.adjMatrix[v1][v2] = 0
        self.adjMatrix[v2][v1] = 0

    def __len__(self):
        return self.size

    def print_matrix(self):
        for row in self.adjMatrix:
            tmp = []
            for val in row:
                tmp.append(val)
            print(tmp)

def main():
    g = Graph(4)
    g.add_edge(0, 1)
    g.add_edge(0, 2)
    g.add_edge(1, 2)
    g.add_edge(0, 3)

    g.print_matrix()

if __name__ == '__main__':
    main()
运行结果:
[0, 1, 1, 1]
[1, 0, 1, 0]
[1, 1, 0, 0]
[1, 0, 0, 0]
C++实现:
#include <iostream>
using namespace std;
class Graph {
private:
    bool** adjMatrix;
    int numVertices;
public:
    Graph(int numVertices) {
        this->numVertices = numVertices;
        adjMatrix = new bool* [numVertices];
        for (int i = 0; i < numVertices; i++) {
            adjMatrix[i] = new bool[numVertices];
            for (int j = 0; j < numVertices; j++)
                adjMatrix[i][j] = false;
        }
    }

    void addEdge(int i, int j) {
        adjMatrix[i][j] = true;
        adjMatrix[j][i] = true;
    }

    void removeEdge(int i, int j) {
        adjMatrix[i][j] = false;
        adjMatrix[j][i] = false;
    }

    void toString() {
        for (int i = 0; i < numVertices; i++) {
            cout << i << " : ";
            for (int j = 0; j < numVertices; j++)
                cout << adjMatrix[i][j] << " ";
            cout << "\n";
        }
    }
    ~Graph() {
        for (int i = 0; i < numVertices; i++)
            delete[] adjMatrix[i];
        delete[] adjMatrix;
    }
};
int main() {
    Graph g(4);
    g.addEdge(0, 1);
    g.addEdge(0, 2);
    g.addEdge(1, 2);
    g.addEdge(0, 3);
    g.toString();
}
运行结果:
0 : 0 1 1 1
1 : 1 0 1 0
2 : 1 1 0 0
3 : 1 0 0 0
2.邻接表的代码样例
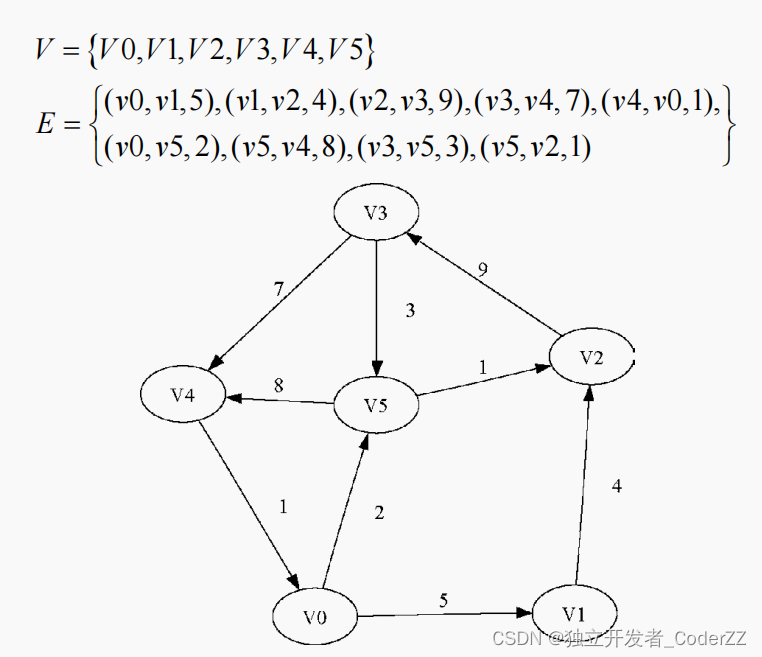
场景:
6个顶点,9条边组成的加权有向图
Python实现:
Python版的邻接矩阵,最简单的实现方式是为每个顶点都维护一个字典,字典的键是顶点,值是权重。
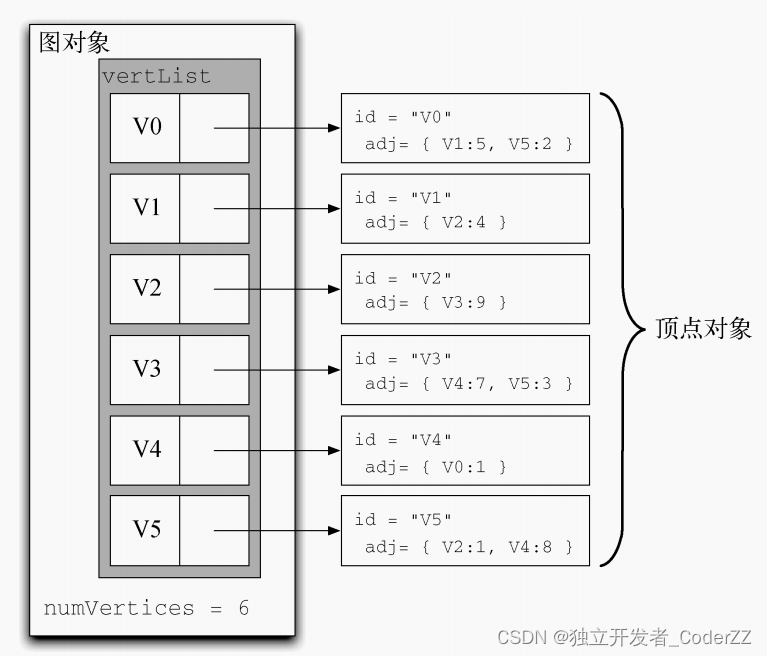
Graph类存储包含所有顶点的主列表。
Vertex类表示图中的每一个顶点,Vertex 使用字典 connectedTo 来记录与其相连的顶点,以及每一条边的权重。
class Graph:
    def __init__(self):
        self.vertList = {}
        self.numVertices = 0
    def addVertex(self, key):
        self.numVertices = self.numVertices + 1
        newVertex = Vertex(key)
        self.vertList[key] = newVertex
        return newVertex
    def getVertex(self, n):
        if n in self.vertList:
            return self.vertList[n]
        else:
            return None
    def __contains__(self, n):
        return n in self.vertList
    #向图中添加带权重的边
    def addEdge(self, f, t, cost=0):
        if f not in self.vertList:
            nv = self.addVertex(f)
        if t not in self.vertList:
            nv = self.addVertex(t)
        self.vertList[f].addNeighbor(self.vertList[t], cost)
    def getVertices(self):
        return self.vertList.keys()
    #魔法函数,遍历图中的所有顶点对象
    def __iter__(self):
        return iter(self.vertList.values())

class Vertex:
    def __init__(self, key):
        self.id = key
        self.connectedTo = {}
    def addNeighbor(self, nbr, weight=0):
        self.connectedTo[nbr] = weight
    def __str__(self):
        return str(self.id) + ' connectedTo: ' + str([x.id for x in self.connectedTo])
    #返回邻接表中的所有顶点
    def getConnections(self):
        return self.connectedTo.keys()
    def getId(self):
        return self.id
    #返回指定顶点之间边上的权重
    def getWeight(self, nbr):
        return self.connectedTo[nbr]

if __name__ == '__main__':
    g = Graph()
    for i in range(6):
        g.addVertex(i)
    print("打印顶点对象: ", g.vertList)
    g.addEdge(0, 1, 5)
    g.addEdge(0, 5, 2)
    g.addEdge(1, 2, 4)
    g.addEdge(2, 3, 9)
    g.addEdge(3, 4, 7)
    g.addEdge(3, 5, 3)
    g.addEdge(4, 0, 1)
    g.addEdge(5, 4, 8)
    g.addEdge(5, 2, 1)
    for v in g:
        for w in v.getConnections():
            #遍历邻接表,返回顶点和邻接的顶点,以及边的权重
            print("( %s , %s : %s)" % (v.getId(), w.getId(), v.getWeight(w)))
运行结果:
打印顶点对象:  {0: <__main__.Vertex object at 0x0000013A5A55B358>,
1: <__main__.Vertex object at 0x0000013A5A55B390>,
2: <__main__.Vertex object at 0x0000013A5A55B3C8>,
3: <__main__.Vertex object at 0x0000013A5A55B400>,
4: <__main__.Vertex object at 0x0000013A5A55B438>,
5: <__main__.Vertex object at 0x0000013A5A55B470>}
( 0 , 1 : 5)
( 0 , 5 : 2)
( 1 , 2 : 4)
( 2 , 3 : 9)
( 3 , 4 : 7)
( 3 , 5 : 3)
( 4 , 0 : 1)
( 5 , 4 : 8)
( 5 , 2 : 1)
C++实现:
#include <iostream>
using namespace std;

struct adjNode {
    int val, cost;
    adjNode* next;
};
struct graphEdge {
    int start_ver, end_ver, weight;
};
class DiaGraph {
    adjNode* getAdjListNode(int value, int weight, adjNode* head) {
        adjNode* newNode = new adjNode;
        newNode->val = value;
        newNode->cost = weight;
        newNode->next = head;
        return newNode;
    }
    int N;
public:
    adjNode** head;
    DiaGraph(graphEdge edges[], int n, int N) {
        head = new adjNode * [N]();
        this->N = N;
        for (int i = 0; i < N; ++i)
            head[i] = nullptr;
        for (unsigned i = 0; i < n; i++) {
            int start_ver = edges[i].start_ver;
            int end_ver = edges[i].end_ver;
            int weight = edges[i].weight;
            adjNode* newNode = getAdjListNode(end_ver, weight, head[start_ver]);
            head[start_ver] = newNode;
        }
    }
    ~DiaGraph() {
        for (int i = 0; i < N; i++)
            delete[] head[i];
        delete[] head;
    }
};

void display_AdjList(adjNode* ptr, int i)
{
    while (ptr != nullptr) {
        cout << "(" << i << ", " << ptr->val
            << ", " << ptr->cost << ") ";
        ptr = ptr->next;
    }
    cout << endl;
}

int main()
{
    // graph edges array.
    graphEdge edges[] = {
    // (x, y, w) -> edge from x to y with weight w
    {0, 1, 5},
    {0, 5, 2},
    {1, 2, 4},
    {2, 3, 9},
    {3, 4, 7},
    {3, 5, 3},
    {4, 0, 1},
    {5, 4, 8},
    {5, 2, 1}
    };
    int N = 6;  // Number of vertices in the graph
    int n = sizeof(edges) / sizeof(edges[0]); // calculate number of edges
    DiaGraph diagraph(edges, n, N);
    cout << "Graph adjacency list " << endl << "(start_vertex, end_vertex, weight):"  << endl;
    for (int i = 0; i < N; i++)
    {
        display_AdjList(diagraph.head[i], i);
    }
    return 0;
}
运行结果:
Graph adjacency list
(start_vertex, end_vertex, weight):
(0, 5, 2) (0, 1, 5)
(1, 2, 4)
(2, 3, 9)
(3, 5, 3) (3, 4, 7)
(4, 0, 1)
(5, 2, 1) (5, 4, 8)
3.广度优先的代码样例
场景:
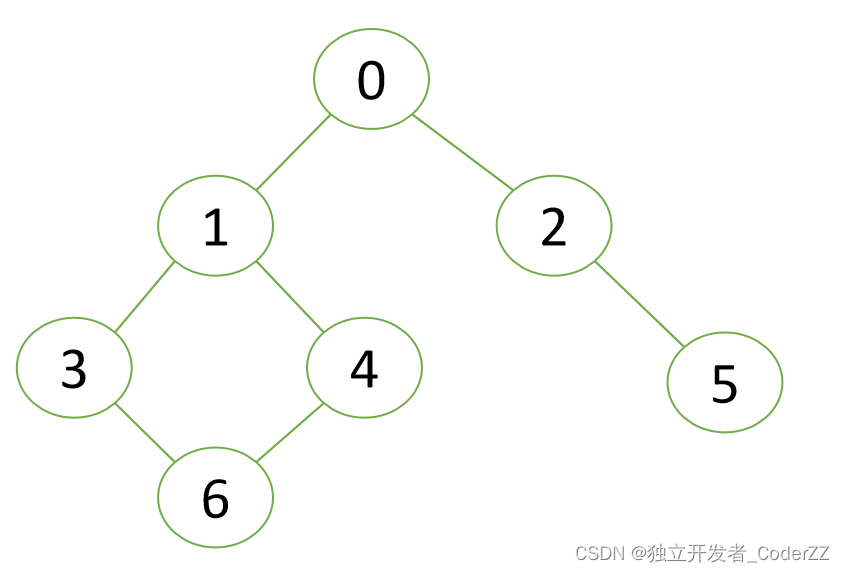
遍历顺序: 0 -> 1 -> 2 -> 3 -> 4 -> 5 -> 6
Python实现:
class Graph:
    adj = []
    def __init__(self, v, e):
        self.v = v
        self.e = e
        Graph.adj = [[0 for i in range(v)]
                     for j in range(v)]

    def addEdge(self, start, e):
        Graph.adj[start][e] = 1
        Graph.adj[e][start] = 1

    def BFS(self, start):
        visited = [False] * self.v
        q = [start]

        # Set source as visited
        visited[start] = True

        while q:
            vis = q[0]

            # Print current node
            print(vis, end=' ')
            q.pop(0)

            # For every adjacent vertex to
            # the current vertex
            for i in range(self.v):
                if (Graph.adj[vis][i] == 1 and
                        (not visited[i])):
                    # Push the adjacent node
                    # in the queue
                    q.append(i)
                    visited[i] = True

v, e = 7, 7

#Create the graph
G = Graph(v, e)
G.addEdge(0, 1)
G.addEdge(0, 2)
G.addEdge(1, 3)
G.addEdge(1, 4)
G.addEdge(2, 5)
G.addEdge(6, 3)
G.addEdge(6, 4)

G.BFS(0)
运行结果:
0 1 2 3 4 5 6C++实现:
#include<bits/stdc++.h>
using namespace std;
vector<vector<int>> adj;

void addEdge(int x, int y)
{
       adj[x][y] = 1;
       adj[y][x] = 1;
}

void bfs(int start)
{
       vector<bool> visited(adj.size(), false);
       vector<int> q;
       q.push_back(start);
       // Set source as visited
       visited[start] = true;
       int vis;
       while (!q.empty()) {
              vis = q[0];
              // Print the current node
              cout << vis << " ";
              q.erase(q.begin());
              // For every adjacent vertex to the current vertex
              for (int i = 0; i < adj[vis].size(); i++) {
                      if (adj[vis][i] == 1 && (!visited[i])) {
                             // Push the adjacent node to the queue
                             q.push_back(i);
                             // Set
                             visited[i] = true;
                      }
              }
       }
}

int main()
{
       // number of vertices
       int v = 7;
       // adjacency matrix
       adj = vector<vector<int>>(v, vector<int>(v, 0));
       addEdge(0, 1);
       addEdge(0, 2);
       addEdge(1, 3);
       addEdge(1, 4);
       addEdge(2, 5);
       addEdge(6, 3);
       addEdge(6, 4);

       bfs(0);
}
运行结果:
0 1 2 3 4 5 64.深度优先的代码样例
场景:
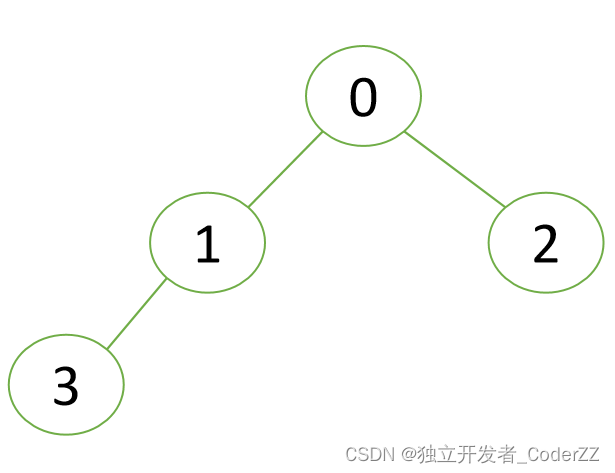
遍历顺序:0 -> 1 -> 3 -> 2
Python实现:
class Graph:
    adj = []

    def __init__(self, v, e):
        self.v = v
        self.e = e
        Graph.adj = [[0 for i in range(v)]
                     for j in range(v)]

    def addEdge(self, start, e):
        Graph.adj[start][e] = 1
        Graph.adj[e][start] = 1

    def DFS(self, start, visited):
        print(start, end=' ')
        visited[start] = True
        for i in range(self.v):
            if (Graph.adj[start][i] == 1 and
                    (not visited[i])):
                self.DFS(i, visited)

v, e = 5, 4

G = Graph(v, e)
G.addEdge(0, 1)
G.addEdge(0, 2)
G.addEdge(1, 3)

G.DFS(0, visited);
运行结果:
0 1 3 2C++实现:
#include <bits/stdc++.h>
using namespace std;

vector<vector<int> > adj;
void addEdge(int x, int y)
{
       adj[x][y] = 1;
       adj[y][x] = 1;
}
void dfs(int start, vector<bool>& visited)
{
       // Print the current node
       cout << start << " ";
       // Set current node as visited
       visited[start] = true;
       // For every node of the graph
       for (int i = 0; i < adj[start].size(); i++) {
              // If some node is adjacent to the current node
              // and it has not already been visited
              if (adj[start][i] == 1 && (!visited[i])) {
                      dfs(i, visited);
              }
       }
}
int main()
{
       // number of vertices
       int v = 5;
       // number of edges
       int e = 4;
       // adjacency matrix
       adj = vector<vector<int> >(v, vector<int>(v, 0));
       addEdge(0, 1);
       addEdge(0, 2);
       addEdge(1, 3);
       vector<bool> visited(v, false);

       dfs(0, visited);
}
运行结果:
0 1 3 2六,参考阅读
《Problem Solving with Algorithms and Data Structures Using Python, Second Edition》
https://www.simplilearn.com/tutorials/data-structure-tutorial/graphs-in-data-structure
https://www.softwaretestinghelp.com/graph-implementation-cpp/
https://www.programiz.com/dsa/graph-adjacency-matrix
https://www.geeksforgeeks.org/implementation-of-dfs-using-adjacency-matrix/
https://www.geeksforgeeks.org/implementation-of-bfs-using-adjacency-matrix/
https://www.programiz.com/dsa/graph-adjacency-matrix


