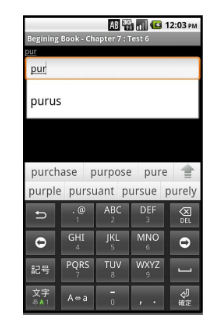
AutoCompleteTextView,有一个text作为前缀,有一个类似spinner作为选择,用户也可以敲入所需,可不在spinner的list之中。
AutoCompleteTextView是EditText的subclass,可以使用EditText所有的属性,例如字体,颜色等。此外,提供android:completionThreshold,用于表明最小要敲入多少字符才开始显示list filter。我们可以通过setAdapter设置一个adapter来给出list的内容,但是由于用户可以自行填入内同,因此不支持selected listener,我们可以注册一个TextWatcher,就如同其他EditText widget一样,来检测特系统的变化,它在用户从list中选择或者人工填入都可以监测到。
步骤一:编写:Android XML
下面是XML的例子
<?xml version="1.0" encoding="utf-8"?>
 <LinearLayout   xmlns:android="http://schemas.android.com/apk/res/android"
   android:orientation="vertical"
   android:layout_width="fill_parent"
   android:layout_height="fill_parent">
   <TextView android:id="@+id/selection6"
     android:layout_width="fill_parent"
     android:layout_height="wrap_content"   />
   <AutoCompleteTextView android:id="@+id/editAuto"
     android:layout_width="fill_parent"
     android:layout_height="wrap_content"
     android:completionThreshold="3" /> <!-- 在我们测试中,缺省为2,即我们敲入第2个字符的时候可以触发list显示 -->
</LinearLayout>
步骤二:JAVA source code
//步骤2.1 增加接口,实现TextWatcher
 public class Chapter7Test6 extends Activity implements TextWatcher{
    private TextView selection;
     private AutoCompleteTextView edit;
     private String[]  items={"lorem", "ipsum", "dolor", "sit", "amet", "consectetuer", "adipiscing", "elit", "morbi", "vel", "ligula", "vitae", "arcu", "aliquet", "mollis", "etiam", "vel", "erat", "placerat", "ante", "porttitor", "sodales", "pellentesque", "augue", "purus"};

    @Override
     protected void onCreate(Bundle savedInstanceState) {
        super.onCreate(savedInstanceState);
         setContentView(R.layout.chapter_7_test6);
         selection = (TextView)findViewById(R.id.selection6);
         edit = (AutoCompleteTextView)findViewById(R.id .editAuto);

         //步骤1:设置适配器
         edit.setAdapter(new ArrayAdapter<String>(this,android.R.layout.simple_dropdown_item_1line,items));
         //步骤2:设置触发函数,采用TextWatcher,
         edit.addTextChangedListener(this);
     }

    /* 步骤2.2,TextWatcher将需实现afterTextChanged(),beforeTextChanged(),onTextChanged()三个方法。本例无须处理after和before,之针对onTextChanged进行处理  */
     public void afterTextChanged(Editable s) {
         //nothing to do
     }

     public void beforeTextChanged(CharSequence s, int start, int count,    int after) {
        //nothing to do
     }

     public void onTextChanged(CharSequence s, int start, int before, int count) {
         selection.setText(edit.getText());
     }
 }
来自Android Tutorial的例子:在这个例子中,我们不采用自定义的List格式,通过XML来定义List的格式
1)设置描述List中item的格式
<?xml version="1.0" encoding="utf-8"?>
 <TextView   xmlns:android="http://schemas.android.com/apk/res/android"
   android:layout_width="fill_parent"
   android:layout_height="fill_parent"
   android:textSize="16sp"
   android:padding="10dp"
   android:textColor="#0000aa">
 </TextView>
Android长度单位详解(dp、sp、px、in、pt、mm、dip)
android中定义的dimension单位有以下这些:
 px(Pixels ,像素):对应屏幕上的实际像素点。
 in(Inches ,英寸):屏幕物理长度单位。
 mm(Millimeters ,毫米):屏幕物理长度单位。
 pt(Points ,磅):屏幕物理长度单位,1/72英寸。
 dp(与密度无关的像素):逻辑长度单位,在 160 dpi 屏幕上,1dp=1px=1/160英寸。随着密度变化,对应的像素数量也变化,但并没有直接的变化比例。
 dip:与dp相同,多用于Google示例中。
 sp(与密度和字体缩放度无关的像素):与dp类似,但是可以根据用户的字体大小首选项进行缩放。
2)设置Activity中的XML
<?xml version="1.0" encoding="utf-8"?>
<LinearLayout  xmlns:android="http://schemas.android.com/apk/res/android"
   android:orientation="horizontal"
   android:layout_width="fill_parent"
   android:layout_height="wrap_content"
   android:padding="5dp">
  <TextView android:text="Country"
     android:layout_width="wrap_content"
     android:layout_height="wrap_content" />
   <AutoCompleteTextView android:id="@+id/auto_country"
     android:layout_width="fill_parent"
     android:layout_height="wrap_content"
     android:layout_marginLeft="5dp"
     android:completionThreshold="1"  />
 </LinearLayout>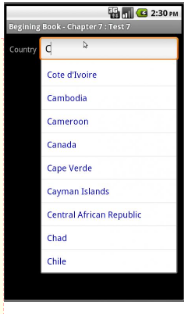
3)源代码:这里我们不进行触发,仅显示内容
AutoCompleteTextView textView = (AutoCompleteTextView) findViewById(R.id.auto_country);
 ArrayAdapter<String> adapter = new ArrayAdapter<String>(this,R.layout.chapter_7_test7_item,Chapter7Test2.COUNTRIES);
textView.setAdapter(adapter);


