微信搜索“SRE成长记”可阅读原文及更多文章
文章目录
GlusterFS 简介 GlusterFS集群搭建 1.gfs集群安装前提 2.测试服务器规划 3.四台gfs集群节点安装gfs服务 4.集群配置 5.挂载客户端 6.GlusterFS集群扩缩容 7.几个常用命令
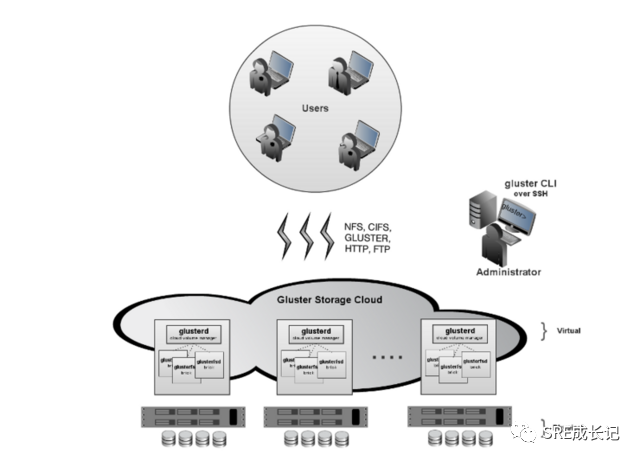
GlusterFS 简介
GlusterFS 是谷歌研发的一个可扩展的分布式网络文件系统,它将来自多个服务器的磁盘存储资源聚合到单个全局命名空间中。适用于数据密集型任务,如云存储和媒体流等大文件的存储。
优势
• 可扩展到几 PB
• 处理数千个客户端
• 兼容波赛
• 使用商用硬件
• 可以使用任何支持扩展属性的磁盘文件系统
• 可使用行业标准协议(如 NFS 和 SMB)进行访问
• 提供复制、配额、异地复制、快照和比特机器人检测
• 允许针对不同的工作负载进行优化
• 开源
• 集群无中心节点,扩缩容方便
劣势
• 与MinIO比,gfs监控不太方便,官方提供的监控工具gluster-prometheus几乎两三年没有更新了,且github提供的安装步骤,在国内服务器非常难以成功编译使用。
GlusterFS集群搭建
1.gfs集群安装前提
• 至少有3个节点 • 有效的网络连接 • 建议每台服务器节点至少两个虚拟磁盘,一个用于操作系统安装,另一个用用于在每个虚拟机上提供 GlusterFS 存储 (sdb)。 • 在每个服务器上设置 NTP 以获得正常运行 文件系统之上的许多应用程序。这是一个重要的要求 格式化gfs虚拟机磁盘(如sdb1):
mkfs.xfs -i size=512 /dev/sdb1
mkdir -p /data/brick1
echo '/dev/sdb1 /data/brick1 xfs defaults 1 2' >> /etc/fstab
mount -a && mount
GlusterFS集群搭建可以用yum安装完成,本文记录服务器不通公网的情况下编译安装指定版本的过程。
2.测试服务器规划
服务器系统:centos7
内核版本:3.10.0-957.el7.x86_64
GlusterFS版本:glusterfs-9.6
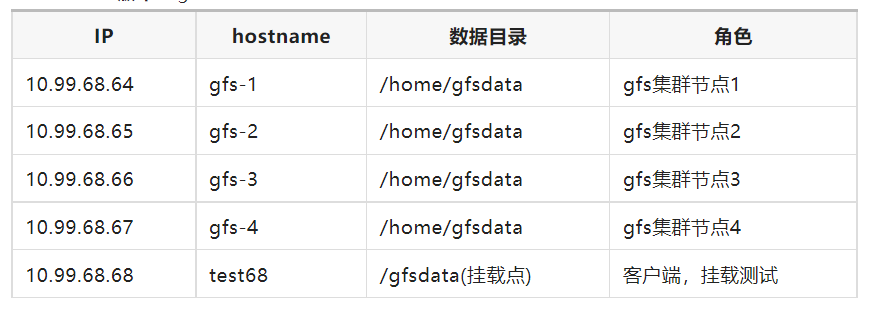 生产环境建议数据目录使用独立磁盘,学习和测试中可以创建一个目录作为数据目录。
3.四台gfs集群节点安装gfs服务
++注:本部分在4台gfs集群节点均需执行++
3.1 配置集群节点/etc/hosts解析
10.99.68.64 gfs-1
10.99.68.65 gfs-2
10.99.68.66 gfs-3
10.99.68.67 gfs-4
3.2 安装依赖包
# yum install -y autoconf automake bison cmockery2-devel dos2unix flex
# yum install -y fuse-devel glib2-devel libacl-devel libaio-devel libattr-devel
# yum install -y libcurl-devel libibverbs-devel librdmacm-devel libtirpc-devel
# yum install -y libtool libxml2-devel lvm2-devel make openssl-devel pkgconfig
# yum install -y pyliblzma python-devel python-eventlet python-netifaces
# yum install -y python-paste-deploy python-simplejson python-sphinx python-webob
# yum install -y pyxattr readline-devel rpm-build sqlite-devel systemtap-sdt-devel
# yum install -y tar userspace-rcu-devel
3.3 上传gfs版本包,并安装
上传glusterfs安装包glusterfs-9.6.tar.gz(下载链接见文末)到服务器并解压到安装目录,进入解压后的目录进行安装:
# cd glusterfs-9.6
# ./autogen.sh
# ./configure --disable-linux-io_uring
# make   #这一步要很久,可以使用make -jN 命令加速,N表示并行作业的数量,如make -j10
# make install
在执行 ./configure --disable-linux-io_uring这一步的末尾有如下信息输出:
GlusterFS configure summary
===========================
FUSE client          : yes
epoll IO multiplex   : yes
fusermount           : yes
readline             : yes
georeplication       : yes
Linux-AIO            : yes
Linux-io_uring       : no
Enable Debug         : no
Run with Valgrind    : no
Sanitizer enabled    : none
Use syslog           : yes
XML output           : yes
Unit Tests           : no
Track priv ports     : yes
POSIX ACLs           : yes
SELinux features     : yes
firewalld-config     : no
Events               : yes
EC dynamic support   : x64 sse avx
Use memory pools     : yes
Nanosecond m/atimes  : yes
Server components    : yes
Legacy gNFS server   : no
IPV6 default         : no
Use TIRPC            : yes
With Python          : 2.7
Cloudsync            : yes
Metadata dispersal   : no
Link with TCMALLOC   : no
Enable Brick Mux     : no
Building with LTO    : no
3.4 启动glusterd
不需要手动创建启动文件,直接启动:
# systemctl daemon-reload
# systemctl start glusterd   #systemctl stop glusterd  #停止服务命令
# systemctl enable glusterd  #设置开机自启动
# systemctl status glusterd #查看状态
3.5 检查启动情况
[root@gfs-1 glusterfs-9.6]# ps -ef|grep glusterd
root 88988 1 0 11:13 ? 00:00:00 /usr/local/sbin/glusterd -p /var/run/glusterd.pid --log-level INFO
root 89032 56661 0 11:13 pts/0 00:00:00 grep --color=auto glusterd
[root@gfs-1 glusterfs-9.6]#

[root@gfs-1 glusterfs-9.6]# netstat -tlunp|grep glusterd
tcp 0 0 0.0.0.0:24007 0.0.0.0:* LISTEN 88988/glusterd
[root@gfs-1 glusterfs-9.6]#
3.6 创建数据目录
生产上建议使用独立磁盘,测试学习可以不需要。
# mkdir /home/gfsdata -p

4. 集群配置
++注:本部分在gfs-1一台节点执行即可++
4.1 配置集群节点信任池
4.1.1 查看当前gfs集群信任池
目前还没有服务器:
[root@gfs-1 glusterfs-9.6]# gluster peer status # 查看集群的状态,当前信任池当中没有其他主机
Number of Peers: 0
4.1.2 添加集群信任池
在gfs-1节点将gfs-2、gfs-3、gfs-4三台节点都加入集群信任池:
[root@gfs-1 glusterfs-9.6]# gluster peer probe gfs-2 # 配置信任池(一端添加就行),加入剩余3个节点)
peer probe: success
[root@gfs-1 glusterfs-9.6]# gluster peer probe gfs-3
peer probe: success
[root@gfs-1 glusterfs-9.6]# gluster peer probe gfs-4
peer probe: success
[root@gfs-1 root]#
注:gfs-1本机不需要添加,会有如下提示:
[root@gfs-1 root]# gluster peer probe gfs-1
peer probe: Probe on localhost not needed
4.1.3 添加完后,检查集群信任池
[root@gfs-1 root]# gluster peer status
Number of Peers: 3
Hostname: gfs-2
Uuid: e1c2e486-76f4-4644-b7b8-401dc7f0c883
State: Peer in Cluster (Connected)
Hostname: gfs-3
Uuid: b28458c9-70d7-41ae-b950-66687ad3d6fb
State: Peer in Cluster (Connected)
Hostname: gfs-4
Uuid: 2e43c445-9257-420f-82b9-f8a1ee656c5b
State: Peer in Cluster (Connected)
[root@gfs-1 root]#
4.2 检查集群节点存储池
[root@gfs-1 root]# gluster pool list # 查看存储池
UUID Hostname State
e1c2e486-76f4-4644-b7b8-401dc7f0c883 gfs-2 Connected
b28458c9-70d7-41ae-b950-66687ad3d6fb gfs-3 Connected
2e43c445-9257-420f-82b9-f8a1ee656c5b gfs-4 Connected
68acb511-5a47-4f64-b8ca-00309c0198a5 localhost Connected
[root@gfs-1 root]#
4.3 创建存储卷
4.3.1 查看当前的卷
[root@gfs-1 root]# gluster volume list #现在的volume还是空的,待创建
No volumes present in cluster
4.3.2 创建卷
卷的类型有分布式卷、复制卷等多种卷,各有优劣,见《关于GlusterFS的卷》。 创建一个复制卷:
[root@gfs-1 glusterfs-9.6]# gluster volume create data replica 4 gfs-1:/home/gfsdata gfs-2:/home/gfsdata gfs-3:/home/gfsdata gfs-4:/home/gfsdata #没有指定类型,默认创建的是分布式卷
volume create: data: success: please start the volume to access data
[root@gfs-1 glusterfs-9.6]#
[root@gfs-1 glusterfs-9.6]# gluster volume list #集群中出现刚创建的卷
data
[root@gfs-1 glusterfs-9.6]#
4.3.3 查看卷的详细信息
[root@gfs-1 glusterfs-9.6]# gluster volume info 查看卷的详细信息
Volume Name: data
Type: Replicate
Volume ID: 3435f05b-3d9f-4b4e-9792-f707cb7365d1
Status: Created
Snapshot Count: 0
Number of Bricks: 1 x 4 = 4
Transport-type: tcp
Bricks:
Brick1: gfs-1:/home/gfsdata
Brick2: gfs-2:/home/gfsdata
Brick3: gfs-3:/home/gfsdata
Brick4: gfs-4:/home/gfsdata
Options Reconfigured:
cluster.granular-entry-heal: on
storage.fips-mode-rchecksum: on
transport.address-family: inet
nfs.disable: on
performance.client-io-threads: off
[root@gfs-1 glusterfs-9.6]#
4.4 启动刚刚创建的卷
[root@gfs-1 glusterfs-9.6]# gluster volume start data
volume start: data: success
[root@gfs-1 glusterfs-9.6]#

5. 客户端挂载
++注:本部分在10.99.98.68这台客户端上操作++
5.1 客户端环境配置
5.1.1 安装客户端服务
# yum -y install glusterfs-client(版本和服务端版本尽量一致,版本差太多会挂载失败)
5.1.2 客户端配置/etc/hosts解析
将gfs集群4台服务器主机hostname加入客户端主机的/etc/hosts文件:
10.99.68.64 gfs-1
10.99.68.65 gfs-2
10.99.68.66 gfs-3
10.99.68.67 gfs-4
5.1.3 创建挂载点目录
# mkdir /gfsdata
5.2 客户端挂载
5.2.1 执行mount命令挂载
# mount -t glusterfs -o backup-volfile-servers=gfs-2:gfs-3:gfs-4,log-level=WARNING gfs-1:/data /gfsdata
5.2.2可将挂载命令写入/etc/rc.local文件开机挂载
# echo "mount -t glusterfs -o backup-volfile-servers=gfs-2:gfs-3:gfs-4,log-level=WARNING gfs-1:/data /gfsdata" >>/etc/rc.local
检查挂载:
[root@test68 ~]# df -h
Filesystem       Size  Used Avail Use% Mounted on
/dev/sda3         49G   11G   39G  22% /
devtmpfs         3.8G     0  3.8G   0% /dev
tmpfs            3.9G     0  3.9G   0% /dev/shm
tmpfs            3.9G   12M  3.8G   1% /run
tmpfs            3.9G     0  3.9G   0% /sys/fs/cgroup
/dev/sda2        509M  137M  373M  27% /boot
/dev/sda6        128M  4.0K  128M   1% /boot/efi
tmpfs            781M     0  781M   0% /run/user/600
gfs-1:/data      576G   19G  534G   4% /gfsdata        #挂载成功
6. GlusterFS集群扩缩容
6.1 GlusterFS集群扩容
6.1.1 新节点服务器安装好gfs服务并启动后,创建数据目录
# mkdir /home/gfsdata -p
6.1.2 将新节点加入信任池
# gluster peer probe gfs-5
# gluster peer probe gfs-6
6.1.3 扩容data卷
# gluster volume add-brick data gfs-5:/home/gfsdata gfs-6:/home/gfsdata force
6.1.4 rebalance卷
# gluster volume rebalance data start
# gluster volume rebalance data status
6.2 GlusterFS缩容
缩容后,缩容节点上的文件也会被带走。
6.2.1 先缩容卷
语法格式:gluster volume remove-brick 卷 节点名:磁盘名 start

示例:gluster volume remove-brick data gfs-6:/home/gfsdata start
6.2.2 将缩容的节点移出信任池
# gluster peer detach gfs-6
7. 几个常用命令
7.1 删除volume重建
先将volume下的测试数据清理干净,再停止volume。
# gluster volume stop data
# gluster volume delete data
# rm -rf /home/gfsdata/.glusterfs
# setfattr -x trusted.glusterfs.volume-id /home/gfsdata/
# setfattr -x trusted.gfid /home/gfsdata/
7.2 设置volume参数示例
参数按实际需求设置
# gluster volume quota gfs-data enable #磁盘配额开关
# gluster volume set gfs-data performance.cache-size 5GB  #读操作时缓存的容量
# gluster volume set gfs-data performance.io-thread-count 32  #并发的IO线程数量
7.3 重新均衡卷
# gluster volume rebalance <VOLNAME> lay-outstart
# gluster volume rebalance <VOLNAME> start
# gluster volume rebalance <VOLNAME> startforce
# gluster volume rebalance <VOLNAME> status
# gluster volume rebalance <VOLNAME> stop
7.4 从信任池移除某个节点
# gluster peer detach <SERVER>
示例:
# gluster peer detach gfs-11
::: hljs-center

:::


