基础环境准备参考
https://blog.51cto.com/u_14814545/5167043
主机
主机 | IP地址 |
控制端 | 192.168.47.23 |
计算节点 | 192.168.47.26 |
数据库/MQ服务器 | 192.168.47.28 |
1.控制端
1.1.包安装
[root@control1 ~]# yum install centos-release-openstack-rocky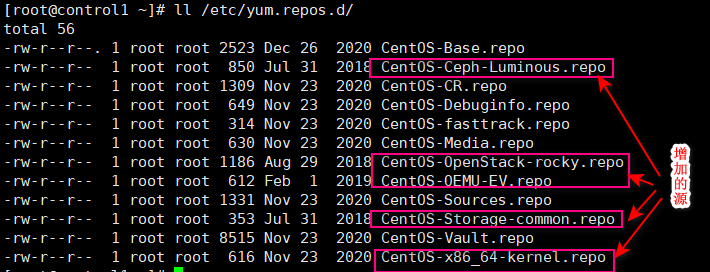
[root@control1 ~]# vim /etc/yum.repos.d/CentOS-OpenStack-rocky.repo
baseurl=https://mirrors.aliyun.com/centos/7/cloud/x86_64/openstack-rocky
[root@control1 ~]# yum install python-openstackclient  openstack-selinux -y
#连接数据库的包安装
[root@control1 ~]# yum install python2-PyMySQL -y
#连接memcached
[root@control1 ~]# yum install python-memcached -y1.2.keyston服务
官方参考:https://docs.openstack.org/keystone/rocky/install/keystone-install-rdo.html
1.2.1数据库
MariaDB [(none)]> CREATE DATABASE keystone;
MariaDB [(none)]> GRANT ALL PRIVILEGES ON keystone.* TO 'keystone'@'%' IDENTIFIED BY 'keystone123';1.2.2安装
[root@control1 ~]# yum install openstack-keystone httpd mod_wsgi新版本没有35357端口
1.2.3配置文件修改
/etc/keystone/keystone.conf
[root@control1 ~]# grep -Ev "^(#|$)" /etc/keystone/keystone.conf |grep -v -B 1 "^\["
[DEFAULT]
admin_token = c58314fca32d11301777  #openssl rand -hex 10获取一个随机token
--
[database]
connection = mysql+pymysql://keystone:keystone123@192.168.47.28/keystone
--
[token]
provider = fernet1.2.4初始化
[root@control1 ~]# su -s /bin/sh -c "keystone-manage db_sync" keystone[root@control1 ~]# keystone-manage fernet_setup --keystone-user keystone --keystone-group keystone
[root@control1 ~]# keystone-manage credential_setup --keystone-user keystone --keystone-group keystone
[root@control1 ~]# ll /etc/keystone/fernet-keys/ #key文件存放路径
total 8
-rw------- 1 keystone keystone 44 Apr 2 11:01 0
-rw------- 1 keystone keystone 44 Apr 2 11:01 11.2.5修改http
[root@control1 ~]# vim /etc/httpd/conf/httpd.conf
ServerName 192.168.47.23:80
[root@control1 ~]# ln -s /usr/share/keystone/wsgi-keystone.conf /etc/httpd/conf.d/
[root@control1 ~]# systemctl start httpd && systemctl enable httpd
1.2.6环境变量设置
[root@control1 ~]# cat test.sh
export OS_TOKEN=c58314fca32d11301777
export OS_URL=http://192.168.47.23:5000/v3
export OS_IDENTITY_API_VERSION=3

[root@control1 ~]# source test.sh1.2.7创建项目/用户/角色
[root@control1 ~]# openstack domain create --description "Default Domain" default
+-------------+----------------------------------+
| Field       | Value                            |
+-------------+----------------------------------+
| description | Default Domain                   |
| enabled     | True                             |
| id          | 054190a1750b4eccbd360988f91dcff5 |
| name        | default                          |
| tags        | []                               |
+-------------+----------------------------------+
1.2.7.1创建admin项目
[root@control1 ~]# openstack project create --domain default --description "Admin Project" admin
+-------------+----------------------------------+
| Field       | Value                            |
+-------------+----------------------------------+
| description | Admin Project                    |
| domain_id   | 054190a1750b4eccbd360988f91dcff5 |
| enabled     | True                             |
| id          | abd8ed2affc3440eb98d996a13cc6cbd |
| is_domain   | False                            |
| name        | admin                            |
| parent_id   | 054190a1750b4eccbd360988f91dcff5 |
| tags        | []                               |
+-------------+----------------------------------+
[root@control1 ~]# openstack user    create --domain default --password-prompt admin
User Password:
Repeat User Password:
+---------------------+----------------------------------+
| Field               | Value                            |
+---------------------+----------------------------------+
| domain_id           | 054190a1750b4eccbd360988f91dcff5 |
| enabled             | True                             |
| id                  | 3167ed06826c4a5e80faf752a08b3baf |
| name                | admin                            |
| options             | {}                               |
| password_expires_at | None                             |
+---------------------+----------------------------------+
[root@control1 ~]# openstack role    create admin #角色只能创建在/etc/keystone/policy.json文件中
+-----------+----------------------------------+
| Field     | Value                            |
+-----------+----------------------------------+
| domain_id | None                             |
| id        | 2fad063e0fdc464e86689d9d2ed6ae55 |
| name      | admin                            |
+-----------+----------------------------------+
[root@control1 ~]# openstack role    add    --project admin  --user admin admin
1.2.7.2创建demon项目
[root@control1 ~]# openstack project create --domain default --description "Demo Project" demo
+-------------+----------------------------------+
| Field       | Value                            |
+-------------+----------------------------------+
| description | Demo Project                     |
| domain_id   | 054190a1750b4eccbd360988f91dcff5 |
| enabled     | True                             |
| id          | ac1240bc80c740a3ac99d4041c158a66 |
| is_domain   | False                            |
| name        | demo                             |
| parent_id   | 054190a1750b4eccbd360988f91dcff5 |
| tags        | []                               |
+-------------+----------------------------------+
[root@control1 ~]# openstack user    create --domain default --password-prompt demo
User Password:
Repeat User Password:
+---------------------+----------------------------------+
| Field               | Value                            |
+---------------------+----------------------------------+
| domain_id           | 054190a1750b4eccbd360988f91dcff5 |
| enabled             | True                             |
| id                  | 86aef6d085c84d08849799586a12b4e3 |
| name                | demo                             |
| options             | {}                               |
| password_expires_at | None                             |
+---------------------+----------------------------------+
[root@control1 ~]# openstack role    create user
+-----------+----------------------------------+
| Field     | Value                            |
+-----------+----------------------------------+
| domain_id | None                             |
| id        | 095b714533a9416ab3a9e7ac8cbf10ac |
| name      | user                             |
+-----------+----------------------------------+
[root@control1 ~]# openstack role    add    --project demo   --user demo user
1.2.7.3创建service
[root@control1 ~]# openstack project create --domain default --description "Service Project" service
+-------------+----------------------------------+
| Field       | Value                            |
+-------------+----------------------------------+
| description | Service Project                  |
| domain_id   | 054190a1750b4eccbd360988f91dcff5 |
| enabled     | True                             |
| id          | 8eb437247cc54552a6b0b0acb799faf9 |
| is_domain   | False                            |
| name        | service                          |
| parent_id   | 054190a1750b4eccbd360988f91dcff5 |
| tags        | []                               |
+-------------+----------------------------------+
1.2.7.4注册服务
[root@control1 ~]# openstack service create --name keystone --description "OpenStack Identity" identity
+-------------+----------------------------------+
| Field       | Value                            |
+-------------+----------------------------------+
| description | OpenStack Identity               |
| enabled     | True                             |
| id          | f579e45d53874f67bc1beeb07c5a7b62 |
| name        | keystone                         |
| type        | identity                         |
+-------------+----------------------------------+
[root@control1 ~]# openstack service list
+----------------------------------+----------+----------+
| ID                               | Name     | Type     |
+----------------------------------+----------+----------+
| f579e45d53874f67bc1beeb07c5a7b62 | keystone | identity |
+----------------------------------+----------+----------+
1.2.7.5创建endpoint
#公共端点公共端点
[root@control1 ~]# openstack endpoint create --region RegionOne identity public http://192.168.47.23:5000/v3
#私有端点
[root@control1 ~]# openstack endpoint create --region RegionOne identity internal http://192.168.47.23:5000/v3
#管理端点
[root@control1 ~]# openstack endpoint create --region RegionOne identity admin http://192.168.47.23:5000/v3

[root@control1 ~]# openstack endpoint list
+----------------------------------+-----------+--------------+--------------+---------+-----------+------------------------------+
| ID                               | Region    | Service Name | Service Type | Enabled | Interface | URL                          |
+----------------------------------+-----------+--------------+--------------+---------+-----------+------------------------------+
| 4b99574d83664261821602f103220912 | RegionOne | keystone     | identity     | True    | admin     | http://192.168.47.23:5000/v3 |
| bea0abc73e0e49e1b3d9c28490b81fd9 | RegionOne | keystone     | identity     | True    | public    | http://192.168.47.23:5000/v3 |
| e3bcca2487d747dc950f96f785e4c609 | RegionOne | keystone     | identity     | True    | internal  | http://192.168.47.23:5000/v3 |
+----------------------------------+-----------+--------------+--------------+---------+-----------+------------------------------+
1.2.7.6验证
如果在原有窗口提示如下

所以一定要打开一个新窗口
export OS_IDENTITY_API_VERSION=3

openstack --os-auth-url http://192.168.47.23:5000/v3 \
--os-project-domain-name default \
--os-user-domain-name default  \
--os-project-name admin --os-username admin token issue

openstack --os-auth-url http://192.168.47.23:5000/v3  \
--os-project-domain-name Default \
--os-user-domain-name Default  \
--os-project-name demo \
--os-username demo token issue
1.2.7.7环境变量脚本
[root@control1 ~]# cat admin.sh
export OS_PROJECT_DOMAIN_NAME=default
export OS_USER_DOMAIN_NAME=default
export OS_PROJECT_NAME=admin
export OS_USERNAME=admin
export OS_PASSWORD=admin
export OS_AUTH_URL=http://192.168.47.23:5000/v3
export OS_IDENTITY_API_VERSION=3
export OS_IMAGE_API_VERSION=2

[root@control1 ~]# cat demo.sh
export OS_PROJECT_DOMAIN_NAME=default
export OS_USER_DOMAIN_NAME=default
export OS_PROJECT_NAME=demo
export OS_USERNAME=demo
export OS_PASSWORD=demo
export OS_AUTH_URL=http://192.168.47.23:5000/v3
export OS_IDENTITY_API_VERSION=3
export OS_IMAGE_API_VERSION=2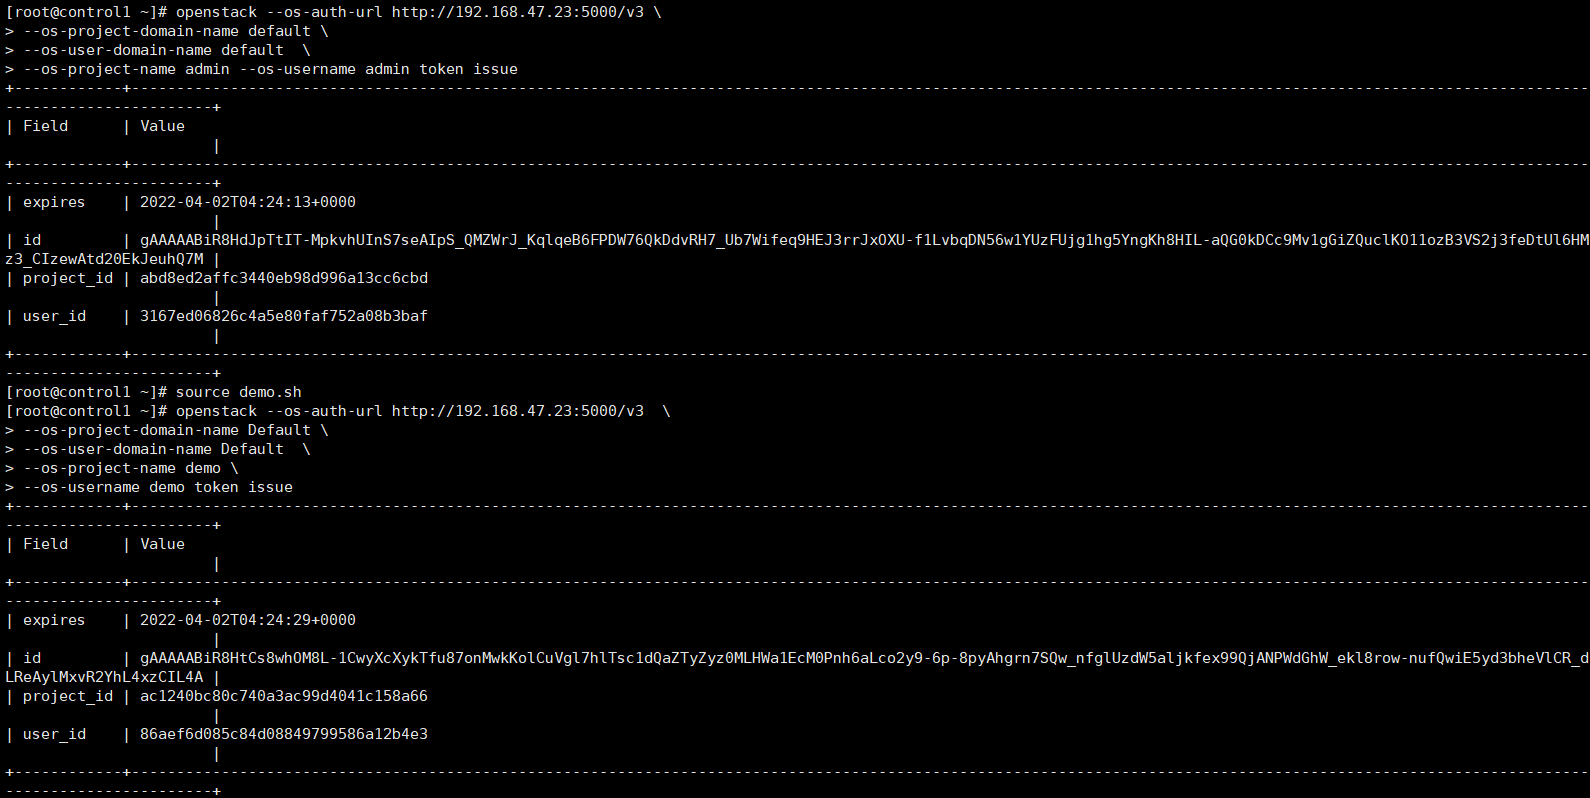
1.3.glance
官方文档参考:https://docs.openstack.org/glance/rocky/install/install-rdo.html
1.3.1数据库
MariaDB [(none)]> CREATE DATABASE glance;
MariaDB [(none)]> GRANT ALL PRIVILEGES ON glance.* TO 'glance'@'%' IDENTIFIED BY 'glance123';
1.3.2创建
#管理员权限创建账户
source admin.sh
openstack user create --domain default --password-prompt glance
openstack role add --project service --user glance admin

#创建实体
openstack service create --name glance  --description "OpenStack Image" image

#创建镜像服务的 API 端点
openstack endpoint create --region RegionOne image public http://192.168.47.23:9292
openstack endpoint create --region RegionOne image internal http://192.168.47.23:9292
openstack endpoint create --region RegionOne image admin http://192.168.47.23:9292
9292#是给客户端使用的
1.3.3安装包
[root@control1 ~]# yum install openstack-glance -y1.3.4配置文件修改
/etc/glance/glance-api.conf
[root@control1 ~]# grep -Ev "^(#|$)" /etc/glance/glance-api.conf |grep -v -B 1 "^\["
[database]
connection = mysql+pymysql://glance:glance123@192.168.47.28/glance
[glance_store]
stores = file,http
default_store = file
filesystem_store_datadir = /var/lib/glance/images/
--
[keystone_authtoken]
www_authenticate_uri = http://192.168.47.23:5000
auth_url = http://192.168.47.23:5000
memcached_servers = 192.168.47.28:11211
auth_type = password
project_domain_name = default
user_domain_name = default
project_name = service
username = glance
password = glance
--
[paste_deploy]
flavor = keystone
/etc/glance/glance-registry.conf
[root@control1 ~]# grep -Ev "^(#|$)" /etc/glance/glance-registry.conf |grep -v -B 1 "^\["
[database]
connection = mysql+pymysql://glance:glance123@192.168.47.28/glance
[keystone_authtoken]
www_authenticate_uri = http://192.168.47.23:5000
auth_url = http://192.168.47.23:5000
memcached_servers = 192.168.47.28:11211
auth_type = password
project_domain_name = default
user_domain_name = default
project_name = service
username = glance
password = glance
--
[paste_deploy]
flavor = keystone
1.3.5初始化数据库
su -s /bin/sh -c "glance-manage db_sync" glance #不需要服务是启动的1.3.6启动服务
systemctl enable openstack-glance-api.service  openstack-glance-registry.service
systemctl start openstack-glance-api.service   openstack-glance-registry.service

[root@control1 ~]# ll /var/lib/glance/
total 0
drwxr-x--- 2 glance glance 6 Apr  2 12:48 images
1.3.7测试
[root@control1 ~]# cd /var/lib/glance/images/
[root@control1 ~]# wget http://download.cirros-cloud.net/0.3.5/cirros-0.3.5-x86_64-disk.img

[root@control1 images]# openstack image create "cirros-0.3.5" --file /var/lib/glance/images/cirros-0.3.5-x86_64-disk.img --disk-format qcow2 --container-format bare --public
+------------------+--------------------------------------------------------------------------------------------------------------------------------------------------------------------------------------------+
| Field            | Value                                                                                                                                                                                      |
+------------------+--------------------------------------------------------------------------------------------------------------------------------------------------------------------------------------------+
| checksum         | f8ab98ff5e73ebab884d80c9dc9c7290                                                                                                                                                           |
| container_format | bare                                                                                                                                                                                       |
| created_at       | 2022-04-02T04:58:05Z                                                                                                                                                                       |
| disk_format      | qcow2                                                                                                                                                                                      |
| file             | /v2/images/0d779796-76ec-4330-aae5-13e8287662cc/file                                                                                                                                       |
| id               | 0d779796-76ec-4330-aae5-13e8287662cc                                                                                                                                                       |
| min_disk         | 0                                                                                                                                                                                          |
| min_ram          | 0                                                                                                                                                                                          |
| name             | cirros-0.3.5                                                                                                                                                                               |
| owner            | abd8ed2affc3440eb98d996a13cc6cbd                                                                                                                                                           |
| properties       | os_hash_algo='sha512', os_hash_value='f0fd1b50420dce4ca382ccfbb528eef3a38bbeff00b54e95e3876b9bafe7ed2d6f919ca35d9046d437c6d2d8698b1174a335fbd66035bb3edc525d2cdb187232', os_hidden='False' |
| protected        | False                                                                                                                                                                                      |
| schema           | /v2/schemas/image                                                                                                                                                                          |
| size             | 13267968                                                                                                                                                                                   |
| status           | active                                                                                                                                                                                     |
| tags             |                                                                                                                                                                                            |
| updated_at       | 2022-04-02T04:58:05Z                                                                                                                                                                       |
| virtual_size     | None                                                                                                                                                                                       |
| visibility       | public                                                                                                                                                                                     |
+------------------+--------------------------------------------------------------------------------------------------------------------------------------------------------------------------------------------+
[root@control1 images]# openstack image list
+--------------------------------------+--------------+--------+
| ID | Name | Status |
+--------------------------------------+--------------+--------+
| 0d779796-76ec-4330-aae5-13e8287662cc | cirros-0.3.5 | active |
+--------------------------------------+--------------+--------+1.4.nova
官方文档:https://docs.openstack.org/nova/rocky/install/controller-install-rdo.html
1.4.1数据库
CREATE DATABASE nova_api;
CREATE DATABASE nova;
CREATE DATABASE nova_cell0;
CREATE DATABASE placement;

GRANT ALL PRIVILEGES ON nova_api.* TO 'nova'@'%' IDENTIFIED BY 'nova123';
GRANT ALL PRIVILEGES ON nova.* TO 'nova'@'%' IDENTIFIED BY 'nova123';
GRANT ALL PRIVILEGES ON nova_cell0.* TO 'nova'@'%' IDENTIFIED BY 'nova123';
GRANT ALL PRIVILEGES ON placement.* TO 'placement'@'%' IDENTIFIED BY 'placement123';
1.4.2创建
source admin
[root@control1 ~]# openstack user create --domain default --password-prompt nova
[root@control1 ~]# openstack role add --project service --user nova admin
[root@control1 ~]# openstack service create --name nova --description "OpenStack Compute" compute

[root@control1 ~]# openstack endpoint create --region RegionOne compute public http://192.168.47.23:8774/v2.1
[root@control1 ~]# openstack endpoint create --region RegionOne compute internal http://192.168.47.23:8774/v2.1
[root@control1 ~]# openstack endpoint create --region RegionOne compute admin http://192.168.47.23:8774/v2.1
--------------------------------------------------------------------------------------------------------------------

[root@control1 ~]# openstack user create --domain default --password-prompt placement
[root@control1 ~]# openstack role add --project service --user placement admin
[root@control1 ~]# openstack service create --name placement --description "Placement API" placement

[root@control1 ~]# openstack endpoint create --region RegionOne placement public http://192.168.47.23:8778
[root@control1 ~]# openstack endpoint create --region RegionOne placement internal http://192.168.47.23:8778
[root@control1 ~]# openstack endpoint create --region RegionOne placement admin http://192.168.47.23:8778
1.4.3包安装
yum install openstack-nova-api openstack-nova-conductor \
  openstack-nova-console openstack-nova-novncproxy \
  openstack-nova-scheduler openstack-nova-placement-api  -y
1.4.4配置文件修改
/etc/nova/nova.conf
[root@control1 ~]# grep -Ev "^(#|$)" /etc/nova/nova.conf |grep -v -B 1 "^\["
[DEFAULT]
enabled_apis = osapi_compute,metadata
use_neutron = True
firewall_driver = nova.virt.firewall.NoopFirewallDriver
transport_url = rabbit://openstack:openstack123@192.168.47.28
[api]
auth_strategy=keystone
[api_database]
connection = mysql+pymysql://nova:nova123@192.168.47.28/nova_api
--
[database]
connection = mysql+pymysql://nova:nova123@192.168.47.28/nova
--
[glance]
api_servers = http://192.168.47.23:9292
--
[keystone_authtoken]
auth_url = http://192.168.47.23:5000/v3
memcached_servers = 192.168.47.28:11211
auth_type = password
project_domain_name = default
user_domain_name = default
project_name = service
username = nova
password = nova
--
[oslo_concurrency]
lock_path=/var/lib/nova/tmp
--
[placement]
os_region_name = RegionOne
project_domain_name = Default
project_name = service
auth_type = password
user_domain_name = Default
auth_url = http://192.168.47.23:5000/v3
username = placement
password = placement
[placement_database]
connection = mysql+pymysql://placement:placement123@192.168.47.28/placement
--
[vnc]
enabled = true
server_listen = 192.168.47.23
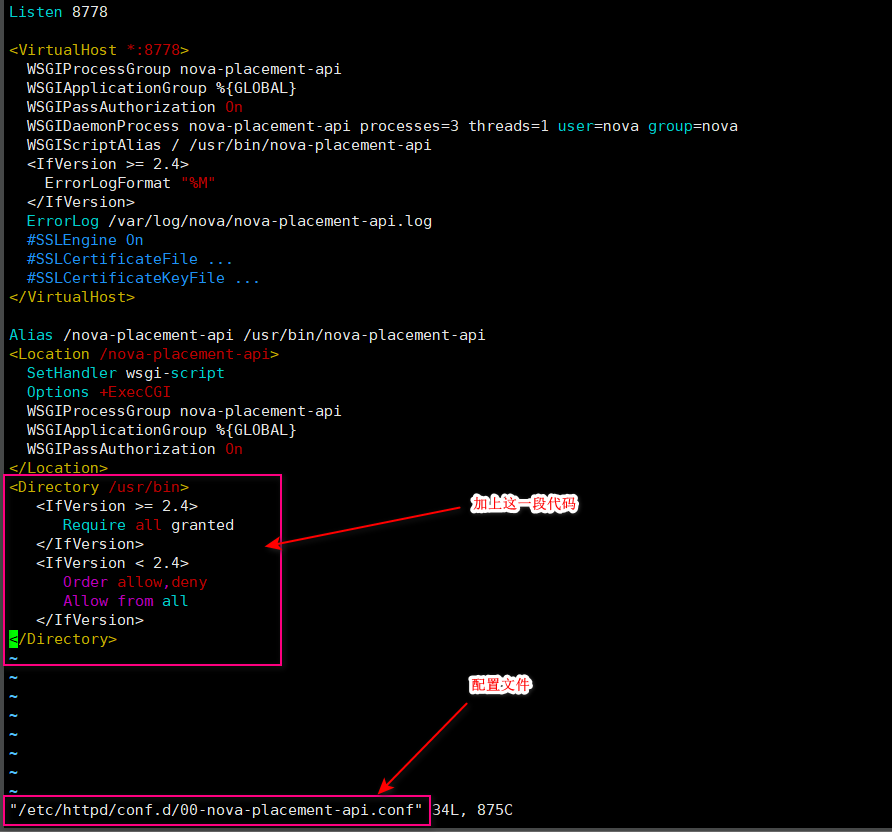
server_proxyclient_address = 192.168.47.23修复bug
/etc/httpd/conf.d/00-nova-placement-api.conf
<Directory /usr/bin>
   <IfVersion >= 2.4>
      Require all granted
   </IfVersion>
   <IfVersion < 2.4>
      Order allow,deny
      Allow from all
   </IfVersion>
</Directory>
初始化
systemctl restart httpd


su -s /bin/sh -c "nova-manage api_db sync" nova
su -s /bin/sh -c "nova-manage cell_v2 map_cell0" nova

[root@control1 ~]# su -s /bin/sh -c "nova-manage cell_v2 create_cell --name=cell1 --verbose" nova
845b5a13-e79a-467b-8b95-b0b18940d050

[root@control1 ~]# su -s /bin/sh -c "nova-manage db sync" nova
/usr/lib/python2.7/site-packages/pymysql/cursors.py:170: Warning: (1831, u'Duplicate index `block_device_mapping_instance_uuid_virtual_name_device_name_idx`. This is deprecated and will be disallowed in a future release.')
  result = self._query(query)
/usr/lib/python2.7/site-packages/pymysql/cursors.py:170: Warning: (1831, u'Duplicate index `uniq_instances0uuid`. This is deprecated and will be disallowed in a future release.')
  result = self._query(query)
验证
[root@control1 ~]#  su -s /bin/sh -c "nova-manage cell_v2 list_cells" nova
+-------+--------------------------------------+---------------------------------------+----------------------------------------------------+----------+
|  Name |                 UUID                 |             Transport URL             |                Database Connection                 | Disabled |
+-------+--------------------------------------+---------------------------------------+----------------------------------------------------+----------+
| cell0 | 00000000-0000-0000-0000-000000000000 |                 none:/                | mysql+pymysql://nova:****@192.168.47.28/nova_cell0 |  False   |
| cell1 | 845b5a13-e79a-467b-8b95-b0b18940d050 | rabbit://openstack:****@192.168.47.28 |    mysql+pymysql://nova:****@192.168.47.28/nova    |  False   |
+-------+--------------------------------------+---------------------------------------+----------------------------------------------------+----------+
启动服务
systemctl enable openstack-nova-api.service \
  openstack-nova-consoleauth openstack-nova-scheduler.service \
  openstack-nova-conductor.service openstack-nova-novncproxy.service

systemctl start openstack-nova-api.service \
  openstack-nova-consoleauth openstack-nova-scheduler.service \
openstack-nova-conductor.service openstack-nova-novncproxy.service启动openstack-nova-api.service提示如下错误
CRITICAL nova [-] Unhandled error: MissingRequiredOptions: Auth plugin requires parameters which were not given: auth_url
经过一遍一遍与官方文档核对,结果还是配置搞错了,如下所示;应该为auth_url

端口

1.5.neutron
官方文档:https://docs.openstack.org/neutron/rocky/install/controller-install-rdo.html
1.5.1数据库
CREATE DATABASE neutron;
GRANT ALL PRIVILEGES ON neutron.* TO 'neutron'@'%' IDENTIFIED BY 'neutron123';
1.5.2创建
source admin.sh
openstack user create --domain default --password-prompt neutron
openstack role add --project service --user neutron admin
openstack service create --name neutron --description "OpenStack Networking" network

#创建网络服务API端点
openstack endpoint create --region RegionOne network public http://192.168.47.23:9696
openstack endpoint create --region RegionOne network internal http://192.168.47.23:9696
openstack endpoint create --region RegionOne network admin http://192.168.47.23:9696
1.5.3提供者网络
参考文档:https://docs.openstack.org/neutron/rocky/install/controller-install-option1-rdo.html
[root@control1 ~]# yum install openstack-neutron openstack-neutron-ml2 \
openstack-neutron-linuxbridge ebtables -y
1.5.4配置文件修改
/etc/neutron/neutron.conf
[root@control1 ~]# grep -Ev "^(#|$)" /etc/neutron/neutron.conf |grep -v -B 1 "^\["
[DEFAULT]
core_plugin = ml2
service_plugins =
transport_url = rabbit://openstack:openstack123@192.168.47.28
auth_strategy = keystone
notify_nova_on_port_status_changes = true
notify_nova_on_port_data_changes = true
--
[database]
connection = mysql+pymysql://neutron:neutron123@192.168.47.28/neutron
[keystone_authtoken]
www_authenticate_uri = http://192.168.47.23:5000
auth_url = http://192.168.47.23:5000
memcached_servers = 192.168.47.28:11211
auth_type = password
project_domain_name = default
user_domain_name = default
project_name = service
username = neutron
password = neutron
--
[nova]
auth_url = http://192.168.47.23:5000
auth_type = password
project_domain_name = default
user_domain_name = default
region_name = RegionOne
project_name = service
username = nova
password = nova
[oslo_concurrency]
lock_path = $state_path/lock
/etc/neutron/plugins/ml2/ml2_conf.ini --2层桥接的配置
[root@control1 ~]# grep -Ev "^(#|$)" /etc/neutron/plugins/ml2/ml2_conf.ini |grep -v -B 1 "^\["
[ml2]
type_drivers = flat,vlan
tenant_network_types =
mechanism_drivers = linuxbridge
extension_drivers = port_security
[ml2_type_flat]
flat_networks = linux36
--
[securitygroup]
enable_ipset = true
/etc/neutron/plugins/ml2/linuxbridge_agent.ini
[root@control1 ~]# grep -Ev "^(#|$)" /etc/neutron/plugins/ml2/linuxbridge_agent.ini |grep -v -B 1 "^\["
[linux_bridge]
physical_interface_mappings = linux36:eth0
--
[securitygroup]
enable_security_group = true
firewall_driver = neutron.agent.linux.iptables_firewall.IptablesFirewallDriver
[vxlan]
enable_vxlan = false
/etc/neutron/dhcp_agent.ini
[root@control1 ~]# grep -Ev "^(#|$)" /etc/neutron/dhcp_agent.ini |grep -v -B 1 "^\["
[DEFAULT]
interface_driver = linuxbridge
dhcp_driver = neutron.agent.linux.dhcp.Dnsmasq
enable_isolated_metadata = true
/etc/neutron/metadata_agent.ini
[root@control1 ~]# grep -Ev "^(#|$)" /etc/neutron/metadata_agent.ini |grep -v -B 1 "^\["
[DEFAULT]
nova_metadata_ip = 192.168.47.23
metadata_proxy_shared_secret = 20211012 #随机设置一个值
/etc/nova/nova.conf
[root@control1 ~]# grep -Ev "^(#|$)" /etc/nova/nova.conf |grep -v -B 1 "^\["
[neutron]
url = http://192.168.47.23:9696
auth_url = http://192.168.47.23:5000
auth_type = password
project_domain_name = default
user_domain_name = default
region_name = RegionOne
project_name = service
username = neutron
password = neutron
service_metadata_proxy = true
metadata_proxy_shared_secret = 20211012
1.5.5修改内核参数
内核参数改为1
vim /etc/sysctl.conf
net.bridge.bridge-nf-call-iptables=1
net.bridge.bridge-nf-call-ip6tables=1
sysctl -p #启动neutron服务才有这两个参数
1.5.6初始化
[root@control1 ~]# ln -s /etc/neutron/plugins/ml2/ml2_conf.ini /etc/neutron/plugin.ini

su -s /bin/sh -c "neutron-db-manage --config-file /etc/neutron/neutron.conf \
  --config-file /etc/neutron/plugins/ml2/ml2_conf.ini upgrade head" neutron
1.5.7启动
#重启计算API 服务
systemctl restart openstack-nova-api.service

systemctl enable  neutron-server.service neutron-linuxbridge-agent.service \
neutron-dhcp-agent.service neutron-metadata-agent.service

systemctl start   neutron-server.service neutron-linuxbridge-agent.service \
neutron-dhcp-agent.service neutron-metadata-agent.service2.计算节点
2.1nova
参考文档:https://docs.openstack.org/nova/rocky/install/compute-install.html
2.1.1包安装
[root@node1 ~]# yum install centos-release-openstack-rocky -y
[root@node1 ~]# yum install python-openstackclient openstack-selinux -y
[root@node1 ~]# yum install openstack-nova-compute -y
2.1.2配置文件修改
/etc/nova/nova.conf
[root@node1 ~]# grep -Ev "^(#|$)" /etc/nova/nova.conf |grep -v -B 1 "^\["
[DEFAULT]
enabled_apis = osapi_compute,metadata
transport_url = rabbit://openstack:openstack123@192.168.47.28
use_neutron = True
firewall_driver = nova.virt.firewall.NoopFirewallDriver
[api]
auth_strategy=keystone
--
[glance]
api_servers = http://192.168.47.23:9292
--
[keystone_authtoken]
auth_url = http://192.168.47.23:5000
memcached_servers = 192.168.47.28:11211
auth_type = password
project_domain_name = default
user_domain_name = default
project_name = service
username = nova
password = nova
--
[oslo_concurrency]
lock_path=/var/lib/nova/tmp
--
[placement]
os_region_name = RegionOne
project_domain_name = Default
project_name = service
auth_type = password
user_domain_name = Default
auth_url = http://192.168.47.23:5000/v3
username = placement
password = placement
--
[vnc]
enabled = True
server_listen = 0.0.0.0
server_proxyclient_address = 192.168.47.26
novncproxy_base_url = http://192.168.47.23:6080/vnc_auto.html
2.1.3验证是否支持虚拟化
egrep -c '(vmx|svm)' /proc/cpuinfo #只要不是0就表示支持,如果不支持就需要如下设置

vim /etc/nova/nova.conf
[libvirt]
virt_type = qemu
2.1.4启动
[root@node1 ~]# systemctl enable libvirtd.service openstack-nova-compute.service
[root@node1 ~]# systemctl start libvirtd.service openstack-nova-compute.service
2.1.5控制端查看
[root@control1 ~]# nova service-list
[root@control1 ~]# openstack compute service list
[root@control1 ~]# openstack image list
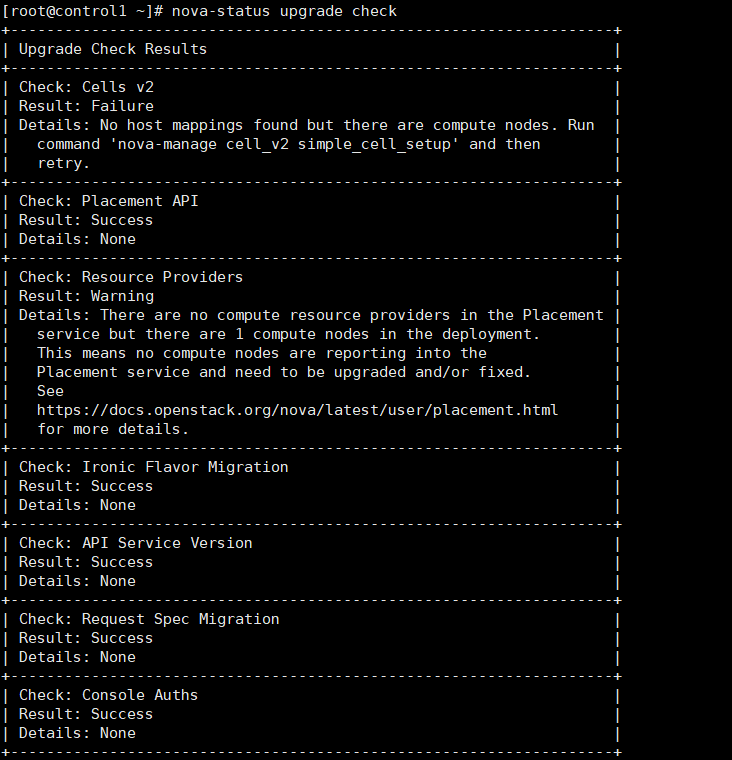
[root@control1 ~]# nova-status upgrade check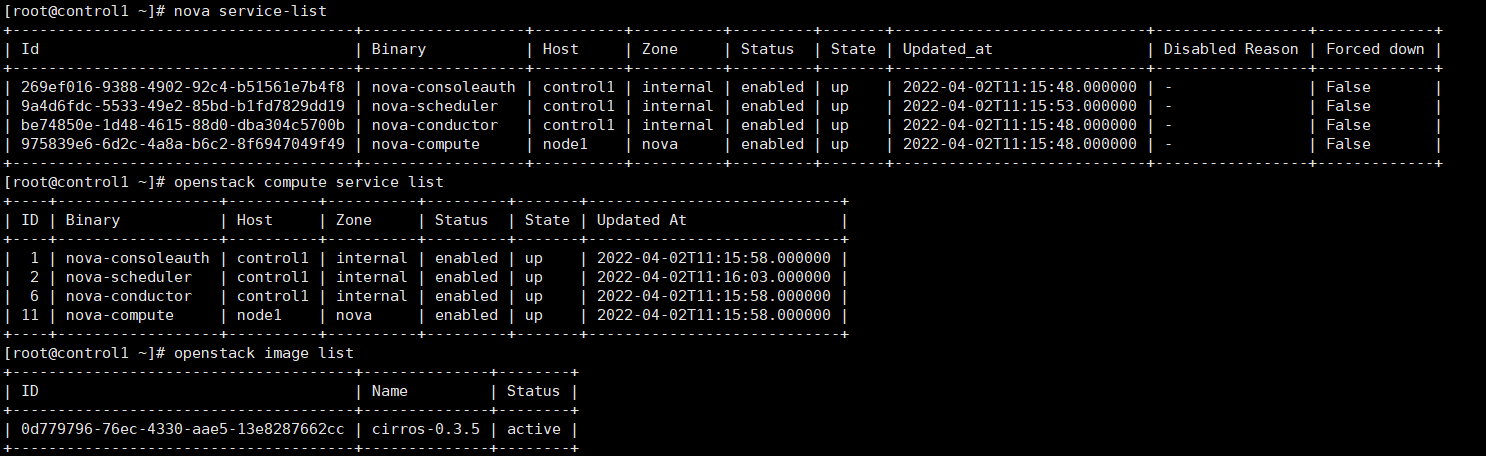
出现如下错误

解决办法如下,并systemctl restart httpd
正常显示
2.1.6控制端验证
[root@control1 ~]# openstack compute service list --service nova-compute
+----+--------------+-------+------+---------+-------+----------------------------+
| ID | Binary       | Host  | Zone | Status  | State | Updated At                 |
+----+--------------+-------+------+---------+-------+----------------------------+
| 11 | nova-compute | node1 | nova | enabled | up    | 2022-04-02T11:18:58.000000 |
+----+--------------+-------+------+---------+-------+----------------------------+
#如果控制端验证无结果,可手动发现计算节点
su -s /bin/sh -c "nova-manage cell_v2 discover_hosts --verbose" nova
vim /etc/nova/nova.conf
可设置发现时间
[scheduler]
discover_hosts_in_cells_interval = 3002.2neutron
官方参考:https://docs.openstack.org/neutron/rocky/install/compute-install-rdo.html
2.2.1安装包
yum install openstack-neutron-linuxbridge ebtables ipset2.2.2配置文件修改
/etc/neutron/neutron.conf
[root@node1 ~]# grep -Ev "^(#|$)" /etc/neutron/neutron.conf |grep -v -B 1 "^\["
[DEFAULT]
transport_url = rabbit://openstack:openstack123@192.168.47.28
auth_strategy = keystone
--
[keystone_authtoken]
www_authenticate_uri = http://192.168.47.23:5000
auth_url = http://192.168.47.23:5000
memcached_servers = 192.168.47.28:11211
auth_type = password
project_domain_name = default
user_domain_name = default
project_name = service
username = neutron
password = neutron
--
[oslo_concurrency]
lock_path = /var/lib/neutron/tmp
/etc/neutron/plugins/ml2/linuxbridge_agent.ini
[root@node1 ~]# grep -Ev "^(#|$)" /etc/neutron/plugins/ml2/linuxbridge_agent.ini |grep -v -B 1 "^\["
[linux_bridge]
physical_interface_mappings = linux36:br0
--
[securitygroup]
enable_security_group = true
firewall_driver = neutron.agent.linux.iptables_firewall.IptablesFirewallDriver
[vxlan]
enable_vxlan = false
/etc/nova/nova.conf
#[neutron] 配置访问参数
url = http://192.168.47.23:9696
auth_url = http://192.168.47.23:5000
auth_type = password
project_domain_name = default
user_domain_name = default
region_name = RegionOne
project_name = service
username = neutron
password = neutron
2.2.3启动
systemctl restart openstack-nova-compute.service
systemctl enable neutron-linuxbridge-agent.service
systemctl start neutron-linuxbridge-agent.service
2.2.4修改内核参数
内核参数改为1
vim /etc/sysctl.conf
net.bridge.bridge-nf-call-iptables=1
net.bridge.bridge-nf-call-ip6tables=1
sysctl -p #启动neutron服务才有这两个参数
2.2.5控制端查看
[root@control1 ~]# openstack network agent list
+--------------------------------------+--------------------+----------+-------------------+-------+-------+---------------------------+
| ID                                   | Agent Type         | Host     | Availability Zone | Alive | State | Binary                    |
+--------------------------------------+--------------------+----------+-------------------+-------+-------+---------------------------+
| 30adc680-869a-48f1-9c41-e69653e20871 | DHCP agent         | control1 | nova              | :-)   | UP    | neutron-dhcp-agent        |
| 5cd14901-9891-4673-a2b4-30353e2cb0ed | Linux bridge agent | node1    | None              | :-)   | UP    | neutron-linuxbridge-agent |
| ab36e46a-f65d-4c4c-92fc-d4d2206f5b73 | Linux bridge agent | control1 | None              | :-)   | UP    | neutron-linuxbridge-agent |
| dcd07265-b9f7-4d0a-838b-278a0eeeba16 | Metadata agent     | control1 | None              | :-)   | UP    | neutron-metadata-agent    |
+--------------------------------------+--------------------+----------+-------------------+-------+-------+---------------------------+3.数据库/MQ服务器
3.1mariadb
[root@mariadb ~]# yum install centos-release-openstack-rocky -y
[root@mariadb ~]# yum install mariadb mariadb-server -y
[root@mariadb ~]# cat /etc/my.cnf.d/openstack.cnf
[mysqld]
bind-address = 0.0.0.0
default-storage-engine = innodb
innodb_file_per_table = on
max_connections = 4096
collation-server = utf8_general_ci
character-set-server = utf8

[root@mariadb ~]# systemctl enable mariadb.service && systemctl start mariadb.service3.2RabbitMQ
[root@mariadb ~]# yum install rabbitmq-server -y
[root@mariadb ~]# systemctl enable rabbitmq-server.service && systemctl start rabbitmq-server.service

#创建账号
[root@mariadb ~]# rabbitmqctl add_user openstack openstack123
Creating user "openstack"
#授权读写权限
[root@mariadb ~]# rabbitmqctl set_permissions openstack ".*" ".*" ".*"
Setting permissions for user "openstack" in vhost "/"3.3memcached
[root@mariadb ~]# yum install memcached -y
[root@mariadb ~]# cat /etc/sysconfig/memcached
PORT="11211"
USER="memcached"
MAXCONN="4096"
CACHESIZE="1024"
OPTIONS="-l 0.0.0.0,::1"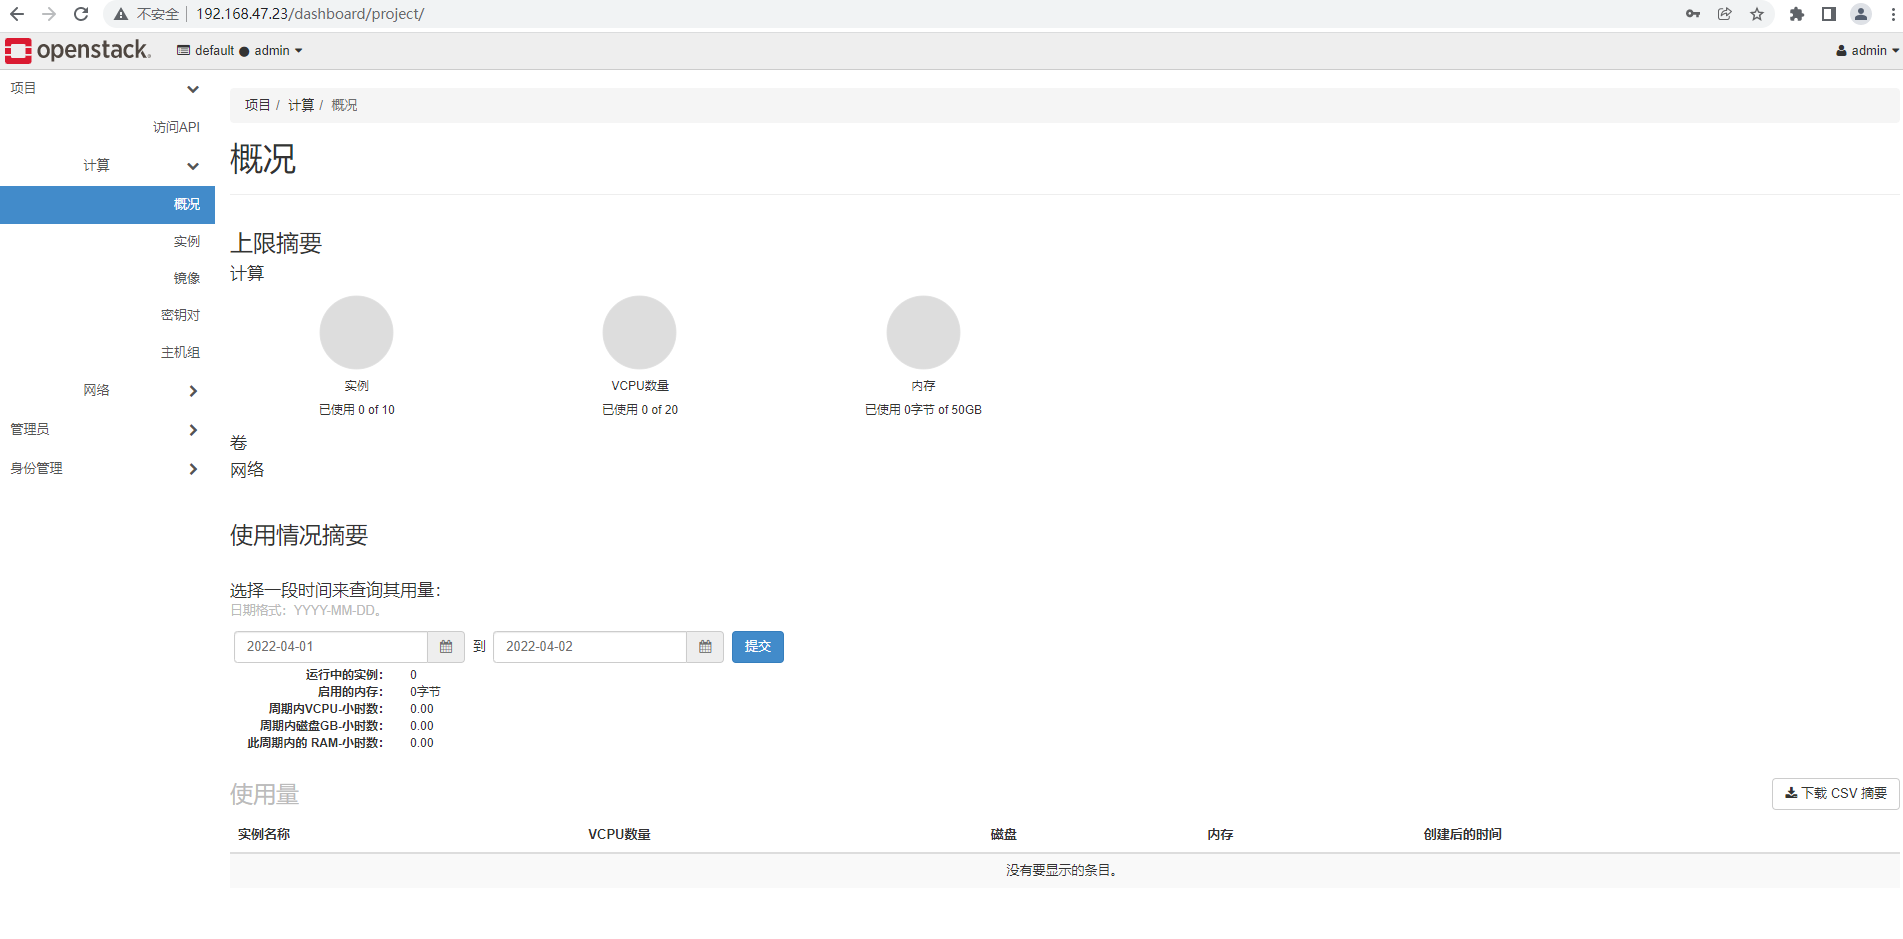
[root@mariadb ~]# systemctl enable memcached.service && systemctl start memcached.service4.控制端-web界面的安装
[root@control1 ~]# yum install openstack-dashboard -yvim /etc/openstack-dashboard/local_settings
-----------------------------------------------
OPENSTACK_HOST = "192.168.47.23" #本机ip地址
ALLOWED_HOSTS = ['*',] #允许所有主机
#配置memcached会话存储服务
SESSION_ENGINE = 'django.contrib.sessions.backends.cache'
CACHES = {
'default': {
'BACKEND': 'django.core.cache.backends.memcached.MemcachedCache',
'LOCATION': '192.168.7.203:11211',
},
}
#启用第3版认证API
OPENSTACK_KEYSTONE_URL = "http://%s:5000/v3" % OPENSTACK_HOST
#启用对域的支持
OPENSTACK_KEYSTONE_MULTIDOMAIN_SUPPORT = True
#配置API版本
OPENSTACK_API_VERSIONS = {
"identity": 3,
"image": 2,
"volume": 2,
}
#通过仪表盘创建的用户默认角色配置为 user
OPENSTACK_KEYSTONE_DEFAULT_ROLE = "user"
#如果您选择网络参数1,禁用支持3层网络服务
OPENSTACK_NEUTRON_NETWORK = {
'enable_router': False,
'enable_quotas': False,
'enable_distributed_router': False,
'enable_ha_router': False,
'enable_lb': False,
'enable_firewall': False,
'enable_vpn': False,
'enable_fip_topology_check': False,
}
#可以选择性地配置时区
TIME_ZONE = "Asia/Shanghai"/etc/httpd/conf.d/openstack-dashboard.conf
WSGIApplicationGroup %{GLOBAL}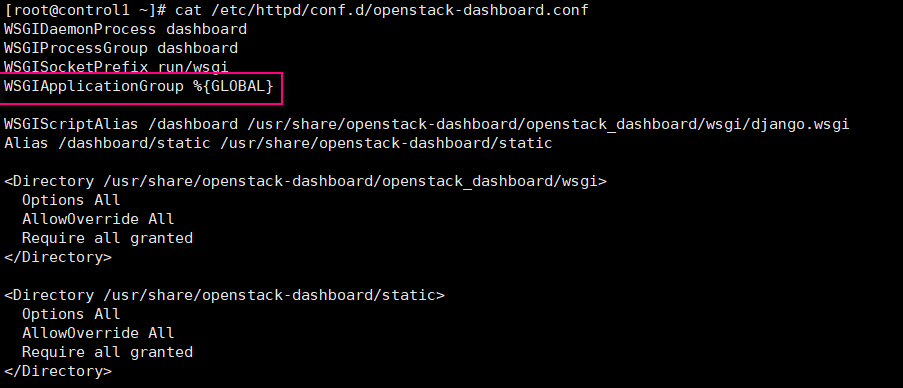
启动
#重启web服务器以及会话存储服务
systemctl restart httpd.service
systemctl restart memcached.service
登录日志查询
tail -f /etc/httpd/logs/error_log
tail -f /var/log/keystone/keystone.log登录异常
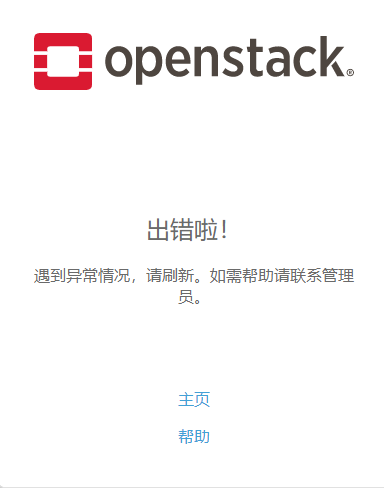
解决办法
[root@control1 ~]# vim /etc/openstack-dashboard/local_settings
把SESSION_ENGINE = 'django.contrib.sessions.backends.cache'修改为
SESSION_ENGINE = 'django.contrib.sessions.backends.file'问题解决参考文档:https://blog.51cto.com/wangzhijian/1913082
最终成功登录:账号admin,密码:admin