html2canvas
需求场景
常见场景的是点击按钮,生成一个悬浮的截图,图片可以保存在手机相册里,也可以分享出去。
如果canvas基础较好,开发时间足够,就可以自己用canvas去画,可以完成开发。
但是用js插件,可以更快实现这种需求。
html2canvas
官网: http://html2canvas.hertzen.com/
实现流程:

举例:
<!DOCTYPE HTML PUBLIC "-//W3C//DTD HTML 4.0//EN" "http://www.w3.org/TR/REC-html40/strict.dtd">
<html>
<head>
<title>
display/box/float/clear test
</title>
<style>
.hide {
display: none!important;
}
.show-wrap {
position: relative;
width: 500px;
height: 500px;
margin: auto;
margin-top: 20px;
background-color: cornsilk;
}
.img-wrap {
position: relative;
width: 320px;
height: 234px;
background: url(./dilireba.jpg) no-repeat center center;
background-size: 100% 100%;
z-index: -2;
}
.bounced {
position: absolute;
z-index: 1;
top: 0;
left: 0;
width: 100%;
height: 100%;
background-color: rgba(0, 0, 0, .8);
display: flex;
justify-content: center;
align-items: center;
}
.shoot-img {
width: 320px;
height: 234px;
}
.btn-wrap {
width: 100%;
text-align: center;
margin-top: 20px;
cursor: pointer;
}
</style>
</head>
<body>
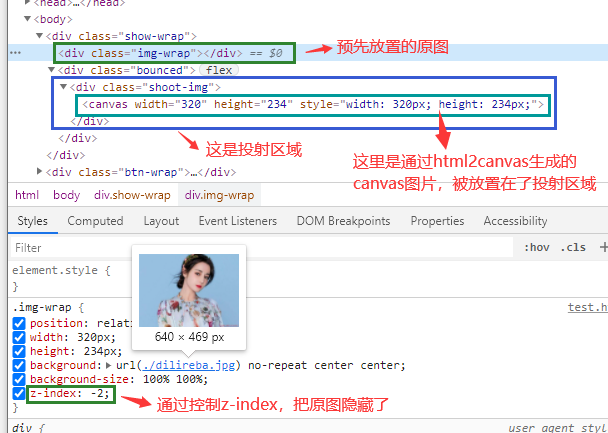
<div class="show-wrap">
<div class="img-wrap"></div>
<div class="bounced hide">
<div class="shoot-img hide"></div>
</div>
</div>
<div class="btn-wrap">
<button class="btn">点击生成截图</button>
</div>
<script src="./jquery 3.6.0.js"></script>
<script type="text/javascript" src="./html2canvas.1.4.1.min.js"></script>
<script type="text/javascript">
// 原生方法获取dom (建议这种方式)
var imgWrap = document.querySelector('.img-wrap'); // 原图dom
var shootImg = document.querySelector('.shoot-img'); // 投射区域dom
// jq方法获取dom,后面必须加[0],不然会报错,所以不建议使用
// var imgWrap = $('.img-wrap')[0];
// var shootImg = $('.shoot-img')[0];
$('.btn').on('click', function() {
// html2canvas获取原图dom,返回一个canvas,这个canvas就是要展示的图片
html2canvas(imgWrap).then(function(canvas) {
// 把这个canvas图片放到投射区域
shootImg.appendChild(canvas);
$('.bounced, .shoot-img').removeClass('hide');
});
})
</script>
</body>
</html>
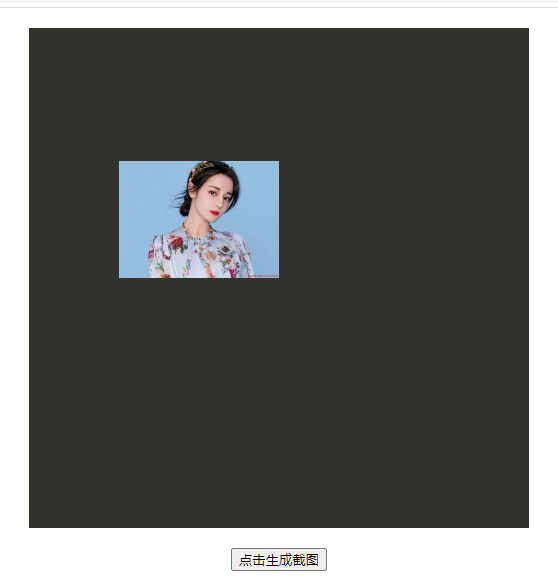
点击按钮可以看到效果:

这个图片可不是我自己放置的哦,而是html2canvas生成的一个canvas图片。
打开控制台,可以找到证据:
到此,对该插件已经有了基本的了解和认识。
配置项
文档:http://html2canvas.hertzen.com/configuration
在哪里写配置项:
var imgWrap = document.querySelector('.img-wrap');
var shootImg = document.querySelector('.shoot-img');

 html2canvas(imgWrap, {
	// 这里写配置项,键值对形式
 }).then(function(canvas) {
     shootImg.appendChild(canvas);
 });
配置项有哪些,怎么用:
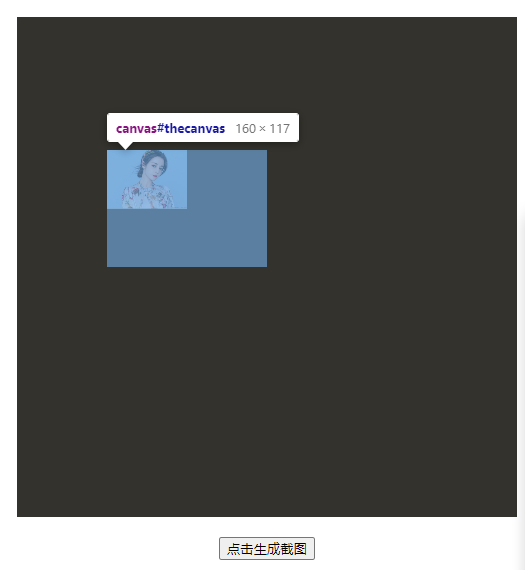
canvas
上面讲了html2canvas的实现流程,它接收一个dom参数,得到的是一个canvas值。
这个canvas值,是插件默认生成的。 那么,我们就可以自己画一个canvas,
然后用自己画的canvas替换掉插件生成的值。
举例:
<!DOCTYPE HTML PUBLIC "-//W3C//DTD HTML 4.0//EN" "http://www.w3.org/TR/REC-html40/strict.dtd">
<html>
  <head>
    <title>
      display/box/float/clear test
    </title>
    <style>
        .hide {
            display: none!important;
        }
        .show-wrap {
            position: relative;
            width: 500px;
            height: 500px;
            margin: auto;
            margin-top: 20px;
            background-color: cornsilk;
        }
        .img-wrap {
			position: relative;
			width: 320px;
			height: 234px;
			background: url(./dilireba.jpg) no-repeat center center;
			background-size: 100% 100%;
            z-index: -2;
		}
        .bounced {
            position: absolute;
            z-index: 1;
            top: 0;
            left: 0;
            width: 100%;
            height: 100%;
            background-color: rgba(0, 0, 0, .8);
            display: flex;
            justify-content: center;
            align-items: center;
        }
        .shoot-img {
            width: 320px;
			height: 234px;
        }
        /* .shoot-img canvas {
            width: 100%;
        } */
        .btn-wrap {
            width: 100%;
            text-align: center;
            margin-top: 20px;
            cursor: pointer;
        }
    </style>
  </head>
  <body>
    <div class="show-wrap">
        <div class="img-wrap"></div>
        <div class="bounced hide">
            <div class="shoot-img hide"></div>
        </div>
    </div>
    <div class="btn-wrap">
        <button class="btn">点击生成截图</button>
    </div>
    <script src="./jquery 3.6.0.js"></script>
    <script type="text/javascript" src="./html2canvas.1.4.1.min.js"></script>
    <script type="text/javascript">
        // 自己画一个canvas,大小是投射区域的一半
        var height = $('.img-wrap').height();
        var width = $('.img-wrap').width();
        var scale = 0.5;
        var canvas = document.createElement("canvas");
        canvas.setAttribute('id', 'thecanvas');
        canvas.width = width * scale;
        canvas.height = height * scale;
        canvas.style.width = width * scale + "px";
        canvas.style.height = height * scale + "px";
        var context = canvas.getContext("2d");
        context.scale(scale, scale);

        var imgWrap = document.querySelector('.img-wrap');
        var shootImg = document.querySelector('.shoot-img');
        $('.btn').on('click', function() {
            html2canvas(imgWrap, {
                canvas: canvas,
            }).then(function(canvas) {
                shootImg.appendChild(canvas);
                $('.bounced, .shoot-img').removeClass('hide');
            });
        })
    </script>
  </body>
</html>
效果如下:
通过自己画canvas,可以控制生成的截图了。
scale
缩放, 可以简单理解为生成的图片大小和canvas大小的比值。
把上个例子的配置项,增加一个配置:scale: 0.5,
再看下效果:
生成的图片宽高,是canvas区域的0.5倍。
但是,具体点说,这个缩放值应该是基于window.devicePixelRatio的。
可以在mdn上查看该api,了解一下。
useCORS
图片跨域的,一般设置为true
注:使用前可以多查看具体用法,坑挺多~~


