一.sharding jdbc简介(这里你可以不看)
首先,我要在这里先介绍一下sharding jdbc:
Sharding-JDBC定位为轻量级java框架,使用客户端直连数据库,以jar包形式提供服务,未使用中间层,无需额外部署,无其他依赖,DBA也无需改变原有的运维方式,可理解为增强版的JDBC驱动,旧代码迁移成本几乎为零。
它主要的功能:分库分表;读写分离; 柔性事务;分布式主键;兼容性;灵活多样的配置;分布式治理能力 (2.0新功能);
前两个功能无需多说,柔性事务主要表现在:最大努力送达型事务,TCC型事务(TBD);分布式主键也不需要多说,兼容性主要体现在:可适用于任何基于java的ORM框架,如:JPA, Hibernate, Mybatis, Spring JDBC Template或直接使用JDBC,可基于任何第三方的数据库连接池,如:DBCP, C3P0, BoneCP, Druid等,理论上可支持任意实现JDBC规范的数据库。目前支持MySQL,Oracle,SQLServer和PostgreSQL;灵活多样的配置主要支持这些配置Java,YAML,Inline表达式,Spring命名空间,Spring boot starter;分布式治理能力 : 配置集中化与动态化,可支持数据源、表与分片策略的动态切换(2.0.0.M1), 客户端的数据库治理,数据源失效自动切换(2.0.0.M2), 基于Open Tracing协议的APM信息输出(2.0.0.M3),分布式治理能力我也没有尝试过。
从sharding jdbc的官网文档中下载的demo,基本上都不能跑起来,而它的基本文档大部分都粘贴的是代码片段,虽然能理解它的意思,但是很难将这些代码拼接起来,我自己做的时候,也踩了很多坑,在网上搜索的例子很多都是基于当当网的sharding jdbc,基本上版本是到了1.5(在我使用的时候),我当时在使用的时候遇到一些问题,想加官网群,发现加不进去,就去找群主,加群主,并且询问为什么不让加讨论群,后来我才知道那个群主是张亮(当当网架构师,负责sharding jdbc的大牛),还好别人没有理我,太唐突了,后面自己也都把这些问题解决了。不过据说当当网的sharding jdbc抽离出来了,由Apache负责,所以:我的依赖从dangdang的
<dependency>
        <groupId>com.dangdang</groupId>
        <artifactId>sharding-jdbc-core</artifactId>
        <version>1.3.3</version>
</dependency>
变为了:
<dependency>
        <groupId>io.shardingjdbc</groupId>
        <artifactId>sharding-jdbc-core</artifactId>
        <version>2.0.3</version>
</dependency>
我当当网的sharding使用的版本比较低,遇到了一些问题,文章末尾会分享出来。
二.开始动手(这是正文)
废话已经说了那么多了,现在进入正题吧,如何进行sharding jdbc的分库分表,如有错误的地方,欢迎指正。
我使用的工具:编译器:IntelliJ IDEA; mysql管理工具:workbench;
1.我们先建立数据库和表(分别建了两个库两张表):
CREATE DATABASE `user_0` /*!40100 DEFAULT CHARACTER SET utf8 */;

CREATE TABLE `user_info_1` (
  `user_id` bigint(19) NOT NULL,
  `user_name` varchar(45) DEFAULT NULL,
  `account` varchar(45) NOT NULL,
  `password` varchar(45) DEFAULT NULL,
  PRIMARY KEY (`user_id`)
) ENGINE=InnoDB DEFAULT CHARSET=utf8;


CREATE TABLE `user_info_0` (
  `user_id` bigint(19) NOT NULL,
  `user_name` varchar(45) DEFAULT NULL,
  `account` varchar(45) NOT NULL,
  `password` varchar(45) DEFAULT NULL,
  PRIMARY KEY (`user_id`)
) ENGINE=InnoDB DEFAULT CHARSET=utf8;


CREATE DATABASE `user_1` /*!40100 DEFAULT CHARACTER SET utf8 */;

CREATE TABLE `user_info_1` (
  `user_id` bigint(19) NOT NULL,
  `user_name` varchar(45) DEFAULT NULL,
  `account` varchar(45) NOT NULL,
  `password` varchar(45) DEFAULT NULL,
  PRIMARY KEY (`user_id`)
) ENGINE=InnoDB DEFAULT CHARSET=utf8;


CREATE TABLE `user_info_0` (
  `user_id` bigint(19) NOT NULL,
  `user_name` varchar(45) DEFAULT NULL,
  `account` varchar(45) NOT NULL,
  `password` varchar(45) DEFAULT NULL,
  PRIMARY KEY (`user_id`)
) ENGINE=InnoDB DEFAULT CHARSET=utf8;
2.开始我们项目的建立,首先明确一点的,我们添加配置的顺序要有先后,思路要清晰,不然在你出错的时候,你都不知道朝哪个方向去思考,我们是spring boot+mybatis+sharding jdbc,我们首先是一个spring boot的项目,所以我们首先建立一个spring boot项目,你可以从https://start.spring.io这个网址去创建一个spring boot项目,也可以从idea编译器上:File->new->project
最后生成的pom文件:
<?xml version="1.0" encoding="UTF-8"?>
<project xmlns="http://maven.apache.org/POM/4.0.0" xmlns:xsi="http://www.w3.org/2001/XMLSchema-instance"
    xsi:schemaLocation="http://maven.apache.org/POM/4.0.0 http://maven.apache.org/xsd/maven-4.0.0.xsd">
    <modelVersion>4.0.0</modelVersion>

    <groupId>com.example</groupId>
    <artifactId>demo</artifactId>
    <version>0.0.1-SNAPSHOT</version>
    <packaging>jar</packaging>

    <name>demo</name>
    <description>Demo project for Spring Boot</description>

    <parent>
        <groupId>org.springframework.boot</groupId>
        <artifactId>spring-boot-starter-parent</artifactId>
        <version>2.0.0.RELEASE</version>
        <relativePath/> <!-- lookup parent from repository -->
    </parent>

    <properties>
        <project.build.sourceEncoding>UTF-8</project.build.sourceEncoding>
        <project.reporting.outputEncoding>UTF-8</project.reporting.outputEncoding>
        <java.version>1.8</java.version>
    </properties>

    <dependencies>
        <dependency>
            <groupId>org.springframework.boot</groupId>
            <artifactId>spring-boot-starter-web</artifactId>
        </dependency>
        <dependency>
            <groupId>org.mybatis.spring.boot</groupId>
            <artifactId>mybatis-spring-boot-starter</artifactId>
            <version>1.3.1</version>
        </dependency>

        <dependency>
            <groupId>mysql</groupId>
            <artifactId>mysql-connector-java</artifactId>
            <scope>runtime</scope>
        </dependency>
        <dependency>
            <groupId>org.springframework.boot</groupId>
            <artifactId>spring-boot-starter-test</artifactId>
            <scope>test</scope>
        </dependency>

        <!--sharding-jdbc -->
        <!--<dependency>-->
            <!--<groupId>com.dangdang</groupId>-->
            <!--<artifactId>sharding-jdbc-core</artifactId>-->
            <!--<version>1.3.3</version>-->
        <!--</dependency>-->
        <dependency>
            <groupId>io.shardingjdbc</groupId>
            <artifactId>sharding-jdbc-core</artifactId>
            <version>2.0.3</version>
        </dependency>
        <dependency>
            <groupId>org.springframework.boot</groupId>
            <artifactId>spring-boot-devtools</artifactId>
            <optional>true</optional>
        </dependency>
        <dependency>
            <groupId>com.alibaba</groupId>
            <artifactId>druid</artifactId>
            <version>1.1.3</version>
        </dependency>
        <dependency>
            <groupId>commons-dbcp</groupId>
            <artifactId>commons-dbcp</artifactId>
            <version>1.4</version>
        </dependency>
        <dependency>
            <groupId>mysql</groupId>
            <artifactId>mysql-connector-java</artifactId>
            <version>5.1.44</version>
        </dependency>
    </dependencies>
    <build>
        <plugins>
            <plugin>
                <groupId>org.springframework.boot</groupId>
                <artifactId>spring-boot-maven-plugin</artifactId>
            </plugin>
        </plugins>
    </build>
</project>
其中,spring-boot-devtools,commons-dbcp,druid,我感觉都是不需要的,我完成项目后也没对这些项目的依赖进行过滤。
这个时候,你可以测试一下,你的spring boot项目能否正常启动,可以,你就进入到下一步的配置当中。
3.mybatis的配置
首先,看看我的源码的目录结构:

我创建一个entity包(实体包),里面有一个UserInfo的类:
public class UserInfo {
    /**
     *
     * This field was generated by MyBatis Generator.
     * This field corresponds to the database column user_info.user_id
     *
     * @mbg.generated Tue Mar 13 23:47:19 CST 2018
     */
    private Long userId;

    /**
     *
     * This field was generated by MyBatis Generator.
     * This field corresponds to the database column user_info.user_name
     *
     * @mbg.generated Tue Mar 13 23:47:19 CST 2018
     */
    private String userName;

    /**
     *
     * This field was generated by MyBatis Generator.
     * This field corresponds to the database column user_info.account
     *
     * @mbg.generated Tue Mar 13 23:47:19 CST 2018
     */
    private String account;

    /**
     *
     * This field was generated by MyBatis Generator.
     * This field corresponds to the database column user_info.password
     *
     * @mbg.generated Tue Mar 13 23:47:19 CST 2018
     */
    private String password;

    /**
     * This method was generated by MyBatis Generator.
     * This method returns the value of the database column user_info.user_id
     *
     * @return the value of user_info.user_id
     *
     * @mbg.generated Tue Mar 13 23:47:19 CST 2018
     */
    public Long getUserId() {
        return userId;
    }

    /**
     * This method was generated by MyBatis Generator.
     * This method sets the value of the database column user_info.user_id
     *
     * @param userId the value for user_info.user_id
     *
     * @mbg.generated Tue Mar 13 23:47:19 CST 2018
     */
    public void setUserId(Long userId) {
        this.userId = userId;
    }

    /**
     * This method was generated by MyBatis Generator.
     * This method returns the value of the database column user_info.user_name
     *
     * @return the value of user_info.user_name
     *
     * @mbg.generated Tue Mar 13 23:47:19 CST 2018
     */
    public String getUserName() {
        return userName;
    }

    /**
     * This method was generated by MyBatis Generator.
     * This method sets the value of the database column user_info.user_name
     *
     * @param userName the value for user_info.user_name
     *
     * @mbg.generated Tue Mar 13 23:47:19 CST 2018
     */
    public void setUserName(String userName) {
        this.userName = userName == null ? null : userName.trim();
    }

    /**
     * This method was generated by MyBatis Generator.
     * This method returns the value of the database column user_info.account
     *
     * @return the value of user_info.account
     *
     * @mbg.generated Tue Mar 13 23:47:19 CST 2018
     */
    public String getAccount() {
        return account;
    }

    /**
     * This method was generated by MyBatis Generator.
     * This method sets the value of the database column user_info.account
     *
     * @param account the value for user_info.account
     *
     * @mbg.generated Tue Mar 13 23:47:19 CST 2018
     */
    public void setAccount(String account) {
        this.account = account == null ? null : account.trim();
    }

    /**
     * This method was generated by MyBatis Generator.
     * This method returns the value of the database column user_info.password
     *
     * @return the value of user_info.password
     *
     * @mbg.generated Tue Mar 13 23:47:19 CST 2018
     */
    public String getPassword() {
        return password;
    }

    /**
     * This method was generated by MyBatis Generator.
     * This method sets the value of the database column user_info.password
     *
     * @param password the value for user_info.password
     *
     * @mbg.generated Tue Mar 13 23:47:19 CST 2018
     */
    public void setPassword(String password) {
        this.password = password == null ? null : password.trim();
    }
}
然后我有一个mapper包(映射包),里面有一个映射类UserInfoMapper
import com.example.demo.entity.UserInfo;
import org.apache.ibatis.annotations.Mapper;

@Mapper
public interface UserInfoMapper {
    /**
     * This method was generated by MyBatis Generator.
     * This method corresponds to the database table user_info
     *
     * @mbg.generated Tue Mar 13 23:47:19 CST 2018
     */
    int insert(UserInfo record);

    /**
     * This method was generated by MyBatis Generator.
     * This method corresponds to the database table user_info
     *
     * @mbg.generated Tue Mar 13 23:47:19 CST 2018
     */
    int insertSelective(UserInfo record);

    /**
     * This method was generated by MyBatis Generator.
     * This method corresponds to the database table user_info
     *
     * @mbg.generated Tue Mar 13 23:47:19 CST 2018
     */
    UserInfo selectByPrimaryKey(Long userId);

    /**
     * This method was generated by MyBatis Generator.
     * This method corresponds to the database table user_info
     *
     * @mbg.generated Tue Mar 13 23:47:19 CST 2018
     */
    int updateByPrimaryKeySelective(UserInfo record);

    /**
     * This method was generated by MyBatis Generator.
     * This method corresponds to the database table user_info
     *
     * @mbg.generated Tue Mar 13 23:47:19 CST 2018
     */
    int updateByPrimaryKey(UserInfo record);
}
还有再resources目录下的mapper目录中的UserInfoMapper.xml
<?xml version="1.0" encoding="UTF-8"?>
<!DOCTYPE mapper PUBLIC "-//mybatis.org//DTD Mapper 3.0//EN" "http://mybatis.org/dtd/mybatis-3-mapper.dtd">
<mapper namespace="com.example.demo.mapper.UserInfoMapper">
  <resultMap id="BaseResultMap" type="com.example.demo.entity.UserInfo">
    <!--
      WARNING - @mbg.generated
      This element is automatically generated by MyBatis Generator, do not modify.
      This element was generated on Tue Mar 13 23:47:19 CST 2018.
    -->
    <id column="user_id" jdbcType="BIGINT" property="userId" />
    <result column="user_name" jdbcType="VARCHAR" property="userName" />
    <result column="account" jdbcType="VARCHAR" property="account" />
    <result column="password" jdbcType="VARCHAR" property="password" />
  </resultMap>
  <sql id="Base_Column_List">
    <!--
      WARNING - @mbg.generated
      This element is automatically generated by MyBatis Generator, do not modify.
      This element was generated on Tue Mar 13 23:47:19 CST 2018.
    -->
    user_id, user_name, account, password
  </sql>
  <select id="selectByPrimaryKey" parameterType="java.lang.Long" resultMap="BaseResultMap">
    <!--
      WARNING - @mbg.generated
      This element is automatically generated by MyBatis Generator, do not modify.
      This element was generated on Tue Mar 13 23:47:19 CST 2018.
    -->
    select
    <include refid="Base_Column_List" />
    from user_info
    where user_id = #{userId,jdbcType=BIGINT}
  </select>
  <insert id="insert" parameterType="com.example.demo.entity.UserInfo">
    <!--
      WARNING - @mbg.generated
      This element is automatically generated by MyBatis Generator, do not modify.
      This element was generated on Tue Mar 13 23:47:19 CST 2018.
    -->
    insert into user_info (user_id, user_name, account,
      password)
    values (#{userId,jdbcType=BIGINT}, #{userName,jdbcType=VARCHAR}, #{account,jdbcType=VARCHAR},
      #{password,jdbcType=VARCHAR})
  </insert>
  <insert id="insertSelective" parameterType="com.example.demo.entity.UserInfo">
    <!--
      WARNING - @mbg.generated
      This element is automatically generated by MyBatis Generator, do not modify.
      This element was generated on Tue Mar 13 23:47:19 CST 2018.
    -->
    insert into user_info
    <trim prefix="(" suffix=")" suffixOverrides=",">
      <if test="userId != null">
        user_id,
      </if>
      <if test="userName != null">
        user_name,
      </if>
      <if test="account != null">
        account,
      </if>
      <if test="password != null">
        password,
      </if>
    </trim>
    <trim prefix="values (" suffix=")" suffixOverrides=",">
      <if test="userId != null">
        #{userId,jdbcType=BIGINT},
      </if>
      <if test="userName != null">
        #{userName,jdbcType=VARCHAR},
      </if>
      <if test="account != null">
        #{account,jdbcType=VARCHAR},
      </if>
      <if test="password != null">
        #{password,jdbcType=VARCHAR},
      </if>
    </trim>
  </insert>
  <update id="updateByPrimaryKeySelective" parameterType="com.example.demo.entity.UserInfo">
    <!--
      WARNING - @mbg.generated
      This element is automatically generated by MyBatis Generator, do not modify.
      This element was generated on Tue Mar 13 23:47:19 CST 2018.
    -->
    update user_info
    <set>
      <if test="userName != null">
        user_name = #{userName,jdbcType=VARCHAR},
      </if>
      <if test="account != null">
        account = #{account,jdbcType=VARCHAR},
      </if>
      <if test="password != null">
        password = #{password,jdbcType=VARCHAR},
      </if>
    </set>
    where user_id = #{userId,jdbcType=BIGINT}
  </update>
  <update id="updateByPrimaryKey" parameterType="com.example.demo.entity.UserInfo">
    <!--
      WARNING - @mbg.generated
      This element is automatically generated by MyBatis Generator, do not modify.
      This element was generated on Tue Mar 13 23:47:19 CST 2018.
    -->
    update user_info
    set user_name = #{userName,jdbcType=VARCHAR},
      account = #{account,jdbcType=VARCHAR},
      password = #{password,jdbcType=VARCHAR}
    where user_id = #{userId,jdbcType=BIGINT}
  </update>
</mapper>
按道理说,这样的配置应该就可以了,你写个测试代码试一试,能不能进行增删查改,应该是可以的,可我运气比较差,居然不行,所以我又加了一个mybatis-config.xml的配置,我不知道你们运行的结果怎么样,但是现在如果出问题,一定在mybatis上,所以问题搜索的范围就相对只有这一个模块
<?xml version="1.0" encoding="UTF-8" ?>
<!DOCTYPE configuration
        PUBLIC "-//mybatis.org//DTD Config 3.0//EN"
        "http://mybatis.org/dtd/mybatis-3-config.dtd">
<configuration>
    <!--<environments default="development">-->
    <!--<environment id="development">-->
    <!--<transactionManager type="JDBC"/>-->
    <!--<dataSource type="POOLED">-->
    <!--<property name="driver" value="${driver-class-name}"/>-->
    <!--<property name="url" value="${url}"/>-->
    <!--<property name="username" value="${username}"/>-->
    <!--<property name="password" value="${password}"/>-->
    <!--</dataSource>-->
    <!--</environment>-->
    <!--</environments>-->
    <typeAliases>
        <package name="com.example.demo.entity"/>
    </typeAliases>
    <mappers>
        <mapper resource="mapper/UserInfoMapper.xml"/>
    </mappers>
</configuration>
4.sharding jdbc的配置
当你mybatis调整好了的时候,这个时候就该加sharding jdbc的配置了,接下如果出问题,应该先朝sharding jdbc的方向去考虑.
从目录结构中我们可以看到,我有一个config包,我把我的配置都写在这里面的,首先,我们先实现我们的分库分表的策略
分库策略的类,DemoDatabaseShardingAlgorithm
package com.example.demo.config;

import com.google.common.collect.Range;
import io.shardingjdbc.core.api.algorithm.sharding.PreciseShardingValue;
import io.shardingjdbc.core.api.algorithm.sharding.standard.PreciseShardingAlgorithm;

import java.util.Collection;
import java.util.LinkedHashSet;
public class DemoDatabaseShardingAlgorithm implements PreciseShardingAlgorithm<Long> {
    @Override
    public String doSharding(Collection<String> collection, PreciseShardingValue<Long> preciseShardingValue) {
        for (String each : collection) {
            if (each.endsWith(Long.parseLong(preciseShardingValue.getValue().toString()) % 2+"")) {
                return each;
            }
        }
        throw new IllegalArgumentException();
    }


    //public class DemoDatabaseShardingAlgorithm implements SingleKeyDatabaseShardingAlgorithm<Long> {
//
//    @Override
//    public String doEqualSharding(Collection<String> databaseNames, ShardingValue<Long> shardingValue) {
//
//        for (String each : databaseNames) {
//            if (each.endsWith(Long.parseLong(shardingValue.getValue().toString()) % 2 + "")) {
//                return each;
//            }
//        }
//        throw new IllegalArgumentException();
//    }
//
//    @Override
//    public Collection<String> doInSharding(Collection<String> databaseNames, ShardingValue<Long> shardingValue) {
//        Collection<String> result = new LinkedHashSet<>(databaseNames.size());
//        for (Long value : shardingValue.getValues()) {
//            for (String tableName : databaseNames) {
//                if (tableName.endsWith(value % 2 + "")) {
//                    result.add(tableName);
//                }
//            }
//        }
//        return result;
//    }
//
//    @Override
//    public Collection<String> doBetweenSharding(Collection<String> databaseNames, ShardingValue<Long> shardingValue) {
//        Collection<String> result = new LinkedHashSet<>(databaseNames.size());
//        Range<Long> range = (Range<Long>) shardingValue.getValueRange();
//        for (Long i = range.lowerEndpoint(); i <= range.upperEndpoint(); i++) {
//            for (String each : databaseNames) {
//                if (each.endsWith(i % 2 + "")) {
//                    result.add(each);
//                }
//            }
//        }
//        return result;
//    }
}
使用io.shardingjdbc,就应该实现PreciseShardingAlgorithm接口,然后实现doSharding方法,对应SQL中的=, IN,还有RangeShardingAlgorithm接口中,对应SQL中的BETWEEN AND,因为我只需要=,in操作,所以只实现了PreciseShardingAlgorithm接口,你如果都需要,你可以都实现(千万不要忽略了一个类可以实现多个接口)。
如果你使用的当当网的sharding jdbc,那么你需要实现SingleKeyDatabaseShardingAlgorithm这个接口,实现其中的三个方法,我注释到的部分就是原来我用当当网的sharding jdbc的实现。
分表策略的类,DemoTableShardingAlgorithm
package com.example.demo.config;

import com.google.common.collect.Range;
import io.shardingjdbc.core.api.algorithm.sharding.PreciseShardingValue;
import io.shardingjdbc.core.api.algorithm.sharding.standard.PreciseShardingAlgorithm;

import java.util.Collection;
import java.util.LinkedHashSet;

//public class DemoTableShardingAlgorithm implements SingleKeyTableShardingAlgorithm<Long> {
public class DemoTableShardingAlgorithm implements PreciseShardingAlgorithm<Long> {
    @Override
    public String doSharding(Collection<String> collection, PreciseShardingValue<Long> preciseShardingValue) {
        for (String each : collection) {
            if (each.endsWith(Long.parseLong(preciseShardingValue.getValue().toString()) % 2+"")) {
                return each;
            }
        }
        throw new IllegalArgumentException();
    }


    //    private static Long timeNode1 = 13L;
//
//    /**
//     * select * from t_order where user_id = 11;类似这个意思
//     * @param tableNames
//     * @param shardingValue
//     * @return
//     */
//    @Override
//    public String doEqualSharding(Collection<String> tableNames, ShardingValue<Long> shardingValue) {
//        for (String each : tableNames) {
//            Long currentTime = shardingValue.getValue()>>23;
//            if (currentTime<=timeNode1){
//                if (each.endsWith(shardingValue.getValue() % 2 + "")) {
//                    return each;
//                }
//            }else {
//                if (each.endsWith(shardingValue.getValue() % 2 + "_1")) {
//                    return each;
//                }
//            }
//        }
//        throw new IllegalArgumentException();
//
//    }
//
//    /**
//     * where user_id in (1,23,7)
//     * @param tableNames
//     * @param shardingValue
//     * @return
//     */
//    @Override
//    public Collection<String> doInSharding(Collection<String> tableNames, ShardingValue<Long> shardingValue) {
//        Collection<String> result = new LinkedHashSet<>(tableNames.size());
//        for (Long value : shardingValue.getValues()) {
//            for (String tableName : tableNames) {
//                if (tableName.endsWith(value % 2 + "")) {
//                    result.add(tableName);
//                }
//            }
//        }
//        return result;
//
//    }
//
//    /**
//     * where user_id between(1, 6)
//     *
//     * @param tableNames
//     * @param shardingValue
//     * @return
//     */
//    @Override
//    public Collection<String> doBetweenSharding(Collection<String> tableNames, ShardingValue<Long> shardingValue) {
//        Collection<String> result = new LinkedHashSet<>(tableNames.size());
//        Range<Long> range = (Range<Long>) shardingValue.getValueRange();
//        for (Long i = range.lowerEndpoint(); i <= range.upperEndpoint(); i++) {
//            for (String each : tableNames) {
//                if (each.endsWith(i % 2 + "")) {
//                    result.add(each);
//                }
//            }
//        }
//        return result;
//
//    }
}
与分库的步骤一致,也是需要实现PreciseShardingAlgorithm和RangeShardingAlgorithm两个接口的类。
剩下的就是最重要的部分,sharding jdbc的配置:
DataSourceConfig:
package com.example.demo.config;


import io.shardingjdbc.core.api.config.ShardingRuleConfiguration;
import io.shardingjdbc.core.api.config.TableRuleConfiguration;
import io.shardingjdbc.core.api.config.strategy.StandardShardingStrategyConfiguration;
import io.shardingjdbc.core.jdbc.core.datasource.ShardingDataSource;
import org.apache.commons.dbcp.BasicDataSource;
import org.apache.ibatis.session.SqlSessionFactory;
import org.mybatis.spring.SqlSessionFactoryBean;
import org.mybatis.spring.SqlSessionTemplate;
import org.mybatis.spring.annotation.MapperScan;
import org.springframework.context.annotation.Bean;
import org.springframework.context.annotation.Configuration;
import org.springframework.context.annotation.Primary;
import org.springframework.core.io.support.PathMatchingResourcePatternResolver;
import org.springframework.jdbc.datasource.DataSourceTransactionManager;

import javax.sql.DataSource;
import java.sql.SQLException;
import java.util.*;

@Configuration
@MapperScan(basePackages = "com.example.demo.mapper", sqlSessionTemplateRef = "testSqlSessionTemplate")
public class DataSourceConfig {

    /**
     * 配置分库分表策略
     *
     * @return
     * @throws SQLException
     */
    @Bean(name = "shardingDataSource")
    DataSource getShardingDataSource() throws SQLException {
        ShardingRuleConfiguration shardingRuleConfig;
        shardingRuleConfig = new ShardingRuleConfiguration();
        shardingRuleConfig.getTableRuleConfigs().add(getUserTableRuleConfiguration());
        shardingRuleConfig.getBindingTableGroups().add("user_info");
        shardingRuleConfig.setDefaultDatabaseShardingStrategyConfig(new StandardShardingStrategyConfiguration("user_id", DemoDatabaseShardingAlgorithm.class.getName()));
        shardingRuleConfig.setDefaultTableShardingStrategyConfig(new StandardShardingStrategyConfiguration("user_id", DemoTableShardingAlgorithm.class.getName()));
        return new ShardingDataSource(shardingRuleConfig.build(createDataSourceMap()));
    }


    /**
     * 设置表的node
     * @return
     */
    @Bean
    TableRuleConfiguration getUserTableRuleConfiguration() {
        TableRuleConfiguration orderTableRuleConfig = new TableRuleConfiguration();
        orderTableRuleConfig.setLogicTable("user_info");
        orderTableRuleConfig.setActualDataNodes("user_${0..1}.user_info_${0..1}");
        orderTableRuleConfig.setKeyGeneratorColumnName("user_id");
        return orderTableRuleConfig;
    }


    /**
     * 需要手动配置事务管理器
     *
     * @param shardingDataSource
     * @return
     */
    @Bean
    public DataSourceTransactionManager transactitonManager(DataSource shardingDataSource) {
        return new DataSourceTransactionManager(shardingDataSource);
    }

    @Bean
    @Primary
    public SqlSessionFactory sqlSessionFactory(DataSource shardingDataSource) throws Exception {
        SqlSessionFactoryBean bean = new SqlSessionFactoryBean();
        bean.setDataSource(shardingDataSource);
        bean.setMapperLocations(new PathMatchingResourcePatternResolver().getResources("classpath:mapper/*.xml"));
        return bean.getObject();
    }

    @Bean
    @Primary
    public SqlSessionTemplate testSqlSessionTemplate(SqlSessionFactory sqlSessionFactory) throws Exception {
        return new SqlSessionTemplate(sqlSessionFactory);
    }

    private Map<String, DataSource> createDataSourceMap() {
        Map<String, DataSource> result = new HashMap<>();
        result.put("user_0", createDataSource("user"));
        result.put("user_1", createDataSource("user_1"));
        return result;
    }

    private DataSource createDataSource(final String dataSourceName) {
        BasicDataSource result = new BasicDataSource();
        result.setDriverClassName(com.mysql.jdbc.Driver.class.getName());
        result.setUrl(String.format("jdbc:mysql://localhost:3306/%s", dataSourceName));
        result.setUsername("root");
        result.setPassword("123456");
        return result;
    }
}
当你遇到一个问题:意思差不多是,需要一个数据源,但是发现好几个,你可以在
getShardingDataSource()这个方法上添加注解:@Primary,设置默认数据源
还有一个重中之重的部分,在Applicatian这个启动类中:加上注解
@EnableAutoConfiguration(exclude={DataSourceAutoConfiguration.class})
@EnableTransactionManagement(proxyTargetClass = true)
主要是为了防止代码的自动配置
package com.example.demo;

import org.springframework.boot.SpringApplication;
import org.springframework.boot.autoconfigure.EnableAutoConfiguration;
import org.springframework.boot.autoconfigure.SpringBootApplication;
import org.springframework.boot.autoconfigure.jdbc.DataSourceAutoConfiguration;
import org.springframework.transaction.annotation.EnableTransactionManagement;

@SpringBootApplication
@EnableAutoConfiguration(exclude={DataSourceAutoConfiguration.class})
@EnableTransactionManagement(proxyTargetClass = true)
public class DemoApplication {

    public static void main(String[] args) {
        SpringApplication.run(DemoApplication.class, args);
    }
}
5.测试
我写了一个测试服务和一个测试类
测试服务:DemoService
package com.example.demo.service;


import com.example.demo.entity.UserInfo;
import com.example.demo.mapper.UserInfoMapper;
import groovy.util.logging.Slf4j;
import io.shardingjdbc.core.api.HintManager;
import io.shardingjdbc.core.hint.HintManagerHolder;
import org.springframework.stereotype.Service;

import javax.annotation.Resource;

@Slf4j
@Service
public class DemoService {

    @Resource
    UserInfoMapper userInfoMapper;

    public static Long userId = 150L;

    public void demo() {
        System.out.println("Insert--------------");

        for (int i = 1; i <= 10; i++) {
            UserInfo userInfo = new UserInfo();
            userInfo.setUserId(userId);
            userInfo.setAccount("Account" + i);
            userInfo.setPassword("pass" + i);
            userInfo.setUserName("name" + i);
            userId++;
            if(i==3){
                HintManagerHolder.clear();
                HintManager hintManager = HintManager.getInstance();
                hintManager.addDatabaseShardingValue("user_info", "user_id", 3L);
                hintManager.addTableShardingValue("user_info", "user_id", 3L);
                System.out.println(userId);
            }
            userInfoMapper.insert(userInfo);
//

//


        }
        System.out.println("over..........");
    }
}
测试类DemoApplicationTests
package com.example.demo;

import com.example.demo.entity.UserInfo;
import com.example.demo.mapper.UserInfoMapper;
import com.example.demo.service.DemoService;
import org.junit.Test;
import org.junit.runner.RunWith;
import org.springframework.beans.factory.annotation.Autowired;
import org.springframework.boot.test.context.SpringBootTest;
import org.springframework.test.context.junit4.SpringRunner;

import javax.annotation.Resource;
import java.sql.Timestamp;
import java.text.DateFormat;
import java.text.ParseException;
import java.text.SimpleDateFormat;
import java.util.Date;

@RunWith(SpringRunner.class)
@SpringBootTest
public class DemoApplicationTests {

    @Resource
    UserInfoMapper userInfoMaper;

    @Resource
    DemoService demoService;

    @Test
    public void contextLoads() {

        demoService.demo();


    }

}
三.遇到的问题
1.首先,我试着用xml的形式来配置,但是一直没有成功,好像是sharding jdbc对xml的支持不是很好,老点的版本是这样,但是新版的应该有很大的改善;
2.在我进行测试的时候,使用的当当网1.3版本的sharding jdbc,一直提示我在sql语句的带上分片键的值,我确实是带上的,我的代码我确定没有问题,网上也没搜到答案,我就根据报错debug sharding jdbc的源码,经过一天的努力,我发现问题了
:是因为我使用的sharding jdbc版本不是1.5以上的版本,所以不是sharding jdbc自带的SQL解析引擎,所以处理SQL的时候使用druid的parameter属性进行SQL中的参数存储,而在高版本的druid中,将parameter替换成inputParameter,而我使用的sharding jdbc仍是使用的parmeter取出参数,所以一直找不到分片键值,升级sharding版本或者降低druid版本就可以了
看图你们就懂了:
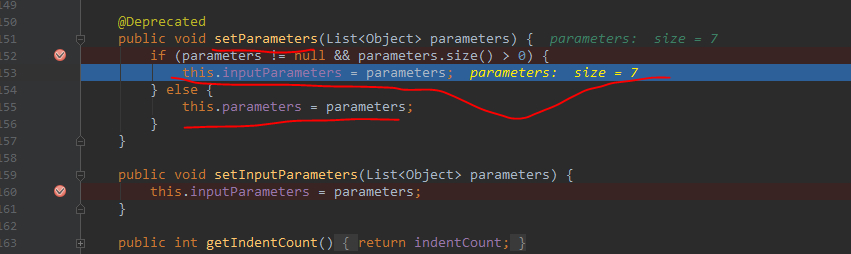

这是两个新版本和旧版本的druid中setParameters方法的源码,看出不同了吧,就是因为这个,我的测试一直报错。
世上无难事,只要肯攀登。
我的愿望是:代码无bug
我的代码的github地址:https://github.com/DragonMat/sharding-jdbc-demo.git


