0️⃣写在前面
文章目录
1️⃣集群安装初始化
到这⾥我们的准备⼯作就完成了,接下来我们就可以在 master 节点上⽤ kubeadm 命令来初始化我们的集群了:
$ kubeadm init --kubernetes-version=v1.10.0 --pod-network-cidr=10.244.0.0/16 --apiserver-a dvertise-address=10.151.30.57
命令⾮常简单,就是 kubeadm init ,后⾯的参数是需要安装的集群版本,因为我们这⾥选 择 flannel 作为 Pod 的⽹络插件,所以需要指定 –pod-network-cidr=10.244.0.0/16 ,然后是 apiserver 的通信地址,这⾥就是我们 master 节点的 IP 地址。执⾏上⾯的命令,如果出现 running with swap on is not supported. Please disable swap 之类的错误,则我们还需要增加⼀个参数 – ignore-preflight-errors=Swap 来忽略 swap 的错误提示信息:
$ kubeadm init \
--kubernetes-version=v1.10.0 \
--pod-network-cidr=10.244.0.0/16 \
--apiserver-advertise-address=10.151.30.57 \
--ignore-preflight-errors=Swap
[init] Using Kubernetes version: v1.10.0
[init] Using Authorization modes: [Node RBAC]
[preflight] Running pre-flight checks.
[WARNING FileExisting-crictl]: crictl not found in system pathSuggestion: go get githu
b.com/kubernetes-incubator/cri-tools/cmd/crictl
[preflight] Starting the kubelet service
[certificates] Generated ca certificate and key.
[certificates] Generated apiserver certificate and key.
[certificates] apiserver serving cert is signed for DNS names [ydzs-master1 kubernetes kub
ernetes.default kubernetes.default.svc kubernetes.default.svc.cluster.local] and IPs [10.9
6.0.1 10.151.30.57]
[certificates] Generated apiserver-kubelet-client certificate and key.
[certificates] Generated etcd/ca certificate and key.
[certificates] Generated etcd/server certificate and key.
[certificates] etcd/server serving cert is signed for DNS names [localhost] and IPs [127.0
.0.1]
[certificates] Generated etcd/peer certificate and key.
[certificates] etcd/peer serving cert is signed for DNS names [ydzs-master1] and IPs [10.1
51.30.57]
[certificates] Generated etcd/healthcheck-client certificate and key.
[certificates] Generated apiserver-etcd-client certificate and key.
[certificates] Generated sa key and public key.
[certificates] Generated front-proxy-ca certificate and key.
[certificates] Generated front-proxy-client certificate and key.
[certificates] Valid certificates and keys now exist in "/etc/kubernetes/pki"
[kubeconfig] Wrote KubeConfig file to disk: "/etc/kubernetes/admin.conf"
[kubeconfig] Wrote KubeConfig file to disk: "/etc/kubernetes/kubelet.conf"
[kubeconfig] Wrote KubeConfig file to disk: "/etc/kubernetes/controller-manager.conf"
[kubeconfig] Wrote KubeConfig file to disk: "/etc/kubernetes/scheduler.conf"
[controlplane] Wrote Static Pod manifest for component kube-apiserver to "/etc/kubernetes/
manifests/kube-apiserver.yaml"
[controlplane] Wrote Static Pod manifest for component kube-controller-manager to "/etc/ku
bernetes/manifests/kube-controller-manager.yaml"
[controlplane] Wrote Static Pod manifest for component kube-scheduler to "/etc/kubernetes/
manifests/kube-scheduler.yaml"
[etcd] Wrote Static Pod manifest for a local etcd instance to "/etc/kubernetes/manifests/e
tcd.yaml"
[init] Waiting for the kubelet to boot up the control plane as Static Pods from directory
"/etc/kubernetes/manifests".
[init] This might take a minute or longer if the control plane images have to be pulled.
[apiclient] All control plane components are healthy after 22.007661 seconds
[uploadconfig] Storing the configuration used in ConfigMap "kubeadm-config" in the "kube-s
ystem" Namespace
[markmaster] Will mark node ydzs-master1 as master by adding a label and a taint
[markmaster] Master ydzs-master1 tainted and labelled with key/value: node-role.kubernetes
.io/master=""
[bootstraptoken] Using token: 8xomlq.0cdf2pbvjs2gjho3
[bootstraptoken] Configured RBAC rules to allow Node Bootstrap tokens to post CSRs in orde
r for nodes to get long term certificate credentials
[bootstraptoken] Configured RBAC rules to allow the csrapprover controller automatically a
pprove CSRs from a Node Bootstrap Token
[bootstraptoken] Configured RBAC rules to allow certificate rotation for all node client c
ertificates in the cluster
[bootstraptoken] Creating the "cluster-info" ConfigMap in the "kube-public" namespace
[addons] Applied essential addon: kube-dns
[addons] Applied essential addon: kube-proxy
Your Kubernetes master has initialized successfully!
To start using your cluster, you need to run the following as a regular user:
mkdir -p $HOME/.kube
sudo cp -i /etc/kubernetes/admin.conf $HOME/.kube/config
sudo chown $(id -u):$(id -g) $HOME/.kube/config
You should now deploy a pod network to the cluster.
Run "kubectl apply -f [podnetwork].yaml" with one of the options listed at:
https://kubernetes.io/docs/concepts/cluster-administration/addons/
You can now join any number of machines by running the following on each node
as root:
kubeadm join 10.151.30.57:6443 --token 8xomlq.0cdf2pbvjs2gjho3 --discovery-token-ca-cert
-hash sha256:92802317cb393682c1d1356c15e8b4ec8af2b8e5143ffd04d8be4eafb5fae368
要注意将上⾯的加⼊集群的命令保存下⾯,如果忘记保存上⾯的 token 和 sha256 值的话也不⽤担 ⼼,我们可以使⽤下⾯的命令来查找:
$ kubeadm token list
kubeadm token list
TOKEN TTL EXPIRES USAGES D
ESCRIPTION EXTRA GROUPS
i5gbaw.os1iow5tdo17rwdu 23h 2018-05-18T01:32:55+08:00 authentication,signing T
he default bootstrap token generated by 'kubeadm init'. system:bootstrappers:kubeadm:def
ault-node-token
要查看 CA 证书的 sha256 的值的话,我们可以使⽤ openssl 来读取证书获取 sha256 的值:
$ openssl x509 -pubkey -in /etc/kubernetes/pki/ca.crt | openssl rsa -pubin -outform der 2> /dev/null | openssl dgst -sha256 -hex | sed 's/^.* //'
e9ca4d9550e698105f1d8fae7ecfd297dd9331ca7d50b5493fa0491b2b4df40c
另外还需要注意的是当前版本的 kubeadm ⽀持的docker版本最⼤是 17.03,所以要注意下。 上⾯的信 息记录了 kubeadm 初始化整个集群的过程,⽣成相关的各种证书、kubeconfig ⽂件、bootstraptoken 等等,后边是使⽤ kubeadm join 往集群中添加节点时⽤到的命令,下⾯的命令是配置如何使⽤kubectl 访问集群的⽅式:
mkdir -p $HOME/.kube
sudo cp -i /etc/kubernetes/admin.conf $HOME/.kube/config
sudo chown $(id -u):$(id -g) $HOME/.kube/config
最后给出了将节点加⼊集群的命令:
kubeadm join 10.151.30.57:6443 --token 8xomlq.0cdf2pbvjs2gjho3 --discovery-token-ca-cert-h
ash sha256:92802317cb393682c1d1356c15e8b4ec8af2b8e5143ffd04d8be4eafb5fae368
我们根据上⾯的提示配置好 kubectl 后,就可以使⽤ kubectl 来查看集群的信息了:
$ kubectl get cs
NAME STATUS MESSAGE ERROR
scheduler Healthy ok
controller-manager Healthy ok
etcd-0 Healthy {"health": "true"}
$ kubectl get csr
NAME AGE REQUESTOR
CONDITION
node-csr-8qygb8Hjxj-byhbRHawropk81LHNPqZCTePeWoZs3-g 1h system:bootstrap:8xomlq
Approved,Issued
$ kubectl get nodes
NAME STATUS ROLES AGE VERSION
ydzs-master1 Ready master 3h v1.10.0
如果你的集群安装过程中遇到了其他问题,我们可以使⽤下⾯的命令来进⾏重置:
$ kubeadm reset
$ ifconfig cni0 down && ip link delete cni0
$ ifconfig flannel.1 down && ip link delete flannel.1
$ rm -rf /var/lib/cni/
2️⃣安装 Pod Network
接下来我们来安装 flannel ⽹络插件,很简单,和安装普通的 POD 没什么两样:
$ wget https://raw.githubusercontent.com/coreos/flannel/master/Documentation/kube-flannel.
yml
$ kubectl apply -f kube-flannel.yml
clusterrole.rbac.authorization.k8s.io "flannel" created
clusterrolebinding.rbac.authorization.k8s.io "flannel" created
serviceaccount "flannel" created
configmap "kube-flannel-cfg" created
daemonset.extensions "kube-flannel-ds" created
另外需要注意的是如果你的节点有多个⽹卡的话,需要在 kube-flannel.yml 中使⽤ --iface 参数指定 集群主机内⽹⽹卡的名称,否则可能会出现 dns ⽆法解析。flanneld 启动参数加上 --iface=
args:
- --ip-masq
- --kube-subnet-mgr
- --iface=eth0
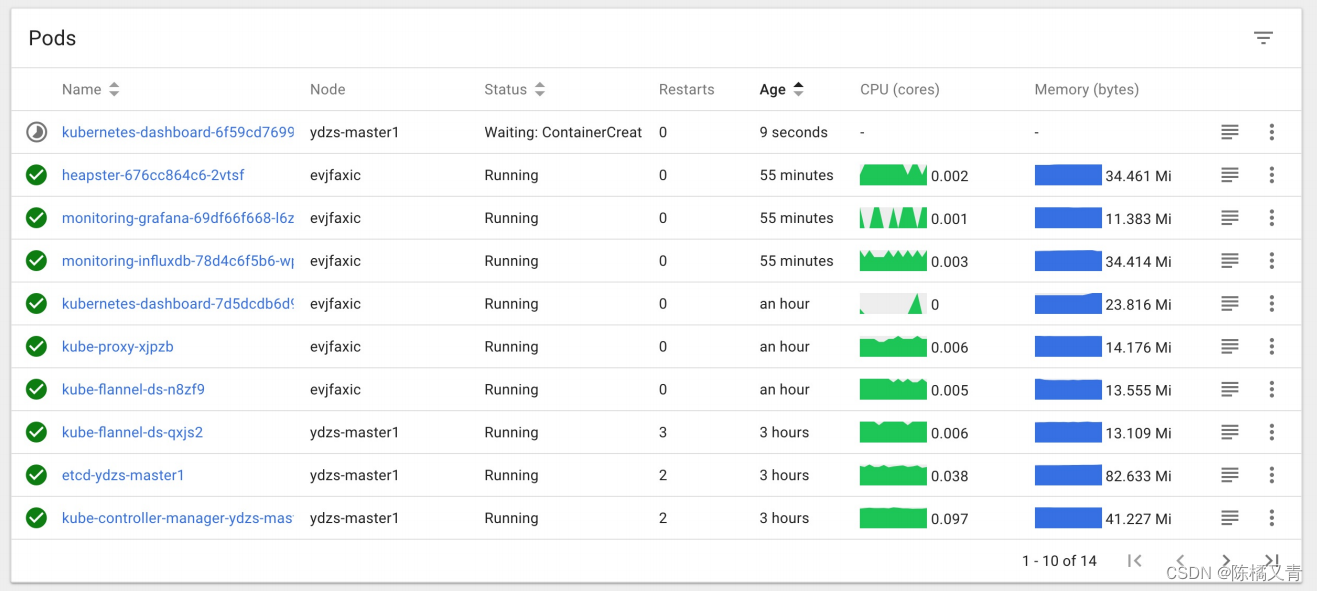
安装完成后使⽤ kubectl get pods 命令可以查看到我们集群中的组件运⾏状态,如果都是Running 状 态的话,那么恭喜你,你的 master 节点安装成功了。
$ kubectl get pods --all-namespaces
NAMESPACE NAME READY STATUS RESTARTS AGE
kube-system etcd-ydzs-master1 1/1 Running 0 10m
kube-system kube-apiserver-ydzs-master1 1/1 Running 0 10m
kube-system kube-controller-manager-ydzs-master1 1/1 Running 0 10m
kube-system kube-dns-86f4d74b45-f5595 3/3 Running 0 10m
kube-system kube-flannel-ds-qxjs2 1/1 Running 0 1m
kube-system kube-proxy-vf5fg 1/1 Running 0 10m
kube-system kube-scheduler-ydzs-master1 1/1 Running 0 10m
3️⃣添加节点
同样的上⾯的环境配置、docker 安装、kubeadmin、kubelet、kubectl 这些都在Node(10.151.30.62)节 点安装配置好过后,我们就可以直接在 Node 节点上执⾏ kubeadm join 命令了(上⾯初始化的时候 有),同样加上参数 --ignore-preflight-errors=Swap :
$ kubeadm join 10.151.30.57:6443 --token 8xomlq.0cdf2pbvjs2gjho3 --discovery-token-ca-cert
-hash sha256:92802317cb393682c1d1356c15e8b4ec8af2b8e5143ffd04d8be4eafb5fae368 --ignore-pre
flight-errors=Swap
[preflight] Running pre-flight checks.
[WARNING Swap]: running with swap on is not supported. Please disable swap
[WARNING FileExisting-crictl]: crictl not found in system path
Suggestion: go get github.com/kubernetes-incubator/cri-tools/cmd/crictl
[discovery] Trying to connect to API Server "10.151.30.57:6443"
[discovery] Created cluster-info discovery client, requesting info from "https://10.151.30
.57:6443"
[discovery] Requesting info from "https://10.151.30.57:6443" again to validate TLS against
the pinned public key
[discovery] Cluster info signature and contents are valid and TLS certificate validates ag
ainst pinned roots, will use API Server "10.151.30.57:6443"
[discovery] Successfully established connection with API Server "10.151.30.57:6443"
This node has joined the cluster:
* Certificate signing request was sent to master and a response
was received.
* The Kubelet was informed of the new secure connection details.
Run 'kubectl get nodes' on the master to see this node join the cluster.
我们可以看到该节点已经加⼊到集群中去了,然后我们把 master 节点的 ~/.kube/config ⽂件拷⻉到 当前节点对应的位置即可使⽤ kubectl 命令⾏⼯具了。
$ kubectl get nodes
NAME STATUS ROLES AGE VERSION
evjfaxic Ready <none> 1h v1.10.0
ydzs-master1 Ready master 3h v1.10.0
到这⾥就算我们的集群部署成功了,接下来就可以根据我们的需要安装⼀些附加的插件,⽐如 Dashboard、Heapster、Ingress-Controller 等等,这些插件的安装⽅法就和我们之前⼿动安装集群的 ⽅式⽅法⼀样了,这⾥就不在重复了。